[ COMPONENTS ] Folding Front Sight Charging Handle [ WARNING ] We recommend using G&G Armament high precision BB's on all G&G Armament guns to ensure
|
|
|
- るるみ くぬぎ
- 7 years ago
- Views:
Transcription
1 CM6 FFR A Product is intended for adults 8 years and older. Wear goggles while shooting. Misuse may cause injury or death. The muzzle of an airsoft gun should never point in a direction in which, if discharged, it would do injury. Read this entire manual to ensure proper usage. Buyers and users should obey the laws and rules of the local authority. EN Si el jugador o jugadores tienen menos de 8 años se les requerirá ir acompañados de un mayor de edad que se responsabilice del menor en todo momento. Durant la prática del Airsoft, es obligatorio llevar gafas de protección ocular acorde a las normativas vigentes en todo momento. En el uso descuidado o indebido del Airsoft puede causar fácilmente daños a sí mismo y a los que le rodean. No se debe apuntar a personas o animales. Lea bien los manuales que acompañan las replicas antes de empezar a usarlas para practicar Airsoft. Los poseedores de réplicas de Airsoft deben seguir estrictamente las leyes y regulaciones locales vigentes en el país de residencia o uso de las mismas, e informarse debidamente en los puntos de venta o autoridades del país antes de comprar y utilizar cualquier réplica de airsoft. ES Ce produit est réservé aux utilisateurs de 8 ans et plus. Toujours porter des protections oculaires adaptées lorsque vous utilisez ce produit. La mauvaise utilisation de ce produit peut causer des blessures graves ou la mort. Ne jamais pointer le canon de la réplique sur une personne ou un animal. Lisez attentivement le mode d'emploi avant d'utiliser ce produit. L'acheteur et l'utilisateur de ce produit doivent se conformer aux lois du pays qui réglementent l'usage et la possession des répliques d'airsoft. FR JP CM6 FFR A EN Operating Instructions I 0-06 FR Mode d'emploi I -8 ES Instrucciones de operación I 07- JP I 9- Tel : Fax : TAIWAN ChangHua (Head Quarter) No.999, Zhonghua Rd. Shengang Township,Changhua County 5095, Taiwan (R.O.C.) Sales Dept. sales@guay.com, bb@guay.com PR Dept. pr@guay.com Technology Dept. support@guay.com G 多

2 [ COMPONENTS ] Folding Front Sight Charging Handle [ WARNING ] We recommend using G&G Armament high precision BB's on all G&G Armament guns to ensure proper feeding and performance. Using low quality BBs may cause the gun to jam, malfunction, or cause damage to the internal parts. Use only 00% silicone oil for maintenance, as other oils may contain corrosive ingredients which may cause damage to plastic and rubber components Read this entire manual to ensure proper usage. Do not adjust the motor without authorization or by certified technician. May be hazardous up to 50 meters. Always wear safety goggles when using this product. Stop shooting when the battery power is low. Product is intended for adults 8 years and older. Magazine Catch Button [ FIRING MODE & SAFETY ] Always keep the safety on if not ready to shoot. Folding Rear Sight Selector Lever GOS-V Retractable Stock Stock Buttplate Release Button Metal Rail System Safety On / The gun will not fire. Semi Auto / Single shot. Full Auto / Automatic firing. [ ETU & FULL AUTO TO -ROUND BURSTS SETTING ] Stock Release Lever Ergonomic Grip Magazine Catch Button Flash Suppressor Trigger Trigger Guard GMAG-V Magazine To set up full auto to -round bursts. Switch the selector switch to semi-auto mode and hold the trigger for 0 seconds, the set-up is now completed. Repeat above steps to switch -round bursts to full auto. Empty magazine and chamber before set up -round bursts or full auto mode. Due to the low voltage from different battery and/or motor specifications, it might cause an auto-semi problem, please charge the battery to full when this problem occurs to assure the longevity of the product. 0 seconds ETU WARNING / FIRING MODE & SAFETY 0 EN Operating Instructions COMPONENTS Operating Instructions EN 0 ETU & FULL AUTO TO -ROUND BURSTS SETTING

3 [ GOS-V STOCK ADJUSTMENT ] [ FRONT SIGHT ADJUSTMENT ] Pull the release lever to adjust the position of the stock. (6 positions) Pull the locking lever until it clicks into place to secure the position of the stock. Press the button. Pull out the grip for the extra storage space. Place the front sight onto the rail. Fasten the screw. Press down the button to fold down the front sight. Press the button to adjust front sight up-down. Turning clockwise : Raises the impact point. Turning counterclockwise : Lowers the impact point. [ INSTALLING THE BATTERY ] MOSFET Recommended -piece Li-Po (G--08) or Ni-Mh (G--056) battery. Do not use batteries with discharge rate above 5C. in case of installing -piece batteries, carefully arrange wires to avoid damage to the connectors or wires. [ REAR SIGHT ADJUSTMENT ] Elevation Click Windage.Press the button..turn the stock buttplate. [ SETTING MAGAZINE ] Pull the wire set from the stock and connect the battery until it clicks. Insert the battery into the stock. Turn and reinstall the stock buttplate. It is strongly recommended to use G&G Armament high precision BB's only. Using low quality BB pellets will shorten product life and void product warranty. Place the rear sight onto the rail. Fasten the screw. Flip down or up. [ CHARGING HANDLE & HOP-UP ADJUSTMENT ] Too much Hop-up. ( Turn the adjust lever toward Normal ) Windage knob (left / right adjustment) Elevation knob (up / down adjustment) Click Normal Hop Best Position. Press the magazine catch button on either sides of the receiver to release the magazine. Open the top plate and load BBs into the chamber and close the plate when the chamber is full. Turn the winding wheel on the bottom of the magazine to tighten the spring. This will allow the BBs to feed through the top of the magazine. Insert the magazine into the airsoft gun until it clicks into place. Pulling the charging handle will take the bolt back and open the port cover. Do not catch your fingers in the dummy bolt. Never hold the gun sideways as the BB pellets will curve right or left. Not enough Hop-up. ( Turn the adjust lever toward Hop ) or Too much Hop-up. ( Turn the adjust lever toward Normal ) EN Operating Instructions FRONT SIGHT / REAR SIGHT ADJUSTMENT STOCK ADJUSTMENT / INSTALLING THE BATTERY / SETTING MAGAZINE Operating Instructions EN CHARGING HANDLE & HOP-UP ADJUSTMENT 0 0
 or Ni-Mh (G--056) battery. Do not use batteries with discharge rate above 5C.")
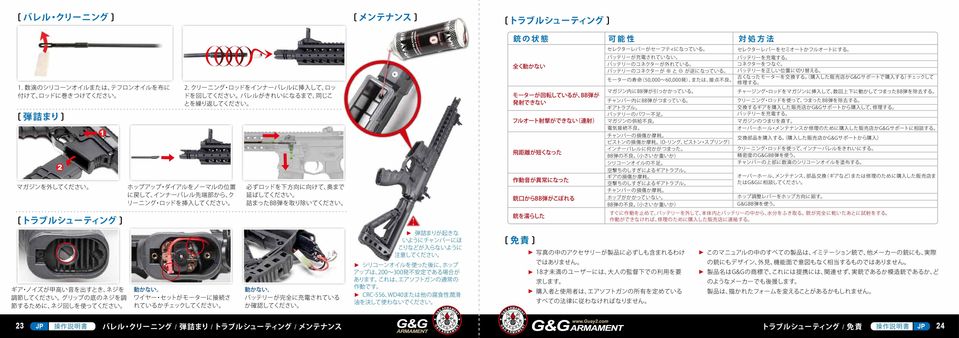
4 [ CLEANING THE BARREL ] [ MAINTENANCE ]. Place a few drops of silicone oil or teflon oil on the cleaning cloth and wind around the rod. [ UNJAM ] Remove the magazine. [ TROUBLESHOOTING ]. Insert the cleaning rod into the inner barrel, turning the rod as you insert. Repeat same steps until barrel is clean. Return the hop up dial to normal position and insert the cleaning rod from the lead edge of the inner barrel. Be sure to have the rod facing down and reaching to the end. Remove clogged pellets. [ TROUBLESHOOTING ] SYMPTOM POTENTIAL CORRECTIVE No operation at all Although motor is revolving, no pellet can be fired Impossible full-auto operation(automatic firing) Shooting distance becomes shorter Too loud operating noise Pellets being fallen out from barrel end If gun gets wet Selector lever is set to safety. Battery is not charged. Battery connector is disconnected. The and of battery connector is reversed. Expired motor life (50,000 to 60,000 rounds) or poor electrical connection. Pellets are clogged inside the magazine. Pellets are clogged in the chamber. Faulty gear. Insufficient battery power. Faulty pellet feed of magazine. Poor electrical connection. Damaged or worn chamber set. Damaged or worn piston set (O-ring,piston spring) Something is jammed in the inner barrel Faulty BB pellets (too small or heavy) Shortage of silicone oil Gear problem caused by too many blank firing Worn or damaged gear Gear problem caused by too many blank firing Damaged or worn chamber set. No hop setting. Faulty BB Pellets (too small or heavy) Set the selector lever to Semi or Full Auto. Charge the battery. Connect the connector. Switch the batteries to the correct position. Replace the dead motor (can be purchased from local dealer or directly from G&G). Check and repair the contacts. Insert the charging rod into the magazine and move up and down a few times to remove clogged pellets. Remove clogged pellets using the cleaning rod. Purchase the replacement gear from your dealer or G&G and repair. Charge the battery. Repair clogging of the magazine. Consult your dealer or G&G for overhaul maintenance or repair. Replace the replacement parts (purchase from your dealer or G&G) Use the cleaning rod and clean the inner barrel. Use G&G Armament high precision BB's. Place a few drops of silicone oil onto the upper chamber. Consult your dealer or G&G for overhaul maintenance, part replacement (gear,etc.) or repair. Turn the hop adjustment lever toward Hop. Use G&G Armament high precision BB's. Stop operation immediately, disconnect the battery, wipe off water from inside the main body and the battery. After the gun is completely dry, carry out trial firing. If the unit is not operational, please contact your local dealer for repair. Adjust screw when the gear noise becomes shrilly. Use a screwdriver to adjust the screw at the bottom of the grip. No operation. Check the wire set contact on the motor. No operation. Make sure the battery is fully charged. Make sure no dirt gets into the chamber to avoid clogging of pellets. Hop-up may be unstable for 00 to 00 rounds after using silicone oil. This is the normal operation of the gun. Never use CRC-556, WD0, or other corrosive lubricants. [ DISCLAIMER ] Accessories in the pictures are not always included with product. Adult supervision required for users under 8 years of age. The purchaser and user should conform to all laws governing the ownership of airsoft guns. All products in this manual are imitation firearms and are not intended nor represented to be comparable in design, appearance, or function to any actural firearm offered by other manufacturers. Product names are trademarks of G&G, which has no affiliation to, and is not associated, or sponsored by any manufacturer of actual or imitation firearms. Products may vary form those pictured EN Operating Instructions CLEANING THE BARREL / UNJAM / MAINTENANCE / TROUBLESHOOTING TROUBLESHOOTING / DISCLAIMER Operating Instructions EN
 Shooting distance becomes")
5 [ COMPONENTES ] Botón retenedor de Cerrojo Guía o mira delantera Manija de carga [ ATENCIÓN ] Balines de alta precisión de G&G recomendados para todas las réplicas. Usando balines de baja calidad puede causar atascos en la réplica, mal funcionamiento o daños en las partes internas. Use solo 00% aceite de silicona para mantenimiento, otros aceites pueden contener ingredientes corrosivos que pueden causar daños a los componentes de goma y plástico. Lea todas las instrucciones antes de usar este producto. No ajuste el motor sin autorización de un técnico certificado. Puede ser dañino a 50 metros. Siempre use gafas de protección cuando use la réplica. Deje de disparar cuando la batería tenga poca carga. Este producto está diseñado para personas de 8 años en adelante. Botón retenedor de cargador [ SEGURO Y MODOS DE DISPARO ] Siempre seleccione el modo seguro inmediatamente cuando termine de disparar. Mira trasera plegable Selector GOS-V Culata Retractable Boton liberador de Cantonera Sistema Rail de Metal Seguro / la réplica no dispara Semi Auto / disparo sencillo Automático / disparo automático [ GATILLO ELECTRÓNICO - AJUSTE DISPARO AUTOMÁTICO Y RÁFAGAS DE RONDAS ] Botón retenedor de cargador Bocacha Ajustar de full auto a ráfagas de rondas. Coloque el selector en modo semi-auto y mantenga apretado el gatillo por 0 segundos, luego estará ajustada. Repita el procedimiento para volver de rondas al modo automático. Liberador de Culata Empuñadura ergonómica Gatillo Guardamonte GMAG-V Cargador Saque el cargador y revise que la recámara no tenga bbs. antes de configurar las ráfagas de rondas o el disparo automático. Debido al bajo voltaje de diferentes baterías y/o especificaciones del motor, puede causar problemas en modo semi-automático. Por favor cargue bien la bateria cuando ocurra este problema para asegurar la longevidad del producto. 0 segundos Gatillo electrónico ES Instrucciones de operación ATENCIÓN / SEGURO Y MODOS DE DISPARO 07 COMPONENTES Instrucciones de operación ES 08 GATILLO ELECTRÓNICO - AJUSTE DISPARO AUTOMÁTICO Y RÁFAGAS DE RONDAS

6 [ GOS-V AJUSTES DE CULATA ] [ AJUSTES DE MIRA DELANTERA ] Hale la palanca liberadora para ajustar la posición de la Culata (6 Posiciones). [ INSTALACIÓN DE BATERÍA ] Hale la palanca de bloqueo hasta que ajuste la posición segura de la culata. Presiones el botón. Hale la empuñadura de culata para espacio extra de almacenaje. Recomendadas Baterías G--08 (dos cuerpos) o G--056 Ni-Mh. No use baterías con rango de descarga debajo de 5C. En caso de instalar baterías de cuerpos, cuidadosamente coloque bien los cables para evitar daños en los conectores o en los propios cables. Coloque la mira delantera en el Rail. [ AJUSTES DE MIRA TRASERA ] Apriete el tornillo. Presione el botón para plegarla. Presione el boton para ajustar la mira arriba o abajo. Girando a favor de las manecillas del reloj sube el punto de mira. Girando en contra de las manecillas del reloj, baja el punto de mira. MOSFET Elevación Click Corta vientos. Presione el botón.. Gire la Cantonera. Saque los cables de la culata y coloque correctamente la batería. Inserte la batería dentro de la culata. Gire y coloque en su posición la Cantonera. Coloque la mira en el rail. Apriete el tornillo. Plegar y desplegar. Perilla corta vientos (Ajuste Izq./Der.) Perilla de elevación (Ajuste Arriba/Abajo) [ AJUSTES DE CARGADOR ] Es extremadamente recomendado solamente el uso de balines G&G. Usando balines de baja calidad puede acortar la vida del producto y anular la garantía. [ MANIJA DE CARGA Y AJUSTES DEL HOP-UP ] Demasiado Hop-up. ( Gire el ajuste a Normal ) Click Normal Hop Dirección correcta. Presione el botón retenedor de cargador colocado en ambos lados para liberar el cargador. Abra la tapa superior y llene con balines y cierre cuando esté lleno. Gire el engranaje en la parte inferior del cargador para atiesar el resorte. Esto hará que los balines alimenten la recámara. Inserte el cargador en el recibidor inferior hasta que escuche un click. Halando la manija de carga llevará el cerrojo atrás y abrirá la cubierta. No pille su dedo con el cerrojo. Nunca dispare la réplica lateralmente. Los balines pueden curvear. No demasiado Hop-up. ( Gire el ajuste a Hop ) o demasiado Hop-up. ( Gire el ajuste a Normal ) ES Instrucciones de operación AJUSTES DE CULATA / INSTALACIÓN DE BATERÍA AJUSTES DE MIRA TRASERA Y DELANTERA Instrucciones de operación ES AJUSTES DEL CARGADOR MANIJA DE CARGA Y AJUSTES DEL HOP-UP 09 0

7 [ LIMPIANDO EL CAÑÓN ] [ MANTENIMIENTO ] [ SOLUCIÓN DE PROBLEMAS ]. Coloque algunas gotas de aceite de Silicona o teflón en un paño limpio y sujete con la varilla. [ DESBLOQUEANDO ] Remueva el cargador. [ SOLUCIÓN DE PROBLEMAS ] Ajuste el tornillo cuando los engranajes se tornen chillones. Use un destornillador para ajustar el tornillo debajo de la empuñadura. Gire el dial de Hop-up a posición normal e inserte la varilla por la bocacha dentro del cañón. No funciona. Revise los contactos del motor.. Inserte la varilla de limpieza dentro del cañón girando la varilla cuando la introduzca. Repita estos pasos hasta que el cañón esté limpio. Asegúrese de introducir la varilla con la parte segmentada hacia abajo. Remueva los balines atascados. No funciona. Asegúrese de que la batería tiene carga suficiente. Asegúrese de que la recámara no esté sucia para evitar el atasco de balines. El Hop-up puede estar inestable por 00 o 00 rondas luego de usar el aceite de Silicona. Esto es normal en la operación de la réplica. Nunca use CRC'556, WD0 u otro lubricante corrosivo. SÍNTOMA PROBLEMA POTENCIAL POSIBLE SOLUCIÓN No funciona A pesar de que el motor funciona, no se pueden disparar los balines No opera el automático La distancia de disparo se hace corta Ruido de operación alto Balines fallan y salen por el cañón Si la réplica se moja [ DESCARGO ] El selector puede estar colocado en modo seguro. La batería no está cargada. Los conectores están desconectados. El y de la batería están mal conectados. Motor agotado (50,000 o 60,000 rondas) o pobre conección eléctrica. Balines atascados en el cargador. Balines atascados en la recámara. Caja de engranajes defectuosa. Insuficiente carga de batería. Llenado incorrecto del cargador. Pobre conección eléctrica. Conjunto de recámara defectuoso o dañado. Conjunto de Pistos dañado o defectuoso (Sellos, Spring) Algo atascado en el cañón interior. Balines defectuosos (muy pequeños o pesados) Escasez de aceite de silicona. Problemas de la caja de engranajes por disparos en seco. Caja de engranajes dañada o defectuososa. Problemas en la caja de engranajes por muchos disparos en seco. Conjunto de recámara dañada o defectuosa. No ajuste del hop. Balines defectuosos (muy pequeños o pesados) Los accesorios en las fotos no siempre están incluidos con el producto. la supervisión de un adulto es requerida para usuarios menores de 8 años. El comprador y el usuario final deben obedecer todas las leyes y reglamentos locales acerca de la propiedad de réplicas de armas. Coloque el selector en Semi o en Automático. Cargue la batería. Ajuste los conectores. Coloque los conectores correctamente (Revise el fusible). Reemplace el motor dañado (puede ser comprado en su distribuidor local o directamente en G&G. Revise y repare los contactos. Inserte la varilla de carga dentro del cargador y mueva hacia arriba y abajo varias veces para remover los balines atascados. Remueva los balines atascados usando la varilla de limpieza. Compre el remplazo del engrannaje en su distribuidor local o en G&G y repare. Cargue la batería. Repare el atasco del cargador. Consulte su distribuidor o a G&G para mantenimento general o reparación. Reemplace las partes (comprándolas en su distribuidor local o en G&G). Use la varilla de limpieza y limpie el cañón interior. Use balines genuinos G&G. Eche varias gotas de aceite de silicona por encima de la recámara. Consulte su distribuidor o a G&G para mantenimiento general, reemplazo de piezas (Engranajes, etc.) o reparación. Gire el dial de ajuste del hop-up hacia Hop. Use los balines G&G. Detenga la operación inmediatamente, desconecte la batería, seque todas las partes internas y la batería. Después de completar el secado, trate de disparar. Si la unidad no funciona por favor contacte su distribuidor local para reparación. Todos los productos en este manual son imitaciones de armas reales y no está representada a ser comparada en diseño, apariencia o funciones con ninguna arma actual ofrecida por otros fabricantes. Los nombres de los productos son marcas registradas de G&G, los cuales no tienen afiliación ni están asociados o patrocinados por ningún fabricante de imitiaciones de armas. Productos pueden variar en la forma a los presentados en las fotos. LIMPIANDO EL CAÑÓN / DESBLOQUEANDO ES Instrucciones de operación SOLUCIÓN DE PROBLEMAS / DESCARGO Instrucciones de operación ES MANTENIMIENTO / SOLUCIÓN DE PROBLEMAS

8 [ COMPOSANTS ] Bouton verrou de la culasse Guidon pliable Levier de chargement [ PRECAUTIONS ] Il est fortement recommandé d'utiliser uniquement des billes de précision G&G. L'utilisation de billes de mauvaise qualité peut causer un bourrage, un dysfonctionnement ou causer des dommages sur les pièces internes de la réplique. Utilisez uniquement de l'huile de silicone à 00% pour l'entretien de votre réplique et éviter les huiles corrosives qui peuvent endommager les composants en plastique et en caoutchouc. Lisez attentivement le mode d'emploi avant Ne réglez pas le moteur sans autorisation ou sans l'aide d'un technicien certifié. d'utiliser ce produit. Portez toujours des protections oculaires adaptées lorsque vous utilisez ce produit. Arrêtez de tirer lorsque la batterie est faible. Ce produit est réservé aux utilisateurs de 8 ans et plus. Bouton verrou du chargeur [ MODE DE TIR ET SECURITE ] Toujours rester en position de sécurité si vous n'êtes pas prêt à tirer. Hausse pliable Crosse rétractable GOS-V Sélecteur de tir Bouton de verrouillage du talon de crosse Rail tactique en métal Sécurité / ne tire pas. Semi Auto / tire en coup-par-coup. Full Auto / tire en rafale. [ UTILISATION DU MOSFET, DE L'ETU ET DU BURST COUPS ] Bouton verrou du chargeur Cache-flamme Pour utiliser le mode full-auto ou le burst coups. Positionnez le sélecteur de tir sur le mode semi et maintenez la queue de détente pendant 0 secondes, le mode burst coups est activé. Procédez de la même façon pour revenir en mode full-auto. Levier verrou de la crosse Poignée ergonomique Queue de détente Pontet Chargeur GMAG-V Retirez le chargeur et assurez vous qu'il ne reste pas de billes dans la chambre hop-up avant de régler le burst coups ou le full auto. En raison de la faible tension de différentes caractéristiques de la batterie et / ou du moteur, cela peut causer un problème d'auto-semi. Veuillez recharger la batterie au maximum lorsque ce problème se produit pour assurer une durée de vie optimale du produit. 0 secondes ETU PRECAUTIONS / MODE DE TIR ET SECURITE FR Mode d'emploi COMPOSANTS Mode d'emploi FR UTILISATION DU MOSFET, DE L'ETU ET DU BURST COUPS

9 [ REGLAGE CROSSE GOS-V ] [ REGLAGE GUIDON ]. Appuyez sur le levier pour déverrouiller la crosse et régler la position (6 positions). [ INSTALLATION BATTERIE ]. Appuyez sur le levier jusqu'à entendre un clic pour verrouiller la crosse dans la position souhaitée.. Appuyez sur le bouton.. Tirez vers le bas pour accéder au compartiment de rangement. Nous vous conseillons d'utiliser une baterrie Li-Po éléments (G--08) ou une batterie Ni-Mh (G--086). N'utilisez pas des batteries avec un ratio de décharge de 5C. Si vous utilisez une batterie Li-Po éléments, prenez soin des fils électriques et des bornes pour éviter de les endommager. Installez le guidon sur le rail. [ REGLAGE HAUSSE ] Resserrez les vis. Appuyez sur le bouton pour plier le guidon. Appuyez sur le bouton pour régler la hauteur. Tournez dans le sens horaire pour élever le point d'impact. Tournez dans le sens antihoraire pour baisser le point d'impact. MOSFET Elevation Clic! Azimut. Appuyez sur le bouton.. Faites pivoter le talon de crosse. Sortez les fils pour brancher les bornes de la batterie jusqu'à entendre un clic. Rentrez la batterie à l'intérieur de la crosse. Refermez la crosse en faisant pivoter le talon. Installez la hausse sur le rail. Resserrez les vis. Abaissez ou relevez. Azimut (réglage gauche/droite) Elevation (réglage haut/bas) [ UTILISATION CHARGEUR ] Il est fortement recommandé d'utiliser uniquement des billes G&G. L'utilisation de billes de mauvaise qualité peut raccourcir la durée de vie du produit et annuler la garantie. [ LEVIER DE CHARGEMENT ET REGLAGE HOP-UP ] Trop de hop-up (tournez la molette vers Normal ). Clic! Normal Hop Position optimale. Appuyez sur le verrou situé de chaque côté de la réplique pour retirer le chargeur. Ouvrez le couvercle, versez les billes et refermez lorsque le chargeur est rempli. Tournez la molette au talon du chargeur pour comprimer le ressort. Cette action permet aux billes d'alimenter la réplique. Insérez le chargeur dans la réplique jusqu'à entendre un clic. Tirer sur le levier de chargement va tirer la culasse en arrière et ouvrir le capot latéral. Ne vous coincez pas les doigts dans la culasse factice. Ne jamais tenir la réplique inclinée sinon la trajectoire des billes partira vers la droite ou la gauche. Pas assez de hop-up (tournez la molette vers Hop). ou trop de hop-up (tournez la molette vers Normal). FR Mode d'emploi REGLAGE GUIDON / REGLAGE HAUSSE REGLAGE CROSSE / INSTALLATION BATTERIE / UTILISATION CHARGEUR Mode d'emploi FR LEVIER DE CHARGEMENT ET REGLAGE HOP-UP 5 6

10 [ NETTOYAGE CANON ] [ ENTRETIEN ]. Versez quelques gouttes d'huile de silicone ou de téflon sur un morceau de tissu que vous accrocherez sur la tige de débourrage. [ DEBOURRAGE ]. Appuyez sur le verrou.. Retirez le chargeur. [ EN CAS DE PANNE ] Utilisez un tournevis pour régler la vis située sur le talon de la poignée lorsque les gears sont trop bruyants.. Insérez la tige de débourrage dans le canon et tournez en même temps. Répétez la même opération jusqu'à ce que canon soit propre. Réglez la molette du hop-up à zéro sur la position Normal et insérez la tige de débourrage dans le canon. Vérifiez le branchement du moteur. Assurez-vous que l'extrémité de la tige soit orientée vers le bas et touche bien le fond du canon pour retirer toutes les billes. Assurez-vous que la batterie soit chargée au maximum. Assurez-vous qu'il n'y ai pas d'impuretés dans la chambre hop-up pour éviter un bourrage. Le hop-up peut être instable pendant 00 ou 00 coups après avoir utilisé l'huile de silicone. Ceci fait parti du fonctionnement normal de la réplique. Ne jamais utiliser les produits CRC-556, WD0 ou autres lubrifiants corrosifs. [ EN CAS DE PANNE ] SYMPTOME CAUSE SOLUTION Ne fonctionne pas Le moteur tourne mais impossible de tirer Impossible d'utilisez le mode full auto La portée de tir diminue Fonctionnement trop bruyant Les billes s'échappent par la bouche du canon Si la réplique est mouillée. [ RECLAMMATION ] Le levier est en mode de sécurité. La batterie est déchargée. La batterie est débranchée. Les bornes et de la batterie sont inversés. Moteur en fin de vie (entre et billes) ou mauvais branchement électrique. Des billes sont coincées dans le chargeur. Des billes sont coincées dans la chambre. Gears défectueux. Batterie trop faible. Billes défectueuses dans le chargeur. Mauvais branchement électrique. Chambre endommagée ou usée. Ensemble piston endommagé ou usé (O-ring, ressort de piston). Quelque chose est coincé dans le canon interne. Billes défectueuses (trop petites ou trop lourdes). Pas assez d'huile de silicone. Problème de Gear à cause de tirs à blanc trop fréquent. Gears endommagés ou usés. Problème de Gear à cause de tirs à blanc trop fréquent. Ensemble de la chambre endommagé ou usé. Aucun réglage du Hop-Up effectué au préalable. Billes défectueuses (trop petites ou trop lourdes). Arrêtez immédiatement d'utiliser votre réplique, débranchez la batterie, essuyez l'eau restée dans le corps ainsi que la batterie. Après séchage complet, faites un essai de tir. Si la réplique ne fonctionne toujours pas, veuillez contacter votre revendeur pour réparation. Les accessoires sur les photos ne sont pas toujours inclus avec la réplique. La surveillance d'un adulte est obligatoire pour les utilisateurs de moins de 8 ans. L'acheteur et l'utilisateur doivent se conformer aux lois du pays concernant la possession d'une réplique airsoft Positionnez le sélecteur de tir sur le mode Semi-auto. Rechargez la batterie. Rebranchez la batterie. Branchez les bornes correctement (vérifiez le fusible). Remplacer le moteur en fin de vie (disponible chez votre revendeur local ou G&G directement). Vérifiez et réparez les branchements. Insérez la tige de débourrage dans le chargeur et remuez de haut en bas pour retirer les billes coincées. Retirez les billes coincées en utilisant la tige de débourrage. Achetez de nouveaux Gears chez votre revendeur local ou G&G directement. Rechargez la batterie. Retirez les billes coincées dans le chargeur. Consultez votre revendeur local ou G&G directement pour un entretien complet ou une réparation. Remplacez les pièces (disponible chez votre revendeur local ou G&G directement). Utilisez la tige de débourrage pour nettoyer le canon interne. Utilisez les billes de qualité supérieure G&G. Vaporisez de l'huile de silicone sur la chambre. Contactez votre revendeur local ou G&G pour effectuer un entretien complet, une réparation ou un changement de pièces. Réglez la molette du Hop-Up dans le sens horaire vers plus d'effet. Utilisez les billes de qualité supérieure G&G. Tous les produits dans ce mode d'emploi sont des imitations d'armes à feu et ne sont en aucun cas destinées ou représentées à être comparé par la conception, par l'apparence ou par le fonctionnement à toutes armes à feu produites par d'autres fabricants. Le nom des produits et les marques déposées G&G n'ont aucune affiliation et ne sont pas associés ou sponsorisés par aucun fabricant d'armes à feu ou d'imitations d'armes à feu. 7 8 FR Mode d'emploi NETTOYAGE CANON / DEBOURRAGE / ENTRETIEN / EN CAS DE PANNE EN CAS DE PANNE / RECLAMMATION Mode d'emploi FR

11 [ ] [ ] [ ] [ ] Bocacha ETU 9 JP / / JP 0

12 [ ] [ ] [ ] [ ] MOSFET [ ] [ ] / JP / / JP

13 [ ] [ ] [ ] [ ] [ ] [ ] JP / / / / JP
14 [ PARTS LIST ] [ LISTADO DE PARTES ] [ LISTE DES PIECES DETACHEES ] [ ] CM6 FFR A - 0 Barrel Nut / Imitación Bloque de Gas / CM6 FFR A - 0 Lower Receiver Set / Conjunto Recibidor inferior / CM6 FFR A - 0 Magazine / Cargador / CM6 FFR A - 0 Inner Barrel / Cañón exterior / CM6 FFR A - 05 Front Sight / Mira delantera / CM6 FFR A - 06 Metal Rail System Set / KeyMOD Conjunto sistema Rail / CM6 FFR A - 07 Buffer Tube Set / Conjunto Tubo amortiguador de Culata / CM6 FFR A - 08 Grip Set / Conjunto empuñadura / CM6 FFR A - 09 Motor Set / Conjunto Motor / CM6 FFR A - 0 Rear Sight / Mira trasera / CM6 FFR A - Outer Barrel / Cañon exterior / CM6 FFR A - Wire Set With MOSFET / Conjunto de cables con Mosfet / CM6 FFR A - Extended Battery Stock Set / Conjunto Culata de extensión / CM6 FFR A - Imitation gas tube / Varilla Pistón / CM6 FFR A - 5 Mock Suppressor / Bocacha / CM6 FFR A - 6 Gear Box Set / Conjunto Gear Box / CM6 FFR A - 7 Upper Receiver / Recibidor superior / CM6 FFR A - 8 Hop-Up Set / Conjunto Hop-up / CM6 FFR A - 9 Charging Handle Set / Conjunto Manija de carga / CM6 FFR A CM6 FFR A-6 CM6 FFR A CM6 FFR A CM6 FFR A CM6 FFR A-0 CM6 FFR A- 5 CM6 FFR A- CM6 FFR A- CM6 FFR A- (.5) CM6 FFR A-05 (05 mm) CM6 SR-06 CM6 FFR A-07 5 CM6 FFR A-09 5 CM6 FFR A-0 CM6 FFR A-08 CM6 FFR A CM6 FFR A-0 CM6 FFR A The grouped parts may all be purchased from the EN G&G Support Department. Todas las partes pueden ser compradas en el departamento ES de Soporte de G&G. Vous pouvez acheter ces pièces en contactant le FR service après-vente G&G. JP support@guaycom 5 EN Operating Instructions ES Instrucciones de operación FR Mode d'emploi JP JP Mode d'emploi FR Instrucciones de operación ES Operating Instructions EN 6

G960 SV_COVER
 G960 SV Product is intended for adults 18 years and older. Wear proper eye protection while shooting. Misuse may cause injury or death. The muzzle of an airsoft gun should never point in a direction in
[ COMPONENTS ] GC6 WILD HOG 7 Magazine Catch Button GC6 WILD HOG 9 Folding Front Sight Charging Handle Selector Lever [ WARNING ] We recommend using G
![[ COMPONENTS ] GC6 WILD HOG 7 Magazine Catch Button GC6 WILD HOG 9 Folding Front Sight Charging Handle Selector Lever [ WARNING ] We recommend using G](/thumbs/89/98370169.jpg "[ COMPONENTS ] GC6 WILD HOG 7 Magazine Catch Button GC6 WILD HOG 9 Folding Front Sight Charging Handle Selector Lever [ WARNING ] We recommend using G") GC6 WILD HOG 7 /9 / /.5 Product is intended for adults 8 years and older. Wear goggles while shooting. Misuse may cause injury or death. The muzzle of an airsoft gun should never point in a direction in
GC6 WILD HOG 7 /9 / /.5 Product is intended for adults 8 years and older. Wear goggles while shooting. Misuse may cause injury or death. The muzzle of an airsoft gun should never point in a direction in
Cover-GC16MPW
 Product is intended for adults 8 years and older. Wear goggles while shooting. Misuse may cause injury or death. The muzzle of an airsoft gun should never point in a direction in which, if discharged,
[ COMPONENTS ] CM6 SRXL Folding Front Sight Charging Handle [ WARNING ] We recommend using G&G Armament high precision BB's on all G&G Armament guns t
![[ COMPONENTS ] CM6 SRXL Folding Front Sight Charging Handle [ WARNING ] We recommend using G&G Armament high precision BB's on all G&G Armament guns t](/thumbs/54/34814030.jpg "[ COMPONENTS ] CM6 SRXL Folding Front Sight Charging Handle [ WARNING ] We recommend using G&G Armament high precision BB's on all G&G Armament guns t") CM6 SRS CM6 SRL CM6 SRXL Product is intended for adults 8 years and older. Wear goggles while shooting. Misuse may cause injury or death. The muzzle of an airsoft gun should never point in a direction
CM6 SRS CM6 SRL CM6 SRXL Product is intended for adults 8 years and older. Wear goggles while shooting. Misuse may cause injury or death. The muzzle of an airsoft gun should never point in a direction
G980 SE_COVER
 G980 SE Product is intended for adults 8 years and older. Wear proper eye protection while shooting. Misuse may cause injury or death. The muzzle of an airsoft gun should never point in a direction in
PDW15_CQB_AR_ALL_0322
 PDW5 CQB/AR Product is intended for adults 8 years and older. Wear proper eye protection while shooting. Misuse may cause injury or death. The muzzle of an airsoft gun should never point in a direction
[ COMPONENTS ] Charging Handle Fixed Stock GR S.P.R. Dust Cover Handguard Panel Mock Flash Hider [ WARNING ] We recommend using G&G Armament high prec
![[ COMPONENTS ] Charging Handle Fixed Stock GR S.P.R. Dust Cover Handguard Panel Mock Flash Hider [ WARNING ] We recommend using G&G Armament high prec](/thumbs/52/29318166.jpg "[ COMPONENTS ] Charging Handle Fixed Stock GR S.P.R. Dust Cover Handguard Panel Mock Flash Hider [ WARNING ] We recommend using G&G Armament high prec") GR S.P.R. GR SNIPER Product is intended for adults years and older. Wear goggles while shooting. Misuse may cause injury or death. The muzzle of an airsoft gun should never point in a direction in which,
GR S.P.R. GR SNIPER Product is intended for adults years and older. Wear goggles while shooting. Misuse may cause injury or death. The muzzle of an airsoft gun should never point in a direction in which,
CM16_RAIDER_ALL_0406
 Product is intended for adults 8 years and older. Wear proper eye protection while shooting. Misuse may cause injury or death. The muzzle of an airsoft gun should never point in a direction in which, if
Cover-CM16_R8
 Product is intended for adults 8 years and older. Wear proper eye protection while shooting. Misuse may cause injury or death. The muzzle of an airsoft gun should never point in a direction in which, if
GR15_RAIDER_ALL_0713
 Product is intended for adults years and older. Wear proper eye protection while shooting. Misuse may cause injury or death. The muzzle of an airsoft gun should never point in a direction in which, if
[ COMPONENTS ] Front sight Rear sight Safety [ WARNING ] We recommend using G&G P.S.B.B. High Precision BB's with all G&G Armament guns to ensure prop
![[ COMPONENTS ] Front sight Rear sight Safety [ WARNING ] We recommend using G&G P.S.B.B. High Precision BB's with all G&G Armament guns to ensure prop](/thumbs/89/99015604.jpg "[ COMPONENTS ] Front sight Rear sight Safety [ WARNING ] We recommend using G&G P.S.B.B. High Precision BB's with all G&G Armament guns to ensure prop") GMG-4 Product is intended for adults 8 years and older. Wear goggles while shooting. Misuse may cause injury or death. The muzzle of an airsoft gun should never point in a direction in which, if discharged,
GMG-4 Product is intended for adults 8 years and older. Wear goggles while shooting. Misuse may cause injury or death. The muzzle of an airsoft gun should never point in a direction in which, if discharged,
COMPONTS FN FS000 Tactical (BLACK) FN FS000 Tactical FDE (DERT TAN) Stock Pad FN F000 SERI Folding rear sight Scope mount rail Stock Pad Scope FN FS00
 FN FS000 Tactical FDE (DERT TAN) Stock Pad FN F000 SERI Folding rear sight Scope mount rail Stock Pad Scope FN FS00") Product is intended for adults 8 years and older. Wear proper eye protection while shooting. Misuse may cause injury or death. The muzzle of an airsoft gun should never point in a direction in which, if
Product is intended for adults 8 years and older. Wear proper eye protection while shooting. Misuse may cause injury or death. The muzzle of an airsoft gun should never point in a direction in which, if
S&T-VSS_maunal
 USER RESTRICTED TO 18 YEARS OF AGE OF OLDER Automatic Electric Airsoft Gun Instruction Manual VSS S&T VSS ST-AEG-21 Always Read Through This Manual Before Operation Scope is not included S&T AS-VAL ST-AEG-22
Mosin_ML
 USER RESTRICTED TO YEARS OF AGE OF OLDER Airsoft Gun Instruction Manual Always Read Through This Manual Before Operation Mosin Nagant Gas Rifle ST-GS-0 WARNING CAUTION Avoid pulling the trigger carelessly.
[ COMPONENTS ] Rear Sling Swivel Upper Hand Guard [ WARNING ] We recommend using G&G Armament high precision BB's on all G&G Armament guns to ensure p
![[ COMPONENTS ] Rear Sling Swivel Upper Hand Guard [ WARNING ] We recommend using G&G Armament high precision BB's on all G&G Armament guns to ensure p](/thumbs/83/88405527.jpg "[ COMPONENTS ] Rear Sling Swivel Upper Hand Guard [ WARNING ] We recommend using G&G Armament high precision BB's on all G&G Armament guns to ensure p") GM903 A4 Product is intended for adults 8 years and older. Wear goggles while shooting. Misuse may cause injury or death. The muzzle of an airsoft gun should never point in a direction in which, if discharged,
GM903 A4 Product is intended for adults 8 years and older. Wear goggles while shooting. Misuse may cause injury or death. The muzzle of an airsoft gun should never point in a direction in which, if discharged,
GPM92_0221
 This product is intended for 18 years old or older. Wear proper eye protection while shooting. Misuse may cause injury or death. The muzzle of an airsoft gun should never be pointed at any direction which
OPERATING INSTRUCTION RNTD Model NTD Model To the use r In order to use the torque driver properly and safely,please read the instructions before oper
 OPERATING INSTRUCTION RNTD Model NTD Model To the use r In order to use the torque driver properly and safely,please read the instructions before operation.if there are any questions,please contact a Tohnichi
[ COMPONENTS ] Magazine catch [ FIRING MODE & SAFETY ] Semi Mode The gun will fire one shot each time the trigger is pulled. Flag Safety The trigger c
![[ COMPONENTS ] Magazine catch [ FIRING MODE & SAFETY ] Semi Mode The gun will fire one shot each time the trigger is pulled. Flag Safety The trigger c](/thumbs/86/94078380.jpg "[ COMPONENTS ] Magazine catch [ FIRING MODE & SAFETY ] Semi Mode The gun will fire one shot each time the trigger is pulled. Flag Safety The trigger c") G980 Product is intended for adults 8 years and older. Wear goggles while shooting. Misuse may cause injury or death. The muzzle of an airsoft gun should never point in a direction in which, if discharged,
G980 Product is intended for adults 8 years and older. Wear goggles while shooting. Misuse may cause injury or death. The muzzle of an airsoft gun should never point in a direction in which, if discharged,
内蔵ハードディスクユニット-20GB (PG-HD2E4H) 内蔵ハードディスクユニット-40GB (PG-HD4E4H)取扱説明書 HARD DISK DRIVE 20GB(PG-HD2E4H) HARD DISK DRIVE 40GB(PG-HD4E4H) USER'S GUIDE
 内蔵ハードディスクユニット-40GB (PG-HD4E4H)取扱説明書 HARD DISK DRIVE 20GB(PG-HD2E4H) HARD DISK DRIVE 40GB(PG-HD4E4H) USER'S GUIDE") B7FY-0351-02 J E J 1 J 1 2 3 2 4 J 3 4 Preface Thank you very much for purchasing the hard disk drive. This hard disk drive provides a IDE interface and can be installed in the 3.5-inch storage bay of
B7FY-0351-02 J E J 1 J 1 2 3 2 4 J 3 4 Preface Thank you very much for purchasing the hard disk drive. This hard disk drive provides a IDE interface and can be installed in the 3.5-inch storage bay of
% + RP-BC30 BATTERY CHARGER STAND K -! # % $ $ % % # $ $ $ %
 i C /RF-ND70R/RF-ND70R 3 4 3 4 5 6 7 % 8 5 6 7 8 9 : ;! # < = > #? @ 9 : ; < = >? @ % + RP-BC30 BATTERY CHARGER STAND K -! % @ # % $ $ % %! @ % # $ $ $ % % % % 3 %! @ % # $ % % % @ $ ! @ % # $ % ^ % ^
DiMAGE7/5
 9223-2773-61 P-B108 Conformité Européenne 9229-2773-21 P-B108 Minolta DiMAGE 7 / DiMAGE 5 NOTE ABOUT
2
 8 23 26A800032A8000 31 37 42 51 2 3 23 37 10 11 51 4 26 7 28 7 8 7 9 8 5 6 7 9 8 17 7 7 7 37 10 13 12 23 21 21 8 53 8 8 8 8 1 2 3 17 11 51 51 18 23 29 69 30 39 22 22 22 22 21 56 8 9 12 53 12 56 43 35 27
2
 8 22 19A800022A8000 30 37 42 49 2 3 22 37 10 11 49 4 24 27 7 49 7 8 7 9 8 5 6 7 9 8 16 7 7 7 37 10 11 20 22 20 20 8 51 8 8 9 17 1 2 3 16 11 49 49 17 22 28 48 29 33 21 21 21 21 20 8 10 9 28 9 53 37 36 25
LC304_manual.ai
 Stick Type Electronic Calculator English INDEX Stick Type Electronic Calculator Instruction manual INDEX Disposal of Old Electrical & Electronic Equipment (Applicable in the European Union
fx-9860G Manager PLUS_J
 fx-9860g J fx-9860g Manager PLUS http://edu.casio.jp k 1 k III 2 3 1. 2. 4 3. 4. 5 1. 2. 3. 4. 5. 1. 6 7 k 8 k 9 k 10 k 11 k k k 12 k k k 1 2 3 4 5 6 1 2 3 4 5 6 13 k 1 2 3 1 2 3 1 2 3 1 2 3 14 k a j.+-(),m1
2 3
 RR-XR330 C Matsushita Electric Industrial Co., Ltd.2001 2 3 4 + - 5 6 1 2 3 2 1-3 + + - 22 +- 7 22 8 9 1 2 1 2 1 2 3 12 4 1 2 5 12 1 1 2 3 1 2 1 2 10 11 1 2 $% 1 1 2 34 2 % 3 % 1 2 1 2 3 1 2 12 13 1 2
2
 8 23 32A950S 30 38 43 52 2 3 23 40 10 33 33 11 52 4 52 7 28 26 7 8 8 18 5 6 7 9 8 17 7 7 7 38 10 12 9 23 22 22 8 53 8 8 8 8 1 2 3 17 11 52 52 19 23 29 71 29 41 55 22 22 22 22 22 55 8 18 31 9 9 54 71 44
 6 3 34 50G5 47 56 63 74 8 9 3 4 5 6 3446 4755 566 76373 7 37 3 8 8 3 3 74 74 79 8 30 75 0 0 4 4 0 7 63 50 50 3 3 6 3 5 4 4 47 7 48 48 48 48 7 36 48 48 3 36 37 6 3 3 37 9 00 5 45 3 4 5 5 80 8 8 74 60 39
 5 7 3AS40AS 33 38 45 54 3 4 5 4 9 9 34 5 5 38 6 8 5 8 39 8 78 0 9 0 4 3 6 4 8 3 4 5 9 5 6 44 5 38 55 4 4 4 4 5 33 3 3 43 6 6 5 6 7 3 6 0 8 3 34 37 /78903 4 0 0 4 04 6 06 8 08 /7 AM 9:3 5 05 7 07 AM 9
No_ST012.indd
 Pipe Threading Machine Supertronic INSTRUCTION MANUAL Double Insulation Important: For your safety and effective operation, read this Instruction Manual carefully and completely before use and thoroughly
 5 30 B36B3 4 5 56 6 7 3 4 39 4 69 5 56 56 60 5 8 3 33 38 45 45 7 8 4 33 5 6 8 8 8 57 60 8 3 3 45 45 8 9 4 4 43 43 43 43 4 3 43 8 3 3 7 6 8 33 43 7 8 43 40 3 4 5 9 6 4 5 56 34 6 6 6 6 7 3 3 3 55 40 55
INSTRUCTION MANUAL WARNING Be sure to READ the Instruction Manual. Prior to using, be sure to check whether the machine functions properly. If not, NE
 INSTRUCTION MANUAL WARNING Be sure to READ the Instruction Manual. Prior to using, be sure to check whether the machine functions properly. If not, NEVER use it. NEVER apply your fingers to near the front
OPERATING INSTRUCTION RNTD Model NTD Model To the use r In order to use the torque driver properly and safely,please read the instructions before oper
 OPERATING INSTRUCTION RNTD Model NTD Model To the use r In order to use the torque driver properly and safely,please read the instructions before operation.if there are any questions,please contact a Tohnichi
2
 8 24 32C800037C800042C8000 32 40 45 54 2 3 24 40 10 11 54 4 7 54 30 26 7 9 8 5 6 7 9 8 18 7 7 7 40 10 13 12 24 22 22 8 55 8 8 8 8 1 2 3 18 11 54 54 19 24 30 69 31 40 57 23 23 22 23 22 57 8 9 30 12 12 56
ES8259取説
 ES8259 B B B B 2 µm µm C C C C µm µm 1 3 4 2 H H 3 C C C C C C C C C C C C C C C C C C C C C C C C C C C 4 B B B B B B B B B B B B 5 B B B C C B B C C B B B C B C B B B 6 7 8 OFF/ON $ & ( $ ' # % # $ %
 6 50G5S 3 34 47 56 63 http://toshibadirect.jp/room048/ 74 8 9 3 4 5 6 3446 4755 566 76373 7 37 3 8 8 3 3 74 74 79 8 30 75 0 0 4 4 0 7 63 50 50 3 3 6 3 5 4 4 47 7 48 48 48 48 7 36 48 48 3 36 37 6 3 3 37
WARNING To reduce the risk of fire or electric shock,do not expose this apparatus to rain or moisture. To avoid electrical shock, do not open the cabi
 ES-600P Operating Instructions WARNING To reduce the risk of fire or electric shock,do not expose this apparatus to rain or moisture. To avoid electrical shock, do not open the cabinet. Refer servicing
combat_manual_site.ai
 131 71 71 71 71 71 71 71 71 71 71 71 7 1 71 71 71 71 71 71 7 1 71 71 71 71 71 71 71 71 71 71 7 1 71 7 1 71 71 71 71 71 71 71 71 71 71 71 7 www.sven.1 7 13RUS 1 71 71 71 71 71 71 71 71 71 71 7 1 71 7 1
MIDI_IO.book
 MIDI I/O t Copyright This guide is copyrighted 2002 by Digidesign, a division of Avid Technology, Inc. (hereafter Digidesign ), with all rights reserved. Under copyright laws, this guide may not be duplicated
Tab 5, 11 Tab 4, 10, Tab 3, 9, 15Tab 2, 8, 14 Tab 1, 7, 13 2
 COMPANION 20 MULTIMEDIA SPEAKER SYSTEM Owner s Guide Tab 5, 11 Tab 4, 10, Tab 3, 9, 15Tab 2, 8, 14 Tab 1, 7, 13 2 Tab1, 7, 13 Tab 2, 8, 14 Tab 3, 9, 15 Tab 4, 10, Tab 5, 11 This product conforms to all
DZ-GX20/DZ-MV780取扱説明書(上巻)
") DZ-GX20 DZ-MV780(S) DZ-MV780(R) DZ-MV780(A) Important Information WARNING : To prevent fire or shock hazard, do not expose this unit to rain or moisture. WARNING : To prevent fire or shock hazard, use
DZ-GX20 DZ-MV780(S) DZ-MV780(R) DZ-MV780(A) Important Information WARNING : To prevent fire or shock hazard, do not expose this unit to rain or moisture. WARNING : To prevent fire or shock hazard, use
2 3 12 13 6 7
 2 8 17 42ZH700046ZH700052ZH7000 28 43 54 63 74 89 2 3 12 13 6 7 3 4 11 21 34 63 65 8 17 4 11 4 55 12 12 10 77 56 12 43 43 13 30 43 43 43 43 10 45 14 25 9 23 74 23 19 24 43 8 26 8 9 9 4 8 30 42 82 18 43
RR-US470 (RQCA1588).indd
.indd") RR-US470 Panasonic Corporation 2006 2 3 4 http://www.sense.panasonic.co.jp/ 1 2 3 ( ) ZOOM 5 6 7 8 9 10 4 2 1 3 4 2 3 1 3 11 12 1 4 2 5 3 1 2 13 14 q φ φ 1 2 3 4 3 1 2 3 4 2 3 15 16 1 2 3 [/]p/o 17 1 2
RR-US470 Panasonic Corporation 2006 2 3 4 http://www.sense.panasonic.co.jp/ 1 2 3 ( ) ZOOM 5 6 7 8 9 10 4 2 1 3 4 2 3 1 3 11 12 1 4 2 5 3 1 2 13 14 q φ φ 1 2 3 4 3 1 2 3 4 2 3 15 16 1 2 3 [/]p/o 17 1 2
H8000操作編
 8 26 35 32H800037H800042H8000 49 55 60 72 2 3 4 48 7 72 32 28 7 8 9 5 7 9 22 43 20 8 8 8 8 73 8 13 7 7 7 55 10 49 49 13 37 49 49 49 49 49 49 12 50 11 76 8 24 26 24 24 6 1 2 3 18 42 72 72 20 26 32 80 34
FSLC.indd
 FSLC/FSLD/FSLH/FSLJ FSCC/FSCD/FSCH Accessory Electric Blinds VAS 453786-2015-12 ENGLISH: Instructions for control keypad - Simple set-up ESPAÑOL: Instrucciones para el teclado de control - Simple set-up
 6 4 4 9RERE6RE 5 5 6 7 8 9 4 5 6 4 4 5 6 8 4 46 5 7 54 58 60 6 69 7 8 0 9 9 79 0 4 0 0 4 4 60 6 9 4 6 46 5 4 4 5 4 4 7 44 44 6 44 8 44 46 44 44 4 44 0 4 4 5 4 8 6 0 4 0 4 4 5 45 4 5 50 4 58 60 57 54
Z7000操作編_本文.indb
 2 8 17 37Z700042Z7000 46Z7000 28 42 52 61 72 87 2 3 12 13 6 7 3 4 11 21 34 61 8 17 4 11 4 53 12 12 10 75 18 12 42 42 13 30 42 42 42 42 10 62 66 44 55 14 25 9 62 65 23 72 23 19 24 42 8 26 8 9 9 4 11 18
19_22_26R9000操作編ブック.indb
 8 19R900022R900026R9000 25 34 44 57 67 2 3 4 10 37 45 45 18 11 67 25 34 39 26 32 43 7 67 7 8 7 9 8 5 7 9 21 18 19 8 8 70 8 19 7 7 7 45 10 47 47 12 47 11 47 36 47 47 36 47 47 24 35 8 8 23 12 25 23 OPEN
i5 Catalyst Case Instructions JP
 Catalyst iphone iphone iphone ON/OFF O O Touch ID Page 01 iphone O O O O O Page 02 ( ) O OK O O O 30 30 min Page 03 ( ) 30 O iphone iphone iphone iphone iphone iphoneiphone Catalyst ON/OFF iphone iphone
;y ;y ;; yy ;y;; yy y;y;y;y ;y; ;; yy ; y Portable CD player Operating Instructions RQT5364-S
 ;y ;y ;; yy ;y;; yy y;y;y;y ;y; ;; yy ; y Portable CD player Operating Instructions -S + - + - 1 3 K 2 - + H K Ni-Cd A.SHOCK S-XBS HOLD HOLD HOLD HOLD ( 1; 1; 6 VOLUME 5 4 1; A.SHOCK S-XBS RANDOM NOR
Microsoft Word - PCM TL-Ed.4.4(特定電気用品適合性検査申込のご案内)
") (2017.04 29 36 234 9 1 1. (1) 3 (2) 9 1 2 2. (1) 9 1 1 2 1 2 (2) 1 2 ( PSE-RE-101/205/306/405 2 PSE-RE-201 PSE-RE-301 PSE-RE-401 PSE-RE-302 PSE-RE-202 PSE-RE-303 PSE-RE-402 PSE-RE-203 PSE-RE-304 PSE-RE-403
(2017.04 29 36 234 9 1 1. (1) 3 (2) 9 1 2 2. (1) 9 1 1 2 1 2 (2) 1 2 ( PSE-RE-101/205/306/405 2 PSE-RE-201 PSE-RE-301 PSE-RE-401 PSE-RE-302 PSE-RE-202 PSE-RE-303 PSE-RE-402 PSE-RE-203 PSE-RE-304 PSE-RE-403
 6 4 45 7ZS 5 59 7 8 94 05 4 5 6 4 5 5 6 8 8 40 45 48 56 60 64 66 66 68 7 78 80 8 7 8 0 0 0 90 0 57 64 69 66 66 69 0 4 4 4 4 4 0 7 48 5 4 4 5 4 4 4 7 46 46 6 46 8 46 48 46 46 4 46 46 4 4 5 4 6 4 9 9 0
MINAS取説アブソ警告クリア方法記載ミス_モータニュース…
 194 201 228 235 268 275 Absolute System Battery installation Initial installation Connect the lead wire from the battery unit top to its own connector. Wait for 5 minutes and then install the battery to
ユーザーズマニュアル
 1 2 3 4 This product (including software) is designed under Japanese domestic specifications and does not conform to overseas standards. NEC *1 will not be held responsible for any consequences resulting
2
 L C -24K 9 L C -22K 9 2 3 4 5 6 7 8 9 10 11 12 11 03 AM 04 05 0 PM 1 06 1 PM 07 00 00 08 2 PM 00 4 PM 011 011 021 041 061 081 051 071 1 2 4 6 8 5 7 00 00 00 00 00 00 00 00 30 00 09 00 15 10 3 PM 45 00
OPERATING INSTRUCTION QL QL5 Model In order to use the torque wrench properly and safely, please read this instructions before operation. If any quest
 OPERATING INSTRUCTION QL QL5 Model In order to use the torque wrench properly and safely, please read this instructions before operation. If any questions, please contact to Tohnichi authorized distributor
DZ-HS503 取扱説明書
 DZ-HS503 Important Information WARNING : To prevent fire or shock hazard, do not expose this unit to rain or moisture. WARNING : To prevent fire or shock hazard, use the recommended accessories only. CAUTION
 6 4 45 ZS7ZS4ZS 5 59 7 8 94 05 4 5 6 4 5 5 6 8 8 40 45 48 56 60 64 66 66 68 7 78 80 8 7 8 0 0 0 90 0 0 4 4 4 4 6 57 64 69 66 66 66 69 4 0 7 48 5 4 4 5 4 4 4 7 46 46 6 46 8 46 48 46 46 4 46 46 4 4 5 4
DZ-GX3300/GX3100/GX3100取扱説明書
 DZ-GX3300(S)/(B) DZ-GX3200 DZ-GX3100 Important Information WARNING : To prevent fire or shock hazard, do not expose this unit to rain or moisture. WARNING : To prevent fire or shock hazard, use the recommended
*Ł\”ƒ‚ä(DCH800)
") B B B B B B B B B C * This device can only be used inside Japan in areas that are covered by subscription cable TV services. Because of differences in broadcast formats and power supply voltages, it cannot
B B B B B B B B B C * This device can only be used inside Japan in areas that are covered by subscription cable TV services. Because of differences in broadcast formats and power supply voltages, it cannot
DZ-HS303 取扱説明書
 DZ-HS303(S)/(A) Important Information WARNING : To prevent fire or shock hazard, do not expose this unit to rain or moisture. WARNING : To prevent fire or shock hazard, use the recommended accessories
I N S T R U M E N T A T I O N & E L E C T R I C A L E Q U I P M E N T Pressure-resistant gasket type retreat method effective bulk compressibility Fro
 Cable Gland This is the s to use for Cable Wiring in the hazardous location. It is much easier to install and maintenance and modification compared with Conduit Wiring with Sealing Fitting. The Standard
P3FY J E
 P3FY-1490-01 J E J 1 J 1 2 2 J 3 3 4 4 5 J 5 Preface Thank you very much for purchasing the hard disk drive. This hard disk drive provides a IDE interface and can be installed in the 3.5-inch storage
The hand operated type HB unit is a worm gear drive which may be used for any valve or device requiring a 90 movement. The HB worm gear actuator is es
 The hand operated type HB unit is a worm gear drive which may be used for any valve or device requiring a 90 movement. The HB worm gear actuator is especially designed for operation of butterfly, plug
1 2 3
 INFORMATION FOR THE USER DRILL SELECTION CHART CARBIDE DRILLS NEXUS DRILLS DIAMOND DRILLS VP-GOLD DRILLS TDXL DRILLS EX-GOLD DRILLS V-GOLD DRILLS STEEL FRAME DRILLS HARD DRILLS V-SELECT DRILLS SPECIAL
GP05取説.indb
 E -G V P 05D L V E -G P 05D W Ni-MH + + + + + + + + + + + + + + + + + + + + + + + + + + + + + + + + + + 1 + 2 + 3 + 4 + 5 + 6 1 2 3 4 5 6 + + + 1 + + + + + + + + + + + + + + + + + + 1 A B C + D + E
Huawei G6-L22 QSG-V100R001_02
 G6 1 2 3 4 5 6 7 8 9 10 11 12 13 14 15 16 1 2 3 17 4 5 18 UI 100% 8:08 19 100% 8:08 20 100% 8:08 21 100% 8:08 22 100% 8:08 ********** 23 100% 8:08 Happy birthday! 24 S S 25 100% 8:08 26 http://consumer.huawei.com/jp/
C 04 D 10 D 11 D 12 D A 14 D 16 D 17 D 18 D 19 D 419 29 D A A A 33 D 2933 2028 3445 20 D A 21 D 22 D 23 D 23 D 24 D 27 D 34 D 35 D 36 D 38 D A A 40 D
 C C D D D D D D C Matsushita Electric Industrial Co., Ltd.All Rights Reserved. C 04 D 10 D 11 D 12 D A 14 D 16 D 17 D 18 D 19 D 419 29 D A A A 33 D 2933 2028 3445 20 D A 21 D 22 D 23 D 23 D 24 D 27 D 34
DMC-P33
 Precaution for use This unit is designed for domestic use only, and it is very dangerous to use the attached battery charger abroad. Never use it out of Japan. KENWOOD CORPORATION CR 3 4 7 7
VE-GP32DL_DW_ZA
 VE-GP32DL VE-GP32DW 1 2 3 4 5 6 1 2 3 4 1 1 2 3 2 3 1 1 2 2 2006 Copyrights VisionInc. @. _ & $ % + = ^ @. _ & $ % + = ^ D11 D12 D21
AN-200A(J-GB).doc :16 AM ページ 2
.doc :16 AM ページ 2") AN-200A(J-GB).doc 10.5.26 11:16 AM ページ 1 JAPANESE VERSION ENGLISH VERSION AN-200A(J-GB).doc 10.5.26 11:16 AM ページ 2 AN-200A(J-GB).doc 10.5.26 11:16 AM ページ 1 S INTRODUCTION Thank you very much for purchasing
AN-200A(J-GB).doc 10.5.26 11:16 AM ページ 1 JAPANESE VERSION ENGLISH VERSION AN-200A(J-GB).doc 10.5.26 11:16 AM ページ 2 AN-200A(J-GB).doc 10.5.26 11:16 AM ページ 1 S INTRODUCTION Thank you very much for purchasing
NSR-500 Installation Guide
 NSR Installation Guide This information has been prepared for the professional installers not for the end users. Please handle the information with care. Overview This document describes HDD installation
by CASIO W61CA For Those Requiring an English/Chinese Instruction
 by CASIO W61CA http://www.au.kddi.com/torisetsu/index.html http://www.au.kddi.com/manual/index.html For Those Requiring an English/Chinese Instruction Manual English/Chinese Simple Manual can be read on
 L C -6D Z3 L C -0D Z3 3 4 5 6 7 8 9 10 11 1 13 14 15 16 17 OIL CLINIC BAR 18 19 POWER TIMER SENSOR 0 3 1 3 1 POWER TIMER SENSOR 3 4 1 POWER TIMER SENSOR 5 11 00 6 7 1 3 4 5 8 9 30 1 3 31 1 3 1 011 1
 L'amour suxuel dans la pensée russe ( I ) "La sonate à kreuzer" de L. Tolstoï AOUAMA Taro Dans "La sonate à Kreuzer" (1890) Tolstoï prêche l'abstinence complète de l'amour sexuel. L'acte sexuel est un
1) 1) Props of preparation. Wire Scale Spike Cutter Hammer Tape Marker (, ) Rope(For Sezing) 2) 2) Marking A 22 A point Position of twenty-two times t
 1) Props of preparation. Wire Scale Spike Cutter Hammer Tape Marker (, ) Rope(For Sezing) 2) 2) Marking A 22 A point Position of twenty-two times t") 1) 1) Props of preparation. Wire Scale Spike Cutter Hammer Tape Marker (, ) Rope(For Sezing) 2) 2) Marking A 22 A point Position of twenty-two times the Dia, from the end of the rope. B A B point Position
1) 1) Props of preparation. Wire Scale Spike Cutter Hammer Tape Marker (, ) Rope(For Sezing) 2) 2) Marking A 22 A point Position of twenty-two times the Dia, from the end of the rope. B A B point Position
Motivation and Purpose There is no definition about whether seatbelt anchorage should be fixed or not. We tested the same test conditions except for t
 Review of Seatbelt Anchorage and Dimensions of Test Bench Seat Cushion JASIC Motivation and Purpose There is no definition about whether seatbelt anchorage should be fixed or not. We tested the same test
Bead Instructions First, locate the acupressure point you wish to stimulate. Next, remove a plastic bead from the bag. Remove the backing from the adh
 icewave Instructions Bead Instructions First, locate the acupressure point you wish to stimulate. Next, remove a plastic bead from the bag. Remove the backing from the adhesive plastic patch included.
+ -
 i i C Matsushita Electric Industrial Co., Ltd.2001 -S F0901KK0 seconds ANTI-SKIP SYSTEM Portable CD player Operating Instructions -S + - + - 9 BATTERY CARRYING CASE K 3 - + 2 1 OP 2 + 3 - K K http://www.baj.or.jp
PFQX2227_ZA
 V E -G P 05D B Ni-MH 1 2 3 4 5 6 1 2 3 4 5 6 A B C D E F 1 2 A B C 1 2 3 2 0 7 9 4 6 6 4 7 9 1 2 3 # 6 6 2 D11 D12 D21 D22 19 # # # # Ni-MH Ω Ω
2 3 12 13 6 7
 02 08 22AV55026AV550 17 25 32 22AV550 26AV550 39 50 2 3 12 13 6 7 3 4 11 8 8 9 9 8 9 23 8 9 17 4 11 4 33 12 12 11 24 18 12 10 21 39 21 4 18 18 45 45 11 5 6 7 76 39 32 12 14 18 8 1 2 32 55 1 2 32 12 54
取説_KX-PW101CL_PW102CW
 See pages 270 and 271 for English Guide. KX-PW101CL KX-PW102CW Ni-Cd F1 F1 F2 F4 F1 F2 F4 F1 F2 F4 2 1 2 Ni-Cd Ni-Cd NTT NTT F1 F1 F1 F1 F1 F1 F1 F1 F4 F4 F4 F1 F4 F1
TH-42PAS10 TH-37PAS10 TQBA0286
 TH-42PAS10 TH-37PAS10 TQBA0286 2 4 8 10 11 17 18 20 21 22 23 24 25 26 27 28 29 30 31 32 33 38 42 44 46 50 51 52 53 54 3 4 5 6 7 8 3 4 1 2 9 5 6 1 4 2 3 5 6 10 11 1 2 3 4 12 13 14 TH-42PAS10 TH-42PAS10
BS・110度CSデジタルハイビジョンチューナー P-TU1000JS取扱説明書
 C S0 CS Digital Hi-Vision Tuner C C C C S0-0A TQZW99 0 C C C C 4 5 6 7 8 9 C C C C C C C C C C C C C C C C C C C C C C C 0 FGIH C 0 FGIH C C C FGIH FG IH FGIH I H FGIH FGIH 0 C C # $ IH F G 0 # $ # $
01.eps
 444 SumiTurn T-REX Tool Holders Cost reduction for copying with unique multiple cornered insert Carbide inserts, cermet inserts and 4 types of breakers are available. Expansion of our popular steel turning
2
 L C -60W 7 2 3 4 5 6 7 8 9 0 2 3 OIL CLINIC BAR 4 5 6 7 8 9 2 3 20 2 2 XXXX 2 2 22 23 2 3 4 5 2 2 24 2 2 25 2 3 26 2 3 6 0 2 3 4 5 6 7 8 9 2 3 0 2 02 4 04 6 06 8 08 5 05 2 3 4 27 2 3 4 28 2 3 4 5 2 2
080906_…o…−…^…b…vVSCW
 Thyristor Type Single-Phase Power Regulator 2030 A 6A 150200A TOKYO RIKOSHA CO., LTD Latest VARITAP VSCW Series Achieved 1/2 the width (our company comparison). Free Power source of 100 to 240V specification.cover-type
ユーザーガイド
 SWR12 ...4...4...4...5...5... 5... 5... 5...6...7... 7 LED... 7... 7... 8... 8... 9... 9 SmartBand 2 Android...10... 10... 10... 11 LED... 12... 12... 13... 13... 13 Google Fit... 13 STAMINA... 14 STAMINA...
00_1512_SLIMLINE_BOOK.indb
 PIECE type SLIM type Imbalance value Less interference type, ideal for deep machining Ideal for drilling 2 PIECE REGULAR type Rigidity value Nozzle type When compared to the slim type, it has more rigidity
Ensemble en français
 9 J ai un grand frère, il a 33 ans - parler de son âge et de sa famille avec le verbe «avoir» - 1 Avec «vous» (poliment) «vous» を用いて ( 丁寧に ) A : Quel âge avez-vous? 何歳ですか? B : J ai 31 ans 31 歳です A : Avez-vous
untitled
 OREC ISSUED NO. SP1000-1 Parts catalogue Spider Mower (EXPORT MODEL) SP1000 MODEL CODE SP1000 0202- CONTENTS HANDLE 1-8 DRIVING & CUTTING 9-12 CHAIN CASE 13 TRANSMISSION 14-22 GEAR FRAME 23 FRONT WHEEL
P (32LX10)
") D D D D D D C Matsushita Electric Industrial Co., Ltd. D D D 2 04 D 08 D 10 D A A A A 16 D 17 D 18 D A 19 D A A A A 26 417 1825 2641 D A A A A 35 D 36 D A A 38 D 41 D 42 D 51 D 52 D 54 D 56 D A A 64 D
D D D D D D C Matsushita Electric Industrial Co., Ltd. D D D 2 04 D 08 D 10 D A A A A 16 D 17 D 18 D A 19 D A A A A 26 417 1825 2641 D A A A A 35 D 36 D A A 38 D 41 D 42 D 51 D 52 D 54 D 56 D A A 64 D
VE-GD21DL_DW_ZB
 V E-G D21D L V E-G D21D W 1 2 3 4 1 2 1 2 1 2 2 1 2 3 1 2 3 1 2 3 1 4 4 2 3 5 5 1 2 3 4 1 2 3 1 2 3 4 1 2 3 2006 Copyrights VisionInc. @. _ & $ % + = ^ 2011
2
 8 26 38 37Z800042Z800047Z8000 54 65 72 83 101 2 3 4 7 101 53 27 33 7 8 9 5 7 9 22 47 72 8 8 8 8 102 8 13 7 7 7 65 10 67 67 13 71 40 67 67 67 67 43 67 12 55 55 11 104 8 24 26 24 20 25 6 1 2 3 18 46 101
2 3
 * This device can only be used inside Japan in areas that are covered by subscription cable TV services. Because of differences in broadcast formats and power supply voltages, it cannot be used in overseas
 02 08 32C700037C700042C7000 17 25 32 39 50 2 3 12 13 6 7 3 4 11 8 8 9 9 8 9 23 8 9 17 4 11 4 33 12 12 11 24 18 12 10 21 39 21 4 11 18 45 5 6 7 76 39 32 12 14 18 8 1 2 31 55 1 2 31 12 54 54 9 1 2 1 2 10
取扱説明書_KX-PW100CL
 See pages 236 238 for English Guide. KX-PW100CL Ni-MH KX-PW100CL-W KX-FKN100-W 1 2 NTT NTT 1 4 3 4 5 6
32C2100操作編ブック.indb
 02 08 32C2100 18 24 31 37 2 3 12 13 6 7 68 67 41 42 33 34 3 4 11 8 18 4 11 4 22 13 23 11 23 12 13 14 15 10 18 19 20 20 10 9 20 18 23 22 8 8 22 9 9 4 30 10 10 11 5 13 13 16 15 26 24 37 40 39 6 7 8 1 2 29
取説_KX-PW38CL_PW48CL
 KX-PW38CL KX-PW48CL See pages 260 and 261 for English Guide. 2 3 1 2 NTT NTT Ni-Cd Ni-Cd 1 2 3 4 5 6 7 8 9 0 1 2 3 4 5 6 7 8 9 0 1 2 3 4 5 6 7 8 9 0 0 6 1 2 3
untitled
 Pour Travailler comme interprète KIKUCHI Utako CNN BS CNN BS NHK DVD C est quelqu un qui jongle avec les mots de la langue française. PR Ça marche pour vous? Très très bien, ça marche très bien. Ça fait