Q6说明书封面
|
|
|
- ゆめじ あさま
- 6 years ago
- Views:
Transcription


1 4K Ultra HD Action Cam Q6 This instruction also applies to Q6+. Waterproof 60m WiFi 170 wide angle LCD Screen
2
3 Warning 1. Keep it from falling and dropping. 2. Keep it away from any strong magnetic interference objects like electrical machine to avoid strong radio waves that might be damaging the product and affect the sound or image quality. 3. Don t expose the product directly to high temperatures and strong sunlight. 4. We recommend using high quality Micro SD Card for the best results. 5. Don t place your Micro SD card near strong magnetic objects to avoid data error. 6. In case of overheating, unwanted smoke or unpleasant smell from the device, unplug it immediately from the power outlet to prevent hazardous fire 7.Keep it away from children while on charging. 8.Stored the device in a cool, dry and dust free location. 1
4 Product Features 1.With a water proof casing, allowing you to film 60 meters under water scene. 2.HD screen display for convenient videos and image playback. 3.Detachable battery for easy replacement and help extend product lifespan. 4.Record videos while charging. 5.HD 16 Megapixel wide angle lens. 6.HDMI Output. 7.Web Camera. 8.Supports SD card memory expandable up to 64GB(Maximum). 9.Supports multiple video recording formats:4k/2.7k/1080p/720p. 10.Supports MP4 recording format. 11.Supports multiple photo shooting modes: Single shot & Snapper. 12.Super light weight, small in size and available in 2 colors. 2

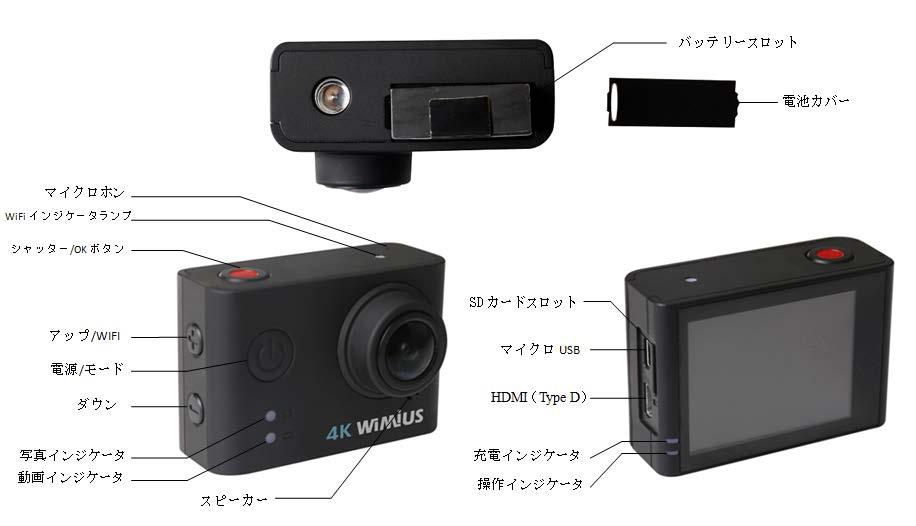
5 Basic Structure 3
")
6 Camera and Accessories (This is only for Q6+) 4
7 Basic Operation 1. Turn on/off the camera To power ON: Press and hold the Power/Mode button. To power OFF: Press and hold the Power/Mode button. 2. Mode Switching Turn camera ON and repeatedly press the Power/Mode button to cycle through camera modes and settings. Press the OK button to enter the settings menu. Repeatedly press the Power/Mode button to cycle through options and press the OK button to select desired option. 3. Video Mode To record video, verify the camera is in Video mode. If the video icon on screen is showing, press the OK button to start recording. In the meanwhile, a red icon at the bottom of the screen and the operation indicator will be flashing at the same time. Click the OK button again to stop the video, also the red icon will disappear and the operation indicator will stop flashing. 5
8 4. Photo Mode To take a photo, verify the camera is in Photo mode. If the picture icon on screen is showing, press the OK button to take photos. 5. Slow Motion To record slow motion video, verify the camera is in Slow Motion mode. If the slow motion video icon on screen is showing, press the OK button to start video. In the meanwhile, a red icon at the bottom of the screen and the operation indicator will be flashing at the same time. Click the OK button again to stop the video, also the red icon will disappear and the operation indicator will stop flashing. 6. Timelapse Video Enter the setting menu, open Timelapse Video function, return to Video mode. If the video icon on screen is showing at the down left corner of the screen, press the OK button to start video. In the meanwhile, a red icon at the bottom of the screen and the operation indicator will be flashing at the same time. Click the OK button again to stop the video, also the red icon will disappear and the operation indicator will stop flashing. 6
9 7. Playback Playing back videos and photos. Verify the camera is in Playback menu. Press Up or Down button to select file, press OK button to playback video. 8. Battery Install and remove the battery. a. Pull the battery cover with your finger to open the battery compartment. b. According to the battery label plus or minus sign and the direction of the arrow, right put the battery into the camera, until the installation in position. c. Take out battery, push away the battery cover can take out the battery. Charge a. Charging can be done by either connecting the camera via USB to a computer or plugging the charger in. b. Charge the camera on vehicle by connecting it to car charger. c. The camera can record video while being charged. d. Charging can be done even when it s powered off. 7
10 Camera WiFi APP 1.Scan the quick response code on the box and download the APP client and install it to the smart phone, which displays the WIMIUS CAM application icon after installation. After the installation, the mobile phone interface will appear a APP application icon. Click to enter the APP WIMIUS CAM interface. 2.The open WIFI function a. Select the WiFi menu, press OK button to enter, select open, the screen will show the WiFi icon SSID:WIMIUS Password: b. Click the UP button to return. At this time to open the phone to set the WiFi function, to find a new set of WiFi name of the network. c. Connect after entering the new WiFi password and confirm the connection. d. At this time to open the phone has been installed WIMIUS CAM APP client, and search to add the camera ID code, after the completion of the camera and video operations can be performed. 8
11 Specification Parameter 9
12 10


13 Accessories Installing 1.Base pasting plane installation: 2. Bicycle frame installation: 3. Three rotating shaft installation: 11
14 2.4G wireless Wristband remote control instruction 1.Use precautions (this is only for Q6+) Remote bracelet is of rain waterproof design, cannot be used in diving. Remote effective distance is 10m-20m which changes with environment. Remote effective distance will be shortened in case of insufficient battery power. Remote control bracelet using standard 2032/3.3V button cell. Replacing the battery requires the use of a screwdriver. 2.Structure display Shutter button Wrist buckle Status indicator light2 Status indicator light1 Record button 12
15 3.Operation instructions Prompt: Please confirm the camera in the picture mode or video mode 1.Record Start recording a. Video mode: Press the Record button to start recording, at the same time the "state indicator light 1" (blue) flashes once. b. Picture mode: Press the Record button, the "status indicator light 1" (blue) flashes once, camera automatically switches to video mode, and start recording. Stop recording: In the recording process, press the Record button, the "status indicator light 1" (blue) flashes once, the recording stops. 2.Photograph Picture mode: Press the shutter button, the "state light 2" (red) flashes once, while the camera to take pictures; Video mode: Press the shutter button, the "state light 2" (red) flashes once, the camera automatically switches to the camera mode, while the camera to take pictures; Recording process: In the recording process, press the shutter button, can be performed to take pictures, while the "state light 2" (red) flashes once; video recording continues after taking pictures; 13
16 Deusche Anleitung für Q6 Anleitung: 1.Ein/Ausschalten Einschalten: Drücken und halten Sie die Power/Mode Button für 3 bis 5 Sekunden, um die Kamera einzuschalten. Ausschalten:Drücken und halten Sie die Power/Mode Button für 3 bis 5 Sekunden, um die Kamera auszuschalten. 2.Moduswechsel Drücken Sie Mode Button beim Einschalten, können Sie Modus wechseln und Einstellung eingeben. Sie können OK Button drücken, um die gewünschte Einstellung zu stellen. 3.Aufnahme Stellen Sie sicher, ob die Kamera in Aufnahme Modus ist. Es gibt auf Linkeseit bei Bildschirm, drücken Sie einfach OK Button, dann wird es aufnehmen. Im gleichzeitig blinkt Kamera Anzeiger und Rot Punkt auf Display. Drücken Sie Ok Button nochmal, wird die Aufnahme beenden und blinkt Kamera Anzeiger und Rot Punkt auf Display nicht mehr. 14
17 4. Fotografieren Stellen Sie sicher, ob die Kamera in Foto Modus ist. Es gibt auf Linkeseit bei Display. Sie können OK Button drücken, damit die Kamera fotografieren kann. 5. Zeitlupe Aufnahme Stellen Sie sicher, ob die Kamera in Zeitlupe Aufnahme Modus ist. Es gibt auf Linkeseit bei Bildschirm, drücken Sie mal OK Button zu aufnehmen. Im gleichzeitig blinkt das Operation Indicator. 6. Zeitraffer Aufnahme/Time-lapse Einschalten Sie bitte die Zeitraffer Aufnahme bei Menüeinstellung und zrück an Aufnahme Modus.Es gibt bei Linkeseit(unten) auf Display. Drücken Sie einfach OK Button, dann wird es aufnehmen. Im gleichzeitig blinkt Kamera Anzeiger und Rot Punkt auf Display.Drücken Sie Ok Button nochmal, wird die Aufnahme beenden und blinkt Kamera Anzeiger und Rot Punkt auf Display nicht mehr. 7. Wiedergabe Es kann Bild und Video wiedergeben. Stellen Sie sicher, dass die Kamera in Wiedergabe Modus ist. Sie können mit Up und Down Button das Bild oder Viedeo auswählen und OK Button drücken, um es wiederzugeben. 15
18 8. Akku Löschen Sie die Batterieabdeckung aus, um die Abdeckung zu entfern. Bauen Sie die Batterie(Anschlussende zuerst) in der Kamera ein, so dass die Anschlüsse auf der richtigen Seite sind. Aufladen a. Die Kamera kann aufgeladen werden, wenn Sie mit einem USB Kabel die Kamera zu einem Computer verbinden oder direkt mit dem Adpater verbinden. b. Im Auto können Sie die Kamera mit einem Auto Ladegerät aufladen. c. Beim Aufladen können Sie auch mit der Kamera aufnehmen, aber nicht empfehlen. d.es kann bei Ausschalten aufladen. 9. WiFi und App verbinden a. Scan die QR Code auf die Verpackung, um App herunterzuladen. b. WiFi öffnen Wählen Sie WiFi Funktion aus, drücken Sie Ok Button und die Funtkion ausschalten. Es wird WiFi Sysbol bei Display zeigen. SSID:WIMIUS Password: Noch mal drücken Sie up/wifi Button, können Sie dann WiFi Funktion ausschalten. Öffnen Sie die WiFi Ihrem Handy oder Tablet PC, suchen Sie die WiFi der Kamera und geben Sie die Password ein. Danach verwenden Sie die App durch Handy oder Tablet PC und zuerst suchen und hinzufügen Kamera ID. Wenn es fertig ist, können Sie durch App die Kamera kontrollieren und aufnehmen. 16
19 WiFi Fernbedienung mit Armband (Es ist nur fit für Kamera Q6+) Oben(Rot): Fotografie TasteUnten: Aufnahme Taste Link: Zustand Anzeiger 1 Rechte oben: Armband Schnalle Recht Uten: Zustand Anzeiger 2 Anleitung: HINWEIS: Stellen Sie sicher, dass die Kamera im Zustand des Foto-/ Aufnahme Modus ist. 1.Aufnahme A: Wenn die Kamera in Aufnahme Modus ist, drücken Sie Aufnahme Taste, blinkt der Zustand Anzeiger 1(blau) einmal, wird die Kamera aufnehmen. B: Wenn die Kamera im Foto Modus ist, drücken Sie mal Aufnahme Taste, blinkt der Zustand Anzeiger 1(blau) ein mal, wird es automatisch auf Aufnahme Modus welchseln und aufnehmen. C: Drücken Sie nochmal Aufnahme Taste, blinkt der Zustand Anzeiger 1(blau) noch einmal, wird Aufnahme beenden. 2.Fotografieren A: Wenn die Kamera in Foto Modus ist, drücken Sie Fotografie Taste, blinkt der Zustand Anzeiger 2(rot) mal und wird ein Foto machen. B: Wenn die Kamera im Aufnahme Modus ist, drücken Sie Fotografie Taste, blinkt der Zustand Anzeiger 2(rot) ein mal, wird es automatisch auf Foto Modus welchseln und fotografieren. C: Wenn die Kamera noch aufnimmt, drücken Sie Fotografie Taste, wird der Zustand Anzeiger 2(rot) mal blinken und ein Foto machen. Nach Bild Speichern wird es weiter aufnehmen. 17
20 Opérations de base 1. Allumer/éteindre Allumer Appuyez long sur le bouton Power / Mode, l'appareil photo est allumé; éteindre Appuyez long sur le bouton Power / Mode, l'appareil photo est éteint; 2. Changement de mode Mode de démarrage, appuyez sur le bouton Power / Mode pour basculer le mode;cliquez sur "OK" pour entrer dans les paramètres du menu, répétez appuyer sur le bouton l'interrupteur / Mode pour changer le mode, cliquez sur le bouton "OK" pour sélectionner l'option désirée; 3. Mode vidéo Lors de l'enregistrement, assurez-vous que l'appareil est en mode d'enregistrement; Lorsque le coin supérieur gauche de l'écran lorsque le signe " ", appuyez sur le bouton "OK" pour lancer l'enregistrement, écran vidéo et simultanément l'indicateur de fonctionnement juste en dessous du point de logo rouge clignote; Appuyez à nouveau sur "OK" pour arrêter l'enregistrement, le fonctionnement simultané de lumières et l'écran juste en dessous du logo clignotant disparaît point rouge; 18
21 4. Mode caméra Pour prendre des photos, assurez-vous que l'appareil photo en mode photo; Lorsque le coin supérieur gauche de l'écran lorsque le signe " ", appuyez sur le bouton "OK" pour commencer à prendre des photos; 5. Ralenti Vidéo Lorsque lente photographie vidéo, assurez-vous que la vidéo de la caméra en mode ralenti; Lorsque le coin supérieur gauche de l'écran lorsque le signe " ", appuyez sur le bouton "OK" pour démarrer l'enregistrement, l'indicateur d'enregistrement et de fonctionnement pendant que l'écran juste en dessous du point de logo rouge clignote; Appuyez à nouveau sur "OK" pour arrêter l'enregistrement, le fonctionnement simultané de lumières et l'écran juste en dessous du logo clignotant disparaît point rouge; 6. Time-lapse Entrez dans le menu de configuration, ouvrez la fonction d'enregistrement de retard, revenir au mode d'enregistrement; Lorsque la partie inférieure gauche de l'écran apparaît le symbole " ", appuyez sur le bouton "OK" pour démarrer l'enregistrement, l'indicateur et le fonctionnement d'enregistrement alors que l'écran juste en dessous du point de logo rouge clignote; 19
22 7. Lecture Lecture vidéo et photo Assurez-vous que l'appareil est en mode de lecture; Appuyez sur les touches Haut ou Bas pour sélectionner le bouton "OK" pour lire fichier vidéo, appuyez sur; 8. Batterie Installation et retrait de la batterie A. Utilisez vos doigts pour retirer le couvercle de la batterie pour ouvrir le compartiment de la batterie; B. Selon le signe marqué sur la batterie et le sens de la flèche, le droit d'insérer les piles dans l'appareil photo jusqu'à ce qu'il soit assis; C. Retirez la batterie, ouvrez le couvercle de la batterie pour retirer la batterie; Charge de la batterie A. Ordinateur connecté et un adaptateur d'alimentation pour la recharge; B. Dans la voiture peut également être connecté directement à un chargeur de voiture pour charger; C. Peut pendant le chargement lors de l'enregistrement; D. Peut être chargé dans l état éteint ; 20
23 9. Caméra connexion WiFi APP a.scannez le code à deux dimensions sur la boîte pour télécharger le client APP, installé sur le téléphone, l'installation apparaîtra sur votre téléphone "WIMIUS CAM" icône de l'application, cliquez sur pour accéder à l'interface de l'app "WIMIUS CAM"; b.ouvrir WIFI Sélectionnez la fonction WiFi, cliquez sur le bouton "OK" pour entrer, sélectionnez "Open" signe apparaît sur le WiFi de l'écran de la caméra: SSID: WIMIUS Mot de passe: Appuyez sur la touche haut pour quitter WIFI. Allumez la fonction WiFi de votre téléphone ou tablette, ouvrir la connexion WiFi du téléphone, le nom de la recherche à une gamme de WiFi; choisir le nom de WiFi de la Caméra, entrez un mot de passe, confirmer la connexion; Ouvre APP téléchargé "WIMIUS CAM", cliquez sur Entrée, rechercher et ajouter l'id de la caméra, vous pouvez accéder à la fonction d'enregistrement après l'achèvement; 21
24 Télécommande sans fil bracelet de contrôle (Cette partie d'introduction est adapté uniquement pour la caméra Q6+ ) Instructions Rapide: Assurez-vous que l'appareil est en mode caméra ou en mode vidéo. 1.Enregistrement Commencer l'enregistrement A. L'appareil est en mode vidéo: Appuyez sur le bouton d'enregistrement de la télécommande, "LED état 1" (bleu) clignote une fois, l'appareil photo pour commencer l'enregistrement; B. L'appareil est en mode caméra: Appuyez sur le bouton d'enregistrement de la télécommande, "LED état 1" (bleu) clignote une fois, l'appareil passe automatiquement en mode vidéo, et commencer l'enregistrement; C. Arrêter l'enregistrement: L'appareil photo pendant l'enregistrement, appuyez sur le bouton d'enregistrement de la télécommande, "LED état 1" (bleu) clignote une fois, l'enregistrement est arrêté; 2. Photographie L'appareil est en mode caméra: Appuyez sur le bouton de la caméra sur la télécommande, "LED état2" (rouge) clignote une fois, alors que l'appareil effectue la photographie; L'appareil est en mode vidéo: Appuyez sur le bouton de la caméra sur la télécommande,"led Etat 2"(rouge) clignote une fois, l'appareil passe automatiquement au mode de la caméra en photographiant; L'appareil photo pendant l'enregistrement: Appuyez sur le bouton de la caméra sur la télécommande, vous pouvez faire des photos, et "Indicateurs d'état 2" (rouge) clignote une fois, après que la caméra continue d'enregistrer; 22
25 Q6 アクションカメラ簡易マニュアル 外観について 23
26 基本操作について 1. 電源オン / オフオン電源 / モードボタンを長押すと 電源が入ります オフ電源 / モードボタンを長押すと 電源オフにします 2. モード切り替え電源が入った後 繰り返して電源 / モードボタンを押せばモード切り替えできます OK ボタンを押すと設定メニューに入ります 電源 / モードボタンを押して切り替えます OK ボタンを押して選択を確認します 3. 録画録画モードに切り替えます モニターの左上に という表示が出たら OKボタンを押して録画開始します 録画中 操作インジケータランプとモニターの下にある赤い点が点滅します OKボタンを押して録画停止します そしてランプと赤い点は消えます 4. 写真写真モードに入ります モニターの左上に という表示が出たら OKボタンを押して写真を撮ります 24
27 5. スローモーションスローモーションモードに入ります モニターの左上に という表示が出たら OK ボタンを押して録画開始します 録画中 操作インジケータランプとモニターの下にある赤い点が点滅します OK ボタンを押して録画停止します そしてランプと赤い点は消えます 6. タイムラプス設定に入ります そしてタイムラプスというオプションをオンにします そして録画モードに戻ります モニターの左下に という表示が出たら OK ボタンを押して録画開始します 録画中 操作インジケータランプとモニターの下にある赤い点が点滅します OK ボタンを押して録画停止します そしてランプと赤い点は消えます 7. 再生再生モードに入ります アップ ダウンボタンを押してファイルを選択します OK ボタンを押して再生します 8. 充電について a. パソコンや電源アダプターに接続すれば充電できます b. 車の車載充電器に接続すれば充電できます c. 充電しながら録画するのは可能です d. 電源オフの状態でも充電できます 充電時間 : 約 3 時間 25
28 9. カメラ WiFi APP の接続について 1. パッケージの箱にある二次元コードをスキャンして App をダウンロードします そして WIMIUS CAM というアプリケーションをインストールします 2.WiFi をオンにする設定の中に WiFi を選択します そして OK ボタンを押して入ります オンを選択します カメラのモニターに下記 WIFI 表示が出ます SSID:WIMIUS パスワード : アップボタンを押して WIFI 画面から戻ります スマホ又はタブレットの WIFI を開き カメラの WIFI 名称 (WIMIUS) を選択してパスワードを入力して接続します WIFI 接続完了になった後 インストールしたアプリ WIMIUS CAM を開きます クリックして入ります カメラの ID を検索して添加します 完了したら録画できます 26

29 2.4Gワイヤレス ベルト リモコン 一 外観について 写真ボタン ベルトバックル インジケータランプ2 インジケータランプ1 動画ボタン 二 操作について ご注意 カメラ本体は写真モード又は録画モードが前提です 1.録画 録画開始 a.カメラ本体は録画モードで リモコンの動画ボタンを押してインジケータ ランプ1 青 が一回点滅します カメラが録画開始します 27
30 b. カメラ本体は写真モードで リモコンの動画ボタンを押して インジケータランプ 1( 青 ) が一回点滅します カメラは自動的に録画モードに切り替え 録画開始します 録画停止 : 録画中に リモコンの動画ボタンを押してインジケータランプ 1( 青 ) が一回点滅して 録画停止になります 2. 写真 カメラ本体が写真モードで リモコンの写真ボタンを押して インジケータランプ 2( 赤 ) が一回点滅してカメラが写真を撮ります カメラ本体が録画モードで リモコンの写真ボタンを押してインジケータランプ 2( 赤 ) が一回点滅して カメラが自動的に写真モードに切り替え 写真を撮ります カメラが録画中に リモコンの写真ボタンを押して写真を撮れます インジケータランプ 2( 赤 ) が一回点滅します 写真を撮った後 録画を続けます 28
31
Q2说明书
 Q3 4K Ultra HD Waterproof 40m 2.4G remote control Warning 1. Keep it from falling and dropping. 2. Keep it away from any strong magnetic interference objects like electrical machine to avoid strong radio
2
 L C -24K 9 L C -22K 9 2 3 4 5 6 7 8 9 10 11 12 11 03 AM 04 05 0 PM 1 06 1 PM 07 00 00 08 2 PM 00 4 PM 011 011 021 041 061 081 051 071 1 2 4 6 8 5 7 00 00 00 00 00 00 00 00 30 00 09 00 15 10 3 PM 45 00
GP05取説.indb
 E -G V P 05D L V E -G P 05D W Ni-MH + + + + + + + + + + + + + + + + + + + + + + + + + + + + + + + + + + 1 + 2 + 3 + 4 + 5 + 6 1 2 3 4 5 6 + + + 1 + + + + + + + + + + + + + + + + + + 1 A B C + D + E
VE-GP32DL_DW_ZA
 VE-GP32DL VE-GP32DW 1 2 3 4 5 6 1 2 3 4 1 1 2 3 2 3 1 1 2 2 2006 Copyrights VisionInc. @. _ & $ % + = ^ @. _ & $ % + = ^ D11 D12 D21
2
 L C -60W 7 2 3 4 5 6 7 8 9 0 2 3 OIL CLINIC BAR 4 5 6 7 8 9 2 3 20 2 2 XXXX 2 2 22 23 2 3 4 5 2 2 24 2 2 25 2 3 26 2 3 6 0 2 3 4 5 6 7 8 9 2 3 0 2 02 4 04 6 06 8 08 5 05 2 3 4 27 2 3 4 28 2 3 4 5 2 2
取説_VE-PV11L(応用編)
") * 0 # VE-PV11L VE-PVC11L VE-PS109N 1 2 3 4 5 6 7 8 9 C H H H C H H H C C CAUTION:These telephones are for use in Japan only. They cannot be used in other countries because of differences in voltages, telephone
* 0 # VE-PV11L VE-PVC11L VE-PS109N 1 2 3 4 5 6 7 8 9 C H H H C H H H C C CAUTION:These telephones are for use in Japan only. They cannot be used in other countries because of differences in voltages, telephone
PFQX2227_ZA
 V E -G P 05D B Ni-MH 1 2 3 4 5 6 1 2 3 4 5 6 A B C D E F 1 2 A B C 1 2 3 2 0 7 9 4 6 6 4 7 9 1 2 3 # 6 6 2 D11 D12 D21 D22 19 # # # # Ni-MH Ω Ω
by CASIO W61CA For Those Requiring an English/Chinese Instruction
 by CASIO W61CA http://www.au.kddi.com/torisetsu/index.html http://www.au.kddi.com/manual/index.html For Those Requiring an English/Chinese Instruction Manual English/Chinese Simple Manual can be read on
SDR-S7_J(80).indb
.indb") SDR-S7 SDR-S7 C 2008 Matsushita Electric Industrial Co., Ltd.All Rights Reserved. F0408KS0 (700 ) VQT1R80 The English Quick guide is indicated on P100 to P103. Refer to the pages if you prefer English.
SDR-S7 SDR-S7 C 2008 Matsushita Electric Industrial Co., Ltd.All Rights Reserved. F0408KS0 (700 ) VQT1R80 The English Quick guide is indicated on P100 to P103. Refer to the pages if you prefer English.
C H H H C H H H C C CUTION:These telephones are for use in Japan only. They cannot be used in other countries because of differences in voltages, tele
 VE-PV01LVE-PVW01LVE-PVC01L 1 4 7 2 3 5 6 8 9 * 0 # C H H H C H H H C C CUTION:These telephones are for use in Japan only. They cannot be used in other countries because of differences in voltages, telephone
2 3
 RR-XR330 C Matsushita Electric Industrial Co., Ltd.2001 2 3 4 + - 5 6 1 2 3 2 1-3 + + - 22 +- 7 22 8 9 1 2 1 2 1 2 3 12 4 1 2 5 12 1 1 2 3 1 2 1 2 10 11 1 2 $% 1 1 2 34 2 % 3 % 1 2 1 2 3 1 2 12 13 1 2
C-720 Ultra Zoom 取扱説明書
 C-720 Ultra Zoom 2 3 4 1 2 3 4 5 5 6 7 6 8 9 7 10 8 ~ ~ 9 ~ ~ ~ ~ ~ ~ ~ ~ ~ ~ 10 ~ ~ ~ 11 12 13 14 ÑñÉí 15 16 ~ 8 1 2 3 4 5 6 7 $ % ^ & 9 ISO 100 0! @ # 1 2 3 4 5 6 7 8 17 $ % ^ & 9 ISO 100 0! @ # 9 0!
取扱説明書_KX-PW100CL
 See pages 236 238 for English Guide. KX-PW100CL Ni-MH KX-PW100CL-W KX-FKN100-W 1 2 NTT NTT 1 4 3 4 5 6
VE-GD21DL_DW_ZB
 V E-G D21D L V E-G D21D W 1 2 3 4 1 2 1 2 1 2 2 1 2 3 1 2 3 1 2 3 1 4 4 2 3 5 5 1 2 3 4 1 2 3 1 2 3 4 1 2 3 2006 Copyrights VisionInc. @. _ & $ % + = ^ 2011
 VE-SV03DL VE-SV03DW Ni-MH Ni-MH Ni-MH 1 2 3 1 2 Ni-MH 3 4 5 I H 3 IH IH IH IH 2 0 4 6 6 1 2 3 # 6 6 4 I H I H I H I H I H I H I H NTT Ni-MH Ni-MH Ni-MH Ω 0570-087-087
取説_KX-PW38CL_PW48CL
 KX-PW38CL KX-PW48CL See pages 260 and 261 for English Guide. 2 3 1 2 NTT NTT Ni-Cd Ni-Cd 1 2 3 4 5 6 7 8 9 0 1 2 3 4 5 6 7 8 9 0 1 2 3 4 5 6 7 8 9 0 0 6 1 2 3
Microsoft Word - Win-Outlook.docx
 Microsoft Office Outlook での設定方法 (IMAP および POP 編 ) How to set up with Microsoft Office Outlook (IMAP and POP) 0. 事前に https://office365.iii.kyushu-u.ac.jp/login からサインインし 以下の手順で自分の基本アドレスをメモしておいてください Sign
BS・110度CSデジタルハイビジョンチューナー P-TU1000JS取扱説明書
 C S0 CS Digital Hi-Vision Tuner C C C C S0-0A TQZW99 0 C C C C 4 5 6 7 8 9 C C C C C C C C C C C C C C C C C C C C C C C 0 FGIH C 0 FGIH C C C FGIH FG IH FGIH I H FGIH FGIH 0 C C # $ IH F G 0 # $ # $
RR-US470 (RQCA1588).indd
.indd") RR-US470 Panasonic Corporation 2006 2 3 4 http://www.sense.panasonic.co.jp/ 1 2 3 ( ) ZOOM 5 6 7 8 9 10 4 2 1 3 4 2 3 1 3 11 12 1 4 2 5 3 1 2 13 14 q φ φ 1 2 3 4 3 1 2 3 4 2 3 15 16 1 2 3 [/]p/o 17 1 2
RR-US470 Panasonic Corporation 2006 2 3 4 http://www.sense.panasonic.co.jp/ 1 2 3 ( ) ZOOM 5 6 7 8 9 10 4 2 1 3 4 2 3 1 3 11 12 1 4 2 5 3 1 2 13 14 q φ φ 1 2 3 4 3 1 2 3 4 2 3 15 16 1 2 3 [/]p/o 17 1 2
取説_KX-PW101CL_PW102CW
 See pages 270 and 271 for English Guide. KX-PW101CL KX-PW102CW Ni-Cd F1 F1 F2 F4 F1 F2 F4 F1 F2 F4 2 1 2 Ni-Cd Ni-Cd NTT NTT F1 F1 F1 F1 F1 F1 F1 F1 F4 F4 F4 F1 F4 F1
*Ł\”ƒ‚ä(CV03)
") VE-CV03 VE-CVW03 VE-CV03 VE-CVW03 Ni-Cd C C BC BC C C C C C C C C C C A C C C A A # $ % & ' # $ 64 A A A A ( A % & ' ( ) ) A * A + A * +, - /. 0/ 10 21 32 53, A - A A. A A / A 0 A 1 A 2 A A A A 3 4 #
VE-CV03 VE-CVW03 VE-CV03 VE-CVW03 Ni-Cd C C BC BC C C C C C C C C C C A C C C A A # $ % & ' # $ 64 A A A A ( A % & ' ( ) ) A * A + A * +, - /. 0/ 10 21 32 53, A - A A. A A / A 0 A 1 A 2 A A A A 3 4 #
Microsoft Word - KUINS-Air_W10_ docx
 KUINS-Air 無線 LAN への接続 (Windows10) How to connect to Wi-Fi KUINS-Air (Windows10) 2019 年 7 月 KUINS-Air への接続には A ID パスワードを使用した接続 もしくは B クライアント証明書を使用した接続方法の 2 種類があります There are 2 ways to connect to KUINS-Air,
0 C C C C C C C
 C * This device can only be used inside Japan in areas that are covered by subscription cable TV services. ecause of differences in broadcast formats and power supply voltages, it cannot be used in overseas
19_22_26R9000操作編ブック.indb
 8 19R900022R900026R9000 25 34 44 57 67 2 3 4 10 37 45 45 18 11 67 25 34 39 26 32 43 7 67 7 8 7 9 8 5 7 9 21 18 19 8 8 70 8 19 7 7 7 45 10 47 47 12 47 11 47 36 47 47 36 47 47 24 35 8 8 23 12 25 23 OPEN
2 3 12 13 6 7
 2 8 17 42ZH700046ZH700052ZH7000 28 43 54 63 74 89 2 3 12 13 6 7 3 4 11 21 34 63 65 8 17 4 11 4 55 12 12 10 77 56 12 43 43 13 30 43 43 43 43 10 45 14 25 9 23 74 23 19 24 43 8 26 8 9 9 4 8 30 42 82 18 43
H8000操作編
 8 26 35 32H800037H800042H8000 49 55 60 72 2 3 4 48 7 72 32 28 7 8 9 5 7 9 22 43 20 8 8 8 8 73 8 13 7 7 7 55 10 49 49 13 37 49 49 49 49 49 49 12 50 11 76 8 24 26 24 24 6 1 2 3 18 42 72 72 20 26 32 80 34
WARNING To reduce the risk of fire or electric shock,do not expose this apparatus to rain or moisture. To avoid electrical shock, do not open the cabi
 ES-600P Operating Instructions WARNING To reduce the risk of fire or electric shock,do not expose this apparatus to rain or moisture. To avoid electrical shock, do not open the cabinet. Refer servicing
Z7000操作編_本文.indb
 2 8 17 37Z700042Z7000 46Z7000 28 42 52 61 72 87 2 3 12 13 6 7 3 4 11 21 34 61 8 17 4 11 4 53 12 12 10 75 18 12 42 42 13 30 42 42 42 42 10 62 66 44 55 14 25 9 62 65 23 72 23 19 24 42 8 26 8 9 9 4 11 18
0 C C C C C C
 C TU-HD50 TUNER TU - HD50 0 TU-HD50 C C C C S00-06C D D D 0 C C C C 4 5 6 7 8 9 C C C C C C C C C C C C C C C C C C C C C C TUNER TU - HD50 FGIH 0 C C C 0 FGIH C C C C C C FGIH FG IH FGIH I H FGIH FGIH
;y ;y ;; yy ;y;; yy y;y;y;y ;y; ;; yy ; y Portable CD player Operating Instructions RQT5364-S
 ;y ;y ;; yy ;y;; yy y;y;y;y ;y; ;; yy ; y Portable CD player Operating Instructions -S + - + - 1 3 K 2 - + H K Ni-Cd A.SHOCK S-XBS HOLD HOLD HOLD HOLD ( 1; 1; 6 VOLUME 5 4 1; A.SHOCK S-XBS RANDOM NOR
 L C -6D Z3 L C -0D Z3 3 4 5 6 7 8 9 10 11 1 13 14 15 16 17 OIL CLINIC BAR 18 19 POWER TIMER SENSOR 0 3 1 3 1 POWER TIMER SENSOR 3 4 1 POWER TIMER SENSOR 5 11 00 6 7 1 3 4 5 8 9 30 1 3 31 1 3 1 011 1
LC-24_22_19K30.indb
 L C -24K 30 L C -22K 30 L C -19K 30 http://www.sharp.co.jp/support/aquos/ 2 3 4 5 6 7 8 LC-24K30 9 10 11 12 LC-24K30 8 10 PM 11 12 9 PM 13 10 PM 14 11 15 PM 16 0 17 AM 1 3 101 103 00 00 30 50 00 00 00
Microsoft Word - PrivateAccess_UM.docx
 `````````````````SIRE Page 1 English 3 日本語 7 Page 2 Introduction Welcome to! is a fast, simple way to store and protect critical and sensitive files on any ixpand Wireless Charger. Create a private vault
2
 8 23 26A800032A8000 31 37 42 51 2 3 23 37 10 11 51 4 26 7 28 7 8 7 9 8 5 6 7 9 8 17 7 7 7 37 10 13 12 23 21 21 8 53 8 8 8 8 1 2 3 17 11 51 51 18 23 29 69 30 39 22 22 22 22 21 56 8 9 12 53 12 56 43 35 27
2
 8 22 19A800022A8000 30 37 42 49 2 3 22 37 10 11 49 4 24 27 7 49 7 8 7 9 8 5 6 7 9 8 16 7 7 7 37 10 11 20 22 20 20 8 51 8 8 9 17 1 2 3 16 11 49 49 17 22 28 48 29 33 21 21 21 21 20 8 10 9 28 9 53 37 36 25
 6 50G5S 3 34 47 56 63 http://toshibadirect.jp/room048/ 74 8 9 3 4 5 6 3446 4755 566 76373 7 37 3 8 8 3 3 74 74 79 8 30 75 0 0 4 4 0 7 63 50 50 3 3 6 3 5 4 4 47 7 48 48 48 48 7 36 48 48 3 36 37 6 3 3 37
 6 3 34 50G5 47 56 63 74 8 9 3 4 5 6 3446 4755 566 76373 7 37 3 8 8 3 3 74 74 79 8 30 75 0 0 4 4 0 7 63 50 50 3 3 6 3 5 4 4 47 7 48 48 48 48 7 36 48 48 3 36 37 6 3 3 37 9 00 5 45 3 4 5 5 80 8 8 74 60 39
LC304_manual.ai
 Stick Type Electronic Calculator English INDEX Stick Type Electronic Calculator Instruction manual INDEX Disposal of Old Electrical & Electronic Equipment (Applicable in the European Union
 6 4 45 ZS7ZS4ZS 5 59 7 8 94 05 4 5 6 4 5 5 6 8 8 40 45 48 56 60 64 66 66 68 7 78 80 8 7 8 0 0 0 90 0 0 4 4 4 4 6 57 64 69 66 66 66 69 4 0 7 48 5 4 4 5 4 4 4 7 46 46 6 46 8 46 48 46 46 4 46 46 4 4 5 4
 6 4 4 9RERE6RE 5 5 6 7 8 9 4 5 6 4 4 5 6 8 4 46 5 7 54 58 60 6 69 7 8 0 9 9 79 0 4 0 0 4 4 60 6 9 4 6 46 5 4 4 5 4 4 7 44 44 6 44 8 44 46 44 44 4 44 0 4 4 5 4 8 6 0 4 0 4 4 5 45 4 5 50 4 58 60 57 54
 5 30 B36B3 4 5 56 6 7 3 4 39 4 69 5 56 56 60 5 8 3 33 38 45 45 7 8 4 33 5 6 8 8 8 57 60 8 3 3 45 45 8 9 4 4 43 43 43 43 4 3 43 8 3 3 7 6 8 33 43 7 8 43 40 3 4 5 9 6 4 5 56 34 6 6 6 6 7 3 3 3 55 40 55
2
 8 23 32A950S 30 38 43 52 2 3 23 40 10 33 33 11 52 4 52 7 28 26 7 8 8 18 5 6 7 9 8 17 7 7 7 38 10 12 9 23 22 22 8 53 8 8 8 8 1 2 3 17 11 52 52 19 23 29 71 29 41 55 22 22 22 22 22 55 8 18 31 9 9 54 71 44
4. Advanced Options をクリックする 5. Startup Settings をクリックする 6. Restart をクリックする
 注意 : 本取扱説明書はメーカ (ROTRONIC AG / スイス ) から発行されている次の書類 ( 原文 ) の和訳を基に作成さ れています 原文と和訳とで解釈が異なる部分があれば原本を参照いただけますようお願いします 原文 How to install unsinged drivers in WIN8 (SD_HW4_0067.docx) 本書最後尾に添付 症状 Windows 8 において
 6 4 45 7ZS 5 59 7 8 94 05 4 5 6 4 5 5 6 8 8 40 45 48 56 60 64 66 66 68 7 78 80 8 7 8 0 0 0 90 0 57 64 69 66 66 69 0 4 4 4 4 4 0 7 48 5 4 4 5 4 4 4 7 46 46 6 46 8 46 48 46 46 4 46 46 4 4 5 4 6 4 9 9 0
TH-42PAS10 TH-37PAS10 TQBA0286
 TH-42PAS10 TH-37PAS10 TQBA0286 2 4 8 10 11 17 18 20 21 22 23 24 25 26 27 28 29 30 31 32 33 38 42 44 46 50 51 52 53 54 3 4 5 6 7 8 3 4 1 2 9 5 6 1 4 2 3 5 6 10 11 1 2 3 4 12 13 14 TH-42PAS10 TH-42PAS10
fx-9860G Manager PLUS_J
 fx-9860g J fx-9860g Manager PLUS http://edu.casio.jp k 1 k III 2 3 1. 2. 4 3. 4. 5 1. 2. 3. 4. 5. 1. 6 7 k 8 k 9 k 10 k 11 k k k 12 k k k 1 2 3 4 5 6 1 2 3 4 5 6 13 k 1 2 3 1 2 3 1 2 3 1 2 3 14 k a j.+-(),m1
RQT8189-S.indd
 A Operating Instructions Portable CD Player SL-CT730 BATTERY CARRYING CASE SL-CT730 SL-CT830 RQT8189-S F0805SZ0 OPEN OPEN + - + - DC IN SL-CT730SL-CT830 DC IN EXT BATT DC IN () SL-CT730 SL-CT830 SL-CT730
2
 8 24 32C800037C800042C8000 32 40 45 54 2 3 24 40 10 11 54 4 7 54 30 26 7 9 8 5 6 7 9 8 18 7 7 7 40 10 13 12 24 22 22 8 55 8 8 8 8 1 2 3 18 11 54 54 19 24 30 69 31 40 57 23 23 22 23 22 57 8 9 30 12 12 56
ProVisionaire Control V3.0セットアップガイド
 ProVisionaire Control V3 1 Manual Development Group 2018 Yamaha Corporation JA 2 3 4 5 NOTE 6 7 8 9 q w e r t r t y u y q w u e 10 3. NOTE 1. 2. 11 4. NOTE 5. Tips 12 2. 1. 13 3. 4. Tips 14 5. 1. 2. 3.
+ -
 i i C Matsushita Electric Industrial Co., Ltd.2001 -S F0901KK0 seconds ANTI-SKIP SYSTEM Portable CD player Operating Instructions -S + - + - 9 BATTERY CARRYING CASE K 3 - + 2 1 OP 2 + 3 - K K http://www.baj.or.jp
入学検定料支払方法の案内 1. 入学検定料支払い用ページにアクセス ポータルの入学検定料支払いフォームから 入学検定料支払い用 URL の ここをクリック / Click here をクリックしてください クリックを行うと 入学検定料支払い用のページが新たに開かれます ( 検定料支払い用ページは ポ
 Keio Academy of New York Admissions Portal 入学検定料支払方法の案内 < 日本語 :P1 ~ 7> Page1 入学検定料支払方法の案内 1. 入学検定料支払い用ページにアクセス ポータルの入学検定料支払いフォームから 入学検定料支払い用 URL の ここをクリック / Click here をクリックしてください クリックを行うと
Introduction Purpose This training course describes the configuration and session features of the High-performance Embedded Workshop (HEW), a key tool
, a key tool") Introduction Purpose This training course describes the configuration and session features of the High-performance Embedded Workshop (HEW), a key tool for developing software for embedded systems that
Introduction Purpose This training course describes the configuration and session features of the High-performance Embedded Workshop (HEW), a key tool for developing software for embedded systems that
Microsoft PowerPoint _QSG AIR PRO WiFi_iphone.ppt
 P - [ ion アプリ ] iphone と WiFi 接続 STEP WiFi PODZ の電源をいれてください ランプが青く光ります ウォームアップに 5 秒ほどかかり 通信が可能になると点滅し始めます バッテリー残量が少なくなると WiFi 接続が不安定になることがあります その場合には フル充電後に再度お試しください! 注意! WiFi PODZ のファームウェアが最新でない場合 ion
C FGIH C C C C C C C C C C C C C C C C C C C C C C C C C C C C C C C C C C C C C C C C C C C C C C C C C C C C C C C
 TUDSR5SET TUDSR5 C 7 8 9 ch DIGITAL CS TUNER C C C C S-A C FGIH C C C C C C C C C C C C C C C C C C C C C C C C C C C C C C C C C C C C C C C C C C C C C C C C C C C C C C C C C C C C C C C C C C C C C
Microsoft Word - KUINS-Air_W8.1_ docx
 KUINS-Air 無線 LAN への接続 (Windows8.1) How to connect to Wi-Fi KUINS-Air (Windows8.1) 2019 年 7 月 KUINS-Air への接続には A ID パスワードを使用した接続 もしくは B クライアント証明書を使用した接続方法の 2 種類があります There are 2 ways to connect to KUINS-Air,
2 3
 * This device can only be used inside Japan in areas that are covered by subscription cable TV services. Because of differences in broadcast formats and power supply voltages, it cannot be used in overseas
 5 7 3AS40AS 33 38 45 54 3 4 5 4 9 9 34 5 5 38 6 8 5 8 39 8 78 0 9 0 4 3 6 4 8 3 4 5 9 5 6 44 5 38 55 4 4 4 4 5 33 3 3 43 6 6 5 6 7 3 6 0 8 3 34 37 /78903 4 0 0 4 04 6 06 8 08 /7 AM 9:3 5 05 7 07 AM 9
2
 8 26 38 37Z800042Z800047Z8000 54 65 72 83 101 2 3 4 7 101 53 27 33 7 8 9 5 7 9 22 47 72 8 8 8 8 102 8 13 7 7 7 65 10 67 67 13 71 40 67 67 67 67 43 67 12 55 55 11 104 8 24 26 24 20 25 6 1 2 3 18 46 101
% + RP-BC30 BATTERY CHARGER STAND K -! # % $ $ % % # $ $ $ %
 i C /RF-ND70R/RF-ND70R 3 4 3 4 5 6 7 % 8 5 6 7 8 9 : ;! # < = > #? @ 9 : ; < = >? @ % + RP-BC30 BATTERY CHARGER STAND K -! % @ # % $ $ % %! @ % # $ $ $ % % % % 3 %! @ % # $ % % % @ $ ! @ % # $ % ^ % ^
C C C - J TH-D TH-D TH-D C C C C C - J TH-D TH-D TH-D C - J TH-D TH-D TH-D C C C C
 C Matsushita Electric Industrial Co., Ltd. - J TH-D TH-D TH-D C C C C - J TH-D TH-D TH-D C C C C C - J TH-D TH-D TH-D C - J TH-D TH-D TH-D C C C C - J FGIH FGIH FG IH FGIH F G FGIH - J c c c c c c C C
MENU 키를 누르면 아래의 화면이 나타납니다
 Stand-Alone Digital Video Recorder Advanced MPEG-4 DVR 16 Channel Models クライアントソフト 再インストールマニュアル くまざわ書店専用 日本語版 1 V1.07-n307 This document contains preliminary information and subject to change without notice.
;y ;y;y;y ;; yy ;y;y;y Portable CD player Operating Instructions RQT5496-S
 ;y ;y;y;y ;; yy ;y;y;y Portable CD player Operating Instructions -S + - + - 1 K C - + 2 3 K - - + - + 2 1 HOLD HOLD HOLD HOLD ( ( 1; ( VOLUME 6 5 4 1; S-XBS A.SHOCK HOLD HOLD 1 Ë 1; 1; RESUME RANDOM
SILAND.JP テンプレート集
 CMSClient ieye ユーザーマニュアル ネットワークカメラ 第 1 版 作成者日本エレコ株式会社 作成日 2018 年 5 月 最終更新日 2018 年 5 月 1 / 17 日本エレコ株式会社 目次 目次... 2 PC ソフト CMSClient インストール... 3 ログイン... 3 カメラの登録... 4 カメラの映像を表示... 5 旋回操作... 6 アイコン説明... 6
*Ł\”ƒ‚ä(DCH800)
") B B B B B B B B B C * This device can only be used inside Japan in areas that are covered by subscription cable TV services. Because of differences in broadcast formats and power supply voltages, it cannot
B B B B B B B B B C * This device can only be used inside Japan in areas that are covered by subscription cable TV services. Because of differences in broadcast formats and power supply voltages, it cannot
スライド 1
 P Android と WiFi 接続 (version. 以上 ) STEP WiFi PODZ の電源を入れてください ランプが青く点灯します ウォームアップに 5 秒ほどかかります WiFi 通信が可能になると 点滅を開始します バッテリー残量が少なくなると WiFi 接続が不安定になることがあります その場合は バッテリーをフル充電してください! 注意! WiFi PODZ のファームウェアが最新でない場合
2 3 12 13 6 7
 02 08 22AV55026AV550 17 25 32 22AV550 26AV550 39 50 2 3 12 13 6 7 3 4 11 8 8 9 9 8 9 23 8 9 17 4 11 4 33 12 12 11 24 18 12 10 21 39 21 4 18 18 45 45 11 5 6 7 76 39 32 12 14 18 8 1 2 32 55 1 2 32 12 54
2
 L C -32D H 6 2 3 4 5 6 7 8 9 4444444444 4444444 444444444 0 2 3 OIL CLINIC BAR 4 5 6 7 88 9 2020 2 22 23 4 4 5 6 7 8 9 0 2 2424 25 26 27 2828 2 3 29 2 3030 3 3232 5 33 3434 35 3636 37 2 3838 3 2 3 2 3
32C2100操作編ブック.indb
 02 08 32C2100 18 24 31 37 2 3 12 13 6 7 68 67 41 42 33 34 3 4 11 8 18 4 11 4 22 13 23 11 23 12 13 14 15 10 18 19 20 20 10 9 20 18 23 22 8 8 22 9 9 4 30 10 10 11 5 13 13 16 15 26 24 37 40 39 6 7 8 1 2 29
取説_VECV02L/CVW02L
 * 0 # 1 2 3 * 0 # 4 5 6 7 8 9 1 2 3 4 5 6 7 8 9 C C R 7 8 9 * 0 # C C C C 1 2 3 4 5 6 7 8 9 0 # 1 2 3 4 5 6 7 8 9 * 0 # C C () 1 4 2 3 7 5 6 8 9 * 0 # C C 035678 C 1 2 3 4 5 6 C C C 035678 CAUTION:These
C 04 D 10 D 11 D 12 D A 14 D 16 D 17 D 18 D 19 D 419 29 D A A A 33 D 2933 2028 3445 20 D A 21 D 22 D 23 D 23 D 24 D 27 D 34 D 35 D 36 D 38 D A A 40 D
 C C D D D D D D C Matsushita Electric Industrial Co., Ltd.All Rights Reserved. C 04 D 10 D 11 D 12 D A 14 D 16 D 17 D 18 D 19 D 419 29 D A A A 33 D 2933 2028 3445 20 D A 21 D 22 D 23 D 23 D 24 D 27 D 34
Introduction Purpose This training course demonstrates the use of the High-performance Embedded Workshop (HEW), a key tool for developing software for
, a key tool for developing software for") Introduction Purpose This training course demonstrates the use of the High-performance Embedded Workshop (HEW), a key tool for developing software for embedded systems that use microcontrollers (MCUs)
Introduction Purpose This training course demonstrates the use of the High-performance Embedded Workshop (HEW), a key tool for developing software for embedded systems that use microcontrollers (MCUs)
VQT3Y03-1 HC-V100M The English Quick Reference Guide is indicated on P98 to 100. Refer to the pages if you prefer English.
 VQT3Y03-1 HC-V100M The English Quick Reference Guide is indicated on P98 to 100. Refer to the pages if you prefer English. 準備 基本 応用 撮影 応用 再生 HDMI パソコンで使う 大事なお知らせなど Quick Reference Guide コピー / ダビング 付属品
IPCClient(英語)の使用方法
の使用方法") IPCClient( 英語 ) の使用方法 1. ダウンロードされた pcsoft2.zip ファイルを解凍して下さい 2. NC004.exe を起動して下さい (NC003 でも使用可能です ) 3. 下記画面の操作方法に沿って ソフトをインストールして下さい (1) 确定 をクリックして下さい (2) Next をクリックして下さい (3) Browse... で保存場所を指定して Next
IPCClient( 英語 ) の使用方法 1. ダウンロードされた pcsoft2.zip ファイルを解凍して下さい 2. NC004.exe を起動して下さい (NC003 でも使用可能です ) 3. 下記画面の操作方法に沿って ソフトをインストールして下さい (1) 确定 をクリックして下さい (2) Next をクリックして下さい (3) Browse... で保存場所を指定して Next
01Ł\”ƒDV700D
 PWR RET RETURN TITLE SUBTITLE AUDIO ANGLE OSD STOP MENU PAUSE REPEAT TRACK GRP TITLE / CHAPTER PLAY T E X T DVD-VIDEO/VIDEO CD/CD PLAYBACK DIGITAL OUTPUT 96 khz 24 bit D/A CONVERTER 1 2 3 4 5 6 7 8 9 CX-DV700
OUTSIDE FRONT COVER Setup Guide セットアップ ガイド C M Y K PMS 3005
 OUTSIDE FRONT COVER Setup Guide セットアップ ガイド C M Y K PMS 3005 Microsoft Surface Hub with 55 display MS Surface Hub Setup Guide English This guide assumes youʼve already unpacked and mounted Microsoft Surface
HA8000シリーズ ユーザーズガイド ~BIOS編~ HA8000/RS110/TS10 2013年6月~モデル
 P1E1M01500-3 - - - LSI MegaRAID SAS-MFI BIOS Version x.xx.xx (Build xxxx xx, xxxx) Copyright (c) xxxx LSI Corporation HA -0 (Bus xx Dev
4 How to Print Cards When you want to print Select the cards you would like to print from your WORD LIST. About the WORD LIST To print multiple cards,
 5 Flash Cards Maker APRICOT Publishing www.apricot-plaza.co.jp 4 How to Print Cards When you want to print Select the cards you would like to print from your WORD LIST. About the WORD LIST To print multiple
FTDI Driver Error and Recovery Procedure Check FTDI driver operation Rev :OK, Rev :NG, Rev :NG May 11, 2017 CHECK FTDI DRIVER
 FTDI Driver Error and Recovery Procedure Check FTDI driver operation Rev. 2.08.02:OK, Rev. 2.08.24:NG, Rev. 2.12.06:NG May 11, 2017 CHECK FTDI DRIVER VERSION 1. Connect FTDI device to PC FTDI デバイスを PC
H2000操作編ブック.indb
 02 08 18 32H200037H200042H2000 26 37 46 53 2 3 12 13 6 7 37 29 40 42 38 78 79 3 4 11 40 29 42 9 9 8 8 10 18 27 27 38 38 38 20 19 39 13 13 11 48 12 13 38 38 14 43 8 4 11 25 24 4 38 22 24 10 9 18 24 4 36
Pill Speaker Quick Start Guide
 USER GUIDE Table of Contents Pill 4 6 6 Pill 10 12 12 Pill 16 18 18 Pill 22 24 24 EN Setting up your Pill 28 Technical Specifications 30 Important Safety Information 30 :03 1 2 3 4 5 6 7 8 Pill 1. / Pill
P (32LX10)
") D D D D D D C Matsushita Electric Industrial Co., Ltd. D D D 2 04 D 08 D 10 D A A A A 16 D 17 D 18 D A 19 D A A A A 26 417 1825 2641 D A A A A 35 D 36 D A A 38 D 41 D 42 D 51 D 52 D 54 D 56 D A A 64 D
D D D D D D C Matsushita Electric Industrial Co., Ltd. D D D 2 04 D 08 D 10 D A A A A 16 D 17 D 18 D A 19 D A A A A 26 417 1825 2641 D A A A A 35 D 36 D A A 38 D 41 D 42 D 51 D 52 D 54 D 56 D A A 64 D
untitled
 CHAP. 1 ---------------------------------------------------------------- 5 1-1. ---------------------------------------------------------------- 5 1-2. ----------------------------------------------------------------
内蔵ハードディスクユニット-20GB (PG-HD2E4H) 内蔵ハードディスクユニット-40GB (PG-HD4E4H)取扱説明書 HARD DISK DRIVE 20GB(PG-HD2E4H) HARD DISK DRIVE 40GB(PG-HD4E4H) USER'S GUIDE
 内蔵ハードディスクユニット-40GB (PG-HD4E4H)取扱説明書 HARD DISK DRIVE 20GB(PG-HD2E4H) HARD DISK DRIVE 40GB(PG-HD4E4H) USER'S GUIDE") B7FY-0351-02 J E J 1 J 1 2 3 2 4 J 3 4 Preface Thank you very much for purchasing the hard disk drive. This hard disk drive provides a IDE interface and can be installed in the 3.5-inch storage bay of
B7FY-0351-02 J E J 1 J 1 2 3 2 4 J 3 4 Preface Thank you very much for purchasing the hard disk drive. This hard disk drive provides a IDE interface and can be installed in the 3.5-inch storage bay of
MD-DP700
 ENGLISH QUICK START GUIDE... Page 27 200 100 ;; RELEASE LOCK EQ-JAZZ EQ-DANCE EQ-VOCAL SR-HALL SR-ARENA EQ-POPS EQ-ROCK SR-CLUB EQ-HEAVY EQ-SOFT SR-LABO EQ-FLAT EQ-USER2 EQ-USER1 SR-OFF ;y
32_42H3000操作編ブック.indb
 02 08 32H300037H300042H3000 19 28 40 50 60 2 3 12 13 6 7 3 4 11 44 32 46 9 9 8 8 10 29 42 19 42 42 42 22 20 41 13 16 13 11 52 12 13 42 42 14 47 8 4 11 27 26 4 42 24 26 10 9 19 26 4 11 10 44 29 42 42 13
NSR-500 Installation Guide
 NSR Installation Guide This information has been prepared for the professional installers not for the end users. Please handle the information with care. Overview This document describes HDD installation
 02 08 32C700037C700042C7000 17 25 32 39 50 2 3 12 13 6 7 3 4 11 8 8 9 9 8 9 23 8 9 17 4 11 4 33 12 12 11 24 18 12 10 21 39 21 4 11 18 45 5 6 7 76 39 32 12 14 18 8 1 2 31 55 1 2 31 12 54 54 9 1 2 1 2 10
323742RH500操作編.indb
 02 08 18 32RH50037RH50042RH500 28 43 49 60 56 69 2 3 12 13 6 7 3 4 11 22 34 20 9 9 8 8 30 43 43 43 30 43 XX 45 15 50 12 12 11 27 40 12 43 43 13 8 4 11 27 4 26 56 24 24 9 24 17 26 4 10 10 XX 19 42 64 30
ZV500操作編_本文.indb
 2 8 17 37ZV50042ZV500 28 42 52 61 72 87 2 3 12 13 6 7 3 4 11 21 34 61 8 17 4 11 4 53 12 12 10 75 18 12 42 42 13 30 42 42 42 42 10 44 55 14 25 9 62 65 23 72 23 19 24 42 8 26 8 9 9 4 11 10 18 41 80 5 6 7
I N S T R U M E N T A T I O N & E L E C T R I C A L E Q U I P M E N T STW Symbol Symbol otary switch) 05 otary switch Symbol angle of notch 181
 05 otary switch Symbol angle of notch 181") These items are using an aluminum alloy cast, so the weight is corrosion-resistant and excel halo tolerance and is light-weight and it's about 1/3 compared with conventional cast iron and made of steel
These items are using an aluminum alloy cast, so the weight is corrosion-resistant and excel halo tolerance and is light-weight and it's about 1/3 compared with conventional cast iron and made of steel
NSR-500 Create DVD Installer Procedures
 Creating NSR-500 DVD Installer Overview This document describes how to create DVD installer for the NSR-500 series. Applicable Model NSR-500 Series To be required * Windows (XP, Vista or 7) installed PC
1 アプリを起動して図 2 の Add Camera をタッチして下さい 2 外装箱或いはカメラ腹部に貼ってあるラベルの左下の部位にあるカメラ ID( 図 8) を図 5 の Camera ID 項目に手で入れます そしてお好きなカメラの名前を Name に入れた上 Password にパスワード
 を図 5 の Camera ID 項目に手で入れます そしてお好きなカメラの名前を Name に入れた上 Password にパスワード") 日本語版スマートフォン設定マニュアル (ios) カメラに電源と有線 LAN ケープルを繋がってる状態で設定してください ( 必ず有線 LAN ケープルをカメラからルーターに繋いでください ) 1. 無料アプリをダウンロードします App Store から P2PWIFICAM2 というアプリ ( 図 1) を検索し ダウンロードして下さい 図 1 P2PWIFICAM2 のアイコン 2.QR コードでカメラの登録設定を行う
日本語版スマートフォン設定マニュアル (ios) カメラに電源と有線 LAN ケープルを繋がってる状態で設定してください ( 必ず有線 LAN ケープルをカメラからルーターに繋いでください ) 1. 無料アプリをダウンロードします App Store から P2PWIFICAM2 というアプリ ( 図 1) を検索し ダウンロードして下さい 図 1 P2PWIFICAM2 のアイコン 2.QR コードでカメラの登録設定を行う
Technische Beschreibung P82R SMD
 P26 halstrup-walcher GmbH http://www.krone.co.jp/ Stegener Straße 10 D-79199 Kirchzarten, Germany 124-0023 2-22-1 TEL:03-3695-5431 FAX:03-3695-5698 E-MAIL:sales-tokyo@krone.co.jp 530-0054 2-2-9F TEL:06-6361-4831
学部ゼミ新規申請方法 (Blackboard 9.1) Seminar Application Method for Undergraduate Seminar Courses ゼミ新規申請は Blackboard で受け付けます! 次セメスターにゼミ履修を希望する学生は 下記マニュアルに従ってゼミ
 Seminar Application Method for Undergraduate Seminar Courses ゼミ新規申請は Blackboard で受け付けます! 次セメスターにゼミ履修を希望する学生は 下記マニュアルに従ってゼミ") ゼミ新規申請は Blackboard で受け付けます! 次セメスターにゼミ履修を希望する学生は 下記マニュアルに従ってゼミ新規申請を行ってください 現在 ゼミを履修している場合は 同一ゼミが次セメスター以降も自動登録されます ゼミのキャンセル 変更を希望する場合の手続きは アカデミック オフィス HP を確認してください ( サブゼミはセメスター毎に申請を行う必要があります 自動登録されません )
ゼミ新規申請は Blackboard で受け付けます! 次セメスターにゼミ履修を希望する学生は 下記マニュアルに従ってゼミ新規申請を行ってください 現在 ゼミを履修している場合は 同一ゼミが次セメスター以降も自動登録されます ゼミのキャンセル 変更を希望する場合の手続きは アカデミック オフィス HP を確認してください ( サブゼミはセメスター毎に申請を行う必要があります 自動登録されません )
 / ようこそ HERO3+ をお買い求めいただきありがとうございます このクイックスタートガイドでは 人生の最も素晴らしい瞬間を撮影するための GoPro の基本的な使い方を説明します GOPRO の情報をチェック facebook.com/gopro youtube.com/gopro twitter.com/gopro instagram.com/gopro 1 / はじめに カメラをハウジングから取り外します
= P 2 3 BATTERY CARRYING CASE B A
 i C Matsushita Electric Industrial Co., Ltd.2001 RQ-SX87V = P 2 3 BATTERY CARRYING CASE B A 4 5 6 + - + - 7 ; 12 3 4 1 < I 2 5 = 3 21 > 6 4? 5 Ë @ 7 8 9 : ; < = > 6 7 A A B C D E B 21 @ 8 C D? E H 9 G
T6 Manual
 GAMESIR GAMING IS WINNING. GameSir T6 Bluetooth Controller 2018 GameSir Inc. All rights reserved. Product may vary slightly from those pictures. User Manual POWER UP YOUR GAMESIR DEVICE PRODUCT DESCRIPTION
MOTIF XF 取扱説明書
 MUSIC PRODUCTION SYNTHESIZER JA 2 (7)-1 1/3 3 (7)-1 2/3 4 (7)-1 3/3 5 http://www.adobe.com/jp/products/reader/ 6 NOTE http://japan.steinberg.net/ http://japan.steinberg.net/ 7 8 9 A-1 B-1 C0 D0 E0 F0 G0
DMC-P33
 Precaution for use This unit is designed for domestic use only, and it is very dangerous to use the attached battery charger abroad. Never use it out of Japan. KENWOOD CORPORATION CR 3 4 7 7