WIFI33说明书六国语言
|
|
|
- やすはる わたぬき
- 6 years ago
- Views:
Transcription

1 WIFI33 User Guide I. Product Overview 1. Antenna 2. Electrode 3. Battery Life LEDs 4. Power Switch 5. Reset Button 6. Power Input 7. Indicator Light 8. Camera Lens 9. IR LEDs
2 II. What s in the Box -1 WIFI Camera Toy Car -1 DC5V Power Adapter -1 Charging Base III. Getting Started 3.1. Please make sure your toy car camera is fully recharged before using Scan the QR code below to install the CloudRover4 application on your Android or IOS device Slide the Power Switch to the ON position to turn on the camera. The indicator light will keep flashing green. IV. Network Setup 4.1. P2P Connection Setup (LAN Mode) Go to the WIFI or WLAN Setting page on your phone or mobile device, connect to the camera s WIFI signal named CC-*****. Wait for the WIFI to be connected and your phone status bar will appear WIFI symbol as below:
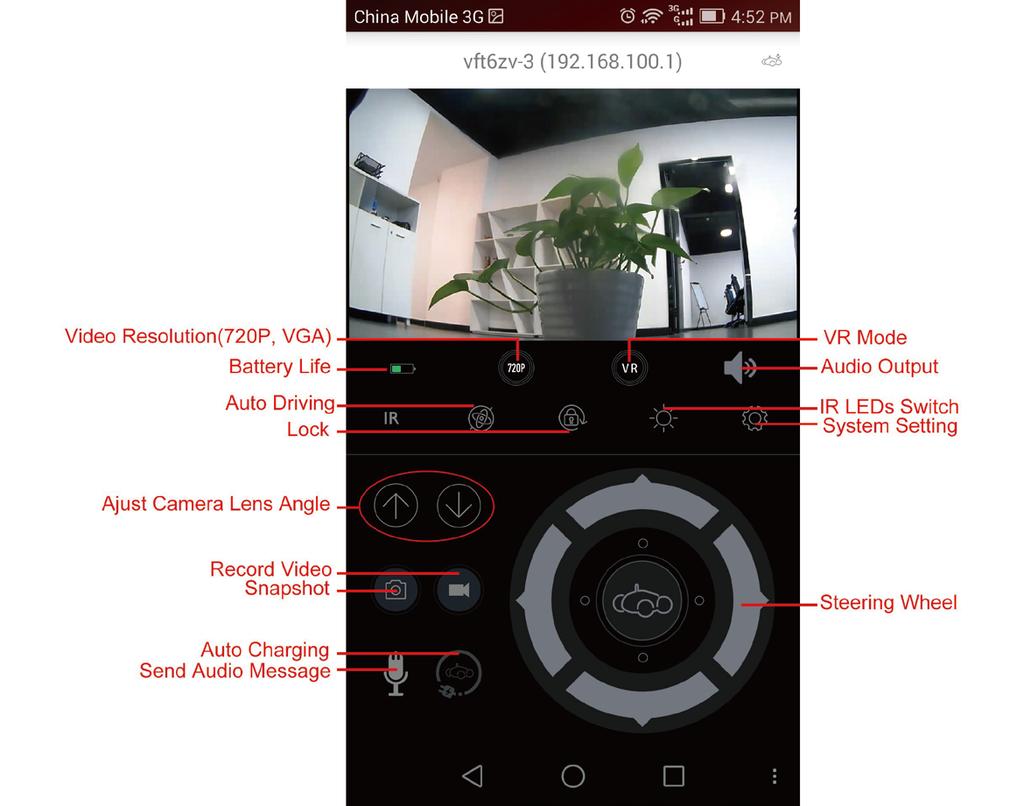
3 Launch the application and the camera s UID will show up automatically. Click the car icon, input default password admin and tap Connect to connect to the camera It will take a moment to enter into the live video page. Now P2P (LAN) mode is complete and you can view video locally, within 15 meters (49 feet) open range. Check the screenshot below to see an explanation of the live video page.
4 4.2. Remote View Setup (WAN Mode) >> Before remote view setup, please make sure that the camera is successfully added to the APP in P2P (LAN) mode Launch the CloudRover4 APP Click Configure the Cloud Companion. On the next page, select a desirable WIFI hotspot to enroll the camera in and then tap Next When the configuration is completed, the camera will say Configure Completed You will be prompted to the home page and the camera icon will be found orange. Click the camera icon and then input the default password admin to login the camera. The indicator light will remain solid green.
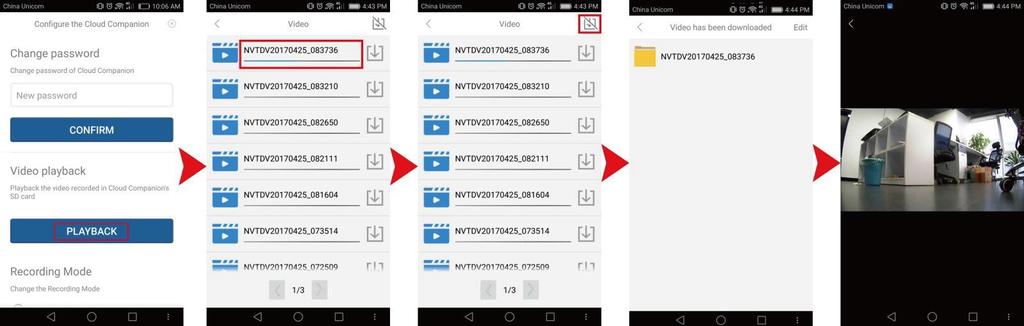
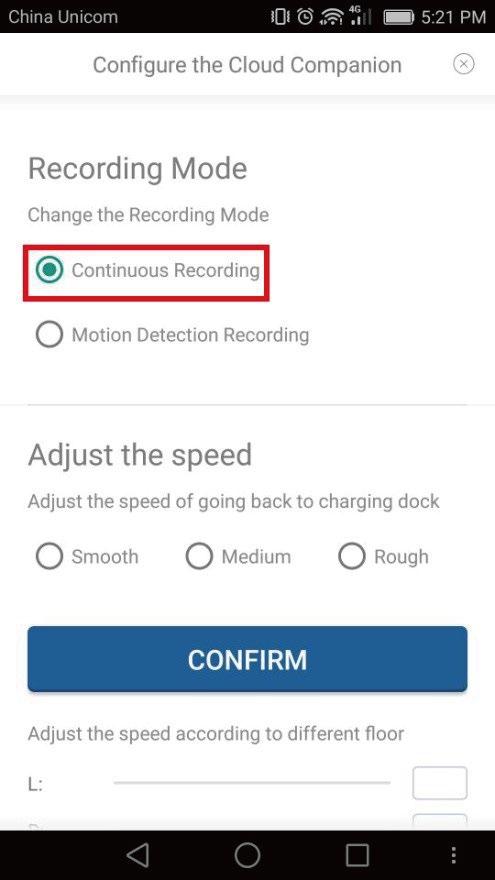
5 [Note]: 1). When the configuration is complete, the camera s WIFI signal named CC-***** will be gone on the WIFI settings page. 2). If the remote view setup failed and you need to reset the camera (See VI) and set up all over again. V. Motion Detection & Continuous Video Recording >> Before motion detection setup, please make sure that the camera is successfully added to the APP and it's online in the P2P (LAN) mode Launch the application and then login your camera Go to the live video page, then tap the gear icon and choose Motion Detection Recording on the next page. When motion is detected, the camera will record a video to the built-in 8GB internal memory automatically Go back to the settings page and then click PLAYBACK. On the next page, tap a video clip and then it will start recording. You can also download the video files and click to check out the video clip.
6 5.4. For continuous video recording, go back to settings page and then choose Continuous Recording mode. The camera will start recording video continuously to the internal memory. You can follow 5.3. to check out the video clips. VI. Resetting to Factory Default If the camera fails to login or doesn t work properly, a quick reset will restore it back to normal operation. Operation: When the camera is powered on, use a pin or paper clip to press and hold the Reset Button (on the bottom of the camera) for 10 seconds until the camera says Waiting for configuration.
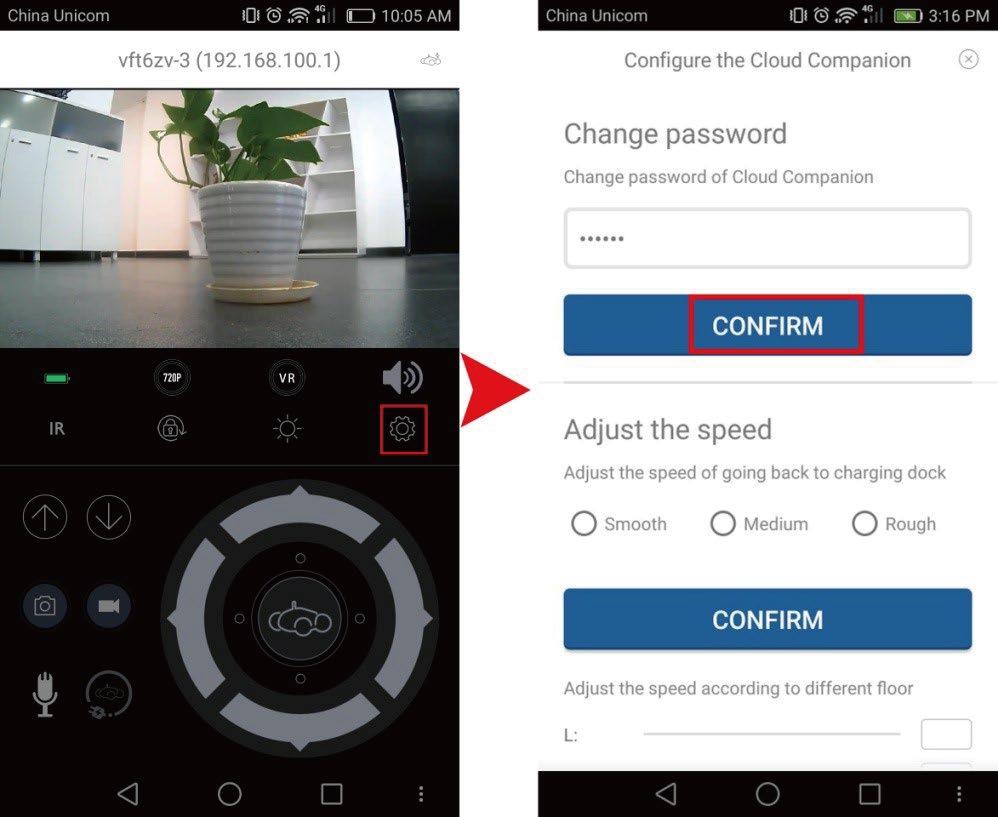
7 VII. Changing Password >> Before changing password, please make sure that the camera is online in the application Launch the application and login the camera Go to the live video page, then click the gear icon. On the settings page, locate Change password section and then input a new password. Next time you login the camera, please enter the new password. VIII. Charging 8.1. Slide the Power Switch to the OFF position and connect the camera to an outlet AC power supply through the DC5V power adapter and the charging base or using the DC5V power adapter directly It will take 4-5 hours to obtain a full charge. When the camera is fully charged, all Battery Life LEDs at the back of the camera will remain solid red. Frequently Asked Questions Q1: Why can t I find the camera s WIFI signal on my phone? A1: There are 4 solutions to this problem: 1. The camera is running low on batteries and please recharge it before using.
8 2. Reset the camera (See VI) and wait for the WIFI signal SSID to show up. 3. Keep your phone or mobile device within the camera s WIFI hotspot range, refreshing the WIFI signal page. It may take up to 2 minutes for the hotspot to become recognizable on your phone or mobile device's WIFI setting page. 4. Shut off your phone or mobile device s WIFI function for a while, then turn it on to search again. Q2: Why does the WAN mode setup fail? A2: Please make sure your network is in a good condition. Plus, the WIFI network the camera is configured with can t be the same with one you connect your phone to. Q3: What can I do if I forget the password? A3: Please reset the camera. (See VI) Q4: Why live video screen shows up black and a searching circle spins in center but nothing ever displays? A4: If your camera is connected to a slow WIFI network, wait seconds for live video to re-appear.
9 WIFI33 Benutzerhandbuch I. Produktübersicht 1. Antenne 2. Elektrode 3. Batterielebensdauer LEDs 4. Netzschalter 5. Reset-Taste 6. Leistungsaufnahme 7. Kontrollleuchte 8. Kameraobjektiv 9. IR-LEDs
10 II. Was ist in der Box -1 WIFI Kamera Spielzeugauto -1 DC5V Netzteil -1 Ladestation III. Anfangen 3.1. Bitte stellen Sie sicher, dass Ihre Spielzeugauto-Kamera vor der Benutzung vollständig aufgeladen ist. 3.2 Scannen Sie den QR-Code unten, um die "CloudRover4" -Anwendung auf Ihrem Android- oder IOS-Gerät zu installieren Schieben Sie den Netzschalter auf ON, um die Kamera einzuschalten. Die Kontrollleuchte blinkt grün. IV. Netzwerkeinrichtung 4.1. P2P-Verbindungsaufbau (LAN-Modus) Gehen Sie auf die WIFI- oder WLAN-Einstellungsseite auf Ihrem Telefon oder Mobilgerät, verbinden Sie das WIFI-Signal der Kamera mit dem Namen "CC - *****". Warten Sie, bis das WIFI angeschlossen ist und Ihre Telefonstatusleiste erscheint als WIFI-Symbol wie folgt:
11 Starten Sie die Anwendung und die UID der Kamera wird automatisch angezeigt. Klicken Sie auf das Autosymbol, geben Sie das Standardpasswort "admin" ein und tippen Sie auf "Verbinden", um eine Verbindung zur Kamera herzustellen Es wird einen Moment Zeit nehmen, um in die Live-Videoseite einzutreten. Jetzt ist der P2P (LAN) Modus komplett und man kann das Video lokal, innerhalb von 15 Metern (49 Fuß) offenen Bereich ansehen. Überprüfen Sie den Screenshot unten, um eine Erklärung der Live-Videoseite zu sehen.
12 4.2. Remote View Setup (WAN-Modus) >> Bevor Sie das Setup der Fernbedienung vornehmen, stellen Sie bitte sicher, dass die Kamera der APP im P2P-Modus (LAN) erfolgreich hinzugefügt wurde Starten Sie die "CloudRover4" APP Klicken Sie auf "Configure the Cloud Companion". Wählen Sie auf der nächsten Seite einen gewünschten WIFI-Hotspot aus, um die Kamera einzuschreiben und dann auf "Weiter" zu tippen Wenn die Konfiguration abgeschlossen ist, wird die Kamera "Configure Completed" sagen Sie werden zur Startseite gefragt und das Kamerasymbol wird orange gefunden. Klicken Sie auf das Kamerasymbol und geben Sie dann das Standardpasswort "admin" ein, um die Kamera anzumelden. Die Kontrollleuchte bleibt grün.
13 [Hinweis]: 1). Wenn die Konfiguration abgeschlossen ist, wird das WIFI-Signal der Kamera mit dem Namen "CC-*****" auf der Seite WIFI-Einstellungen verschoben. 2). Wenn das Remote-View-Setup fehlgeschlagen ist und Sie die Kamera zurücksetzen müssen (siehe VI) und wieder einrichten. V. Bewegungserkennung & Kontinuierliche Videoaufnahme >> Vor der Erkennung der Bewegungserkennung ist darauf zu achten, dass die Kamera der APP erfolgreich hinzugefügt wurde und im P2P (LAN) Modus online ist Starten Sie die Anwendung und melden Sie sich dann Ihre Kamera an Gehen Sie auf die Live-Videoseite, dann tippen Sie auf das Zahnrad-Symbol und wählen Sie "Motion Detection Recording" auf der nächsten Seite. Wenn die Bewegung erkannt wird, nimmt die Kamera automatisch ein Video auf den internen internen Speicher 8GB auf Gehen Sie zurück zur Einstellungsseite und dann auf "WIEDERGABE". Tippen Sie auf der nächsten Seite auf einen Videoclip und dann beginnt die Aufnahme. Sie können auch die Videodateien herunterladen und klicken, um den Videoclip auszuprobieren.
14 5.4 Für die kontinuierliche Videoaufnahme gehen Sie zurück zur Einstellungsseite und wählen dann den Modus "Kontinuierliche Aufnahme". Die Kamera startet die Aufnahme von Video kontinuierlich in den internen Speicher. Sie können folgen 5.3. Um die Videoclips auszuprobieren. VI. Rücksetzen auf Werkseinstellung Wenn sich die Kamera nicht anmeldet oder nicht ordnungsgemäß funktioniert, wird ein schneller Reset wieder in den normalen Betrieb zurückgesetzt. Bedienung: Wenn die Kamera eingeschaltet ist, verwenden Sie einen Stift oder eine Büroklammer, um die Reset-Taste (auf der Unterseite der Kamera) für 10 Sekunden zu drücken, bis die Kamera "Warten auf Konfiguration" sagt.
15 VII. Passwort ändern >> Bevor Sie das Passwort ändern, stellen Sie bitte sicher, dass die Kamera online in der Anwendung ist Starten Sie die Anwendung und melden Sie sich die Kamera an. 7.2 Gehen Sie auf die Live-Videoseite und klicken Sie dann auf das Zahnradsymbol. Suchen Sie auf der Einstellungsseite den Abschnitt "Passwort ändern" und geben Sie dann ein neues Passwort ein. Wenn Sie das nächste Mal die Kamera anmelden, geben Sie bitte das neue Passwort ein. VIII. Aufladen 8.1. Schieben Sie den Netzschalter in die AUS-Position und schließen Sie die Kamera an eine Steckdose an. Stromversorgung über den DC5V Netzadapter und die Ladebasis oder direkt mit dem DC5V Netzteil Es dauert 4-5 Stunden, um eine volle Ladung zu erhalten. Wenn die Kamera vollständig aufgeladen ist, bleiben alle Batterielebensdauer-LEDs auf der Rückseite der Kamera fest rot. Häufig Gestellte Fragen Q1: Warum kann ich das WIFI-Signal der Kamera nicht auf meinem Handy finden?
16 A1: Es gibt 4 Lösungen für dieses Problem: 1. Die Kamera läuft auf Batterien und lädt sie bitte vor dem Gebrauch auf. 2. Setzen Sie die Kamera zurück (siehe VI) und warten Sie, bis das WIFI-Signal SSID angezeigt wird. 3. Halten Sie Ihr Telefon oder Mobilgerät in der WIFI-Hotspot-Reihe der Kamera und erfrischen die WIFI-Signalseite. Es kann bis zu 2 Minuten dauern, bis der Hotspot auf der Telefon- oder Mobiltelefon-WIFI-Einstellungsseite erkennbar wird. 4. Schalten Sie die WIFI-Funktion Ihres Telefons oder des Mobilgeräts für eine Weile aus, und schalten Sie es dann wieder ein. Q2: Warum funktioniert das WAN-Modus-Setup? A2: Bitte stellen Sie sicher, dass Ihr Netzwerk in einem guten Zustand ist. Plus, das WIFI-Netzwerk die Kamera ist konfiguriert mit kann nicht das gleiche mit einem Sie Ihr Telefon zu verbinden. Q3: Was kann ich tun, wenn ich das Passwort vergessen habe? A3: Bitte die Kamera zurücksetzen (Siehe VI) Q4: Warum Live-Video-Bildschirm zeigt sich schwarz und ein Suchkreis dreht sich in der Mitte, aber nichts zeigt jemals? A4: Wenn Ihre Kamera an ein langsames WIFI-Netzwerk angeschlossen ist, warten Sie Sekunden, bis das Live-Video erneut angezeigt wird.
17 WIFI33 Mode d'emploi I. Aperçu du Produit 1. Antenne 2. Electrode 3. LED Indicateur de la Batterie 4. Interrupteur d Alimentation 5. Bouton de Réinitialisation 6. Entrée de Puissance 7. Voyant Lumineux 8. Lentille de Caméra 9. Voyants Infrarouges
18 II. Qu'y a-t-il dans la Boite -1 WIFI Camera Toy Car -1 Adaptateur secteur DC5V -1 Base de recharge III. Commencer 3.1. Assurez-vous que votre caméra de voiture jouet est entièrement rechargée avant de l'utiliser Scannez le code QR ci-dessous pour installer l'application "CloudRover4" sur votre appareil Android ou IOS Faites glisser l'interrupteur d Alimentation sur la position ON pour allumer l'appareil photo. Le voyant continuera à clignoter en vert. IV. Configuration du Réseau 4.1. Configuration de la Connexion P2P (Mode LAN) Accédez à la page WIFI ou WLAN Setting sur votre téléphone ou votre appareil mobile, connectez-vous au signal WIFI de l'appareil photo appelé "CC-*****". Attendez que le WIFI soit connecté et que votre barre d'état du téléphone apparaîtra comme symbole WIFI comme suit:
19 Lancez l'application et l'uid de l'appareil photo s'affiche automatiquement. Cliquez sur l'icône de la voiture, entrez le mot de passe par défaut "admin" et appuyez sur "Connecter" pour vous connecter à la caméra Il faudra un moment pour entrer dans la page vidéo en direct. Maintenant, le mode P2P (LAN) est terminé et vous pouvez visualiser la vidéo localement, dans une plage ouverte de 15 mètres (49 pieds). Vérifiez la capture d'écran ci-dessous pour voir une explication de la page vidéo en direct.
20 4.2. Configuration de la Vue à Distance (Mode WAN) >> Avant la configuration de la vue à distance, assurez-vous que l'appareil photo a été ajouté avec succès à l'app au mode P2P (LAN) Lancez l'application "CloudRover4" Cliquez sur "Configure the Cloud Companion". Sur la page suivante, sélectionnez un point d'accès Wi-Fi souhaitable pour inscrire la caméra, puis appuyez sur "Suivant" Lorsque la configuration est terminée, la caméra dira "Configure Completed" Vous serez invité à la page d'accueil et l'icône de la caméra sera trouvée orange. Cliquez sur l'icône de la caméra, puis entrez le mot de passe par défaut "admin" pour vous connecter à la caméra. Le témoin lumineux reste vert.
21 [Note]: 1). Lorsque la configuration est terminée, le signal WIFI de la caméra nommé "CC-*****" se déroule sur la page de configuration WIFI. 2). Si la configuration de la vue à distance a échoué et que vous devez réinitialiser la caméra (voir VI) et la configurer à nouveau. V. Détection de Mouvement et Enregistrement Vidéo Continu >> Avant la configuration de détection de mouvement, assurez-vous que l'appareil photo a été ajouté avec succès à l'app et qu'il est en ligne en mode P2P (LAN) Lancez l'application, puis connectez-vous à votre appareil photo Accédez à la page vidéo en direct, puis appuyez sur l'icône de l'engrenage et choisissez "Enregistrement de détection de mouvement" sur la page suivante. Lorsque le mouvement est détecté, l'appareil photo enregistre automatiquement une vidéo sur la mémoire interne intégrée de 8 Go Revenez à la page de paramètres, puis cliquez sur "LECTURE". Sur la page suivante, appuyez sur un clip vidéo, puis lancer l'enregistrement. Vous pouvez également télécharger les fichiers vidéo et cliquer pour regarder le clip vidéo.
22 5.4. Pour l'enregistrement vidéo continu, revenez à la page des paramètres, puis choisissez le mode "Enregistrement continu". L'appareil photo va commencer à enregistrer la vidéo en continu sur la mémoire interne. Vous pouvez suivre 5.3. Pour consulter les clips vidéo. VI. Réinitialisation en Usine par Défaut Si l'appareil photo ne parvient pas à se connecter ou ne fonctionne pas correctement, une réinitialisation rapide le rétablira à son fonctionnement normal. Fonctionnement: Lorsque l'appareil photo est sous tension, utilisez une épingle ou un trombone pour appuyer sur le Bouton de Réinitialisation (en bas de l'appareil photo) pendant 10 secondes jusqu'à ce que l'appareil photo indique "en attente de configuration".
23 VII. Modification du Mot de Passe >> Avant de changer de mot de passe, assurez-vous que l'appareil photo est en ligne dans la demande Lancez l'application et connectez-vous à la caméra Accédez à la page vidéo en direct, puis cliquez sur l'icône de l'engrenage. Dans la page des paramètres, recherchez la section "Modifier le mot de passe" puis saisissez un nouveau mot de passe. La prochaine fois que vous vous connectez à la caméra, entrez le nouveau mot de passe. VIII. Charger 8.1. Faites glisser l'interrupteur d Alimentation sur la position OFF et connectez l'appareil photo à une alimentation secteur de sortie via l'adaptateur secteur DC5V et la base de chargement ou à l'aide de l'adaptateur secteur DC5V directement Il faudra 4-5 heures pour obtenir une charge complète. Lorsque l'appareil photo est complètement chargé, toutes les LED de vie de batterie à l'arrière de l'appareil restent rouges. Questions Fréquemment Posées Q1: Pourquoi ne puis-je pas trouver le signal WIFI de l'appareil photo sur mon téléphone?
24 A1: Il existe 4 solutions à ce problème: 1. L'appareil photo utilise de faibles batteries et rechargez-les avant d'utiliser. 2. Réinitialisez l'appareil photo (voir VI) et attendez que le SSID du signal WIFI s'affiche. 3. Conservez votre téléphone ou votre appareil mobile dans la plage de points chauds Wi-Fi de la caméra, en actualisant la page du signal WIFI. Il peut prendre jusqu'à 2 minutes pour que le point d'accès soit reconnaissable sur la page de configuration de votre téléphone ou du WIFI de votre appareil mobile. 4. Éteignez votre téléphone ou la fonction WIFI de votre appareil mobile pendant un certain temps, puis allumez-le pour effectuer une nouvelle recherche. Q2: Pourquoi l'installation du mode WAN échoue-t-elle? A2: assurez-vous que votre réseau est en bon état. De plus, le réseau WIFI avec lequel la caméra est configurée ne peut pas être le même avec celui auquel vous connectez votre téléphone. Q3: Que puis-je faire si j'oublie le mot de passe? A3: Réinitialisez la caméra. (Voir VI) Q4: Pourquoi l'écran vidéo en direct apparaît noir et un cercle de recherche tourne au centre mais rien ne s'affiche jamais? A4: Si votre caméra est connectée à un réseau WIFI lent, attendez 10 à 30 secondes pour que la vidéo en direct apparaisse à nouveau.
25 WIFI33 Guida Utente I. Panoramica del Prodotto 1. Antenna 2. Elettrodo 3. LED di vita della batteria 4. Interruttore di alimentazione 5. Pulsante di ripristino 6. Ingresso alimentazione 7. Indicatore luminoso 8. Obiettivo della fotocamera 9. LED IR
26 II. Cosa c'è nella scatola -1 WIFI Macchina del giocattolo della macchina fotografica -1 Adattatore di alimentazione DC5V -1 Base di ricarica III. Iniziare 3.1. Assicurarsi che la fotocamera per auto giocattoli sia completamente ricaricata prima di utilizzare Scansiona il codice QR qui sotto per installare l'applicazione "CloudRover4" sul tuo dispositivo Android o IOS Spostare l'interruttore di alimentazione in posizione ON per accendere la fotocamera. La spia di segnalazione continua a lampeggiare verde. IV. Configurazione di rete 4.1. Impostazione del collegamento P2P (modalità LAN) Passare alla pagina WIFI o WLAN Setting sul telefono o sul dispositivo mobile, connettersi al segnale WIFI della fotocamera denominato "CC - *****". Attendere che il WIFI sia collegato e la barra di stato del telefono apparirà il simbolo WIFI come segue:
27 Avviare l'applicazione e l'uid della fotocamera verrà visualizzata automaticamente. Fare clic sull'icona dell'automobile, inserire la password predefinita "admin" e toccare "Connessione" per connettersi alla fotocamera Ci vorrà un momento per entrare nella pagina video dal vivo. Ora la modalità P2P (LAN) è completa e è possibile visualizzare video localmente, entro un raggio di 15 metri (49 piedi). Controlla lo screenshot qui sotto per vedere una spiegazione della pagina video in diretta.
28 4.2. Impostazione di visualizzazione remota (modalità WAN) >> Prima di impostare la visualizzazione remota, accertarsi che la fotocamera sia stata aggiunta correttamente alla modalità APP in modalità P2P (LAN) Avviare APP "CloudRover4" Fai clic su "Configura il Cloud Companion". Nella pagina successiva, selezionare un punto desiderato WIFI per accedere alla fotocamera e quindi toccare "Avanti" Una volta completata la configurazione, la fotocamera dirà "Configura Completo" Verrà richiesto alla home page e l'icona della fotocamera sarà arancione. Fai clic sull'icona della fotocamera e inserisci la password predefinita "admin" per accedere alla fotocamera. La spia di segnalazione rimane verde solido.
29 [Nota]: 1). Una volta completata la configurazione, il segnale WIFI della fotocamera denominato "CC - *****" verrà visualizzato nella pagina delle impostazioni WIFI. 2). Se l'impostazione di visualizzazione remota non è riuscita e bisogna reimpostare la fotocamera (vedere VI) e impostarla nuovamente. V. Rilevazione di movimento e registrazione continua di video >> Prima di impostare la rilevazione del movimento, assicurarsi che la fotocamera sia stata aggiunta correttamente all'app ed è online in modalità P2P (LAN) Avviare l'applicazione e quindi accedere alla fotocamera Vai alla pagina video dal vivo, quindi tocca l'icona a forma di ingranaggio e scegli "Registrazione di rilevazione di movimento" nella pagina successiva. Quando viene rilevato il movimento, la videocamera registra automaticamente un video alla memoria interna incorporata da 8 GB Tornate alla pagina delle impostazioni e fate clic su "RIPRODUZIONE". Nella prossima pagina tocca un clip video e inizia la registrazione. È inoltre possibile scaricare i file video e fare clic per controllare il clip video.
30 5.4. Per la registrazione video continua, tornare alla pagina delle impostazioni e selezionare la modalità "Continuous Recording". La fotocamera inizia a registrare video continuamente nella memoria interna. Puoi seguire 5.3. Per controllare i video clip. VI. Ripristino predefinito di fabbrica Se la fotocamera non riesce a accedere o non funziona correttamente, un reset rapido lo ripristinerà al normale funzionamento. Funzionamento: Quando la fotocamera è accesa, utilizzare un perno o una clip di carta per tenere premuto il pulsante di ripristino (in fondo alla fotocamera) per 10 secondi finché la fotocamera dice "In attesa di configurazione".
31 VII. Modifica della password >> Prima di cambiare la password, assicurati che la fotocamera sia online nell'applicazione Avviare l'applicazione e accedere alla fotocamera Vai alla pagina video dal vivo, quindi fai clic sull'icona a forma di ingranaggio. Nella pagina delle impostazioni, individuare la sezione "Modifica password" e inserire una nuova password. La prossima volta che accedi alla fotocamera, inserisci la nuova password. VIII. Ricarica 8.1. Spostare l'interruttore di alimentazione in posizione OFF e collegare la fotocamera ad un'alimentazione di rete CA attraverso l'adattatore di alimentazione DC5V e la base di ricarica o direttamente utilizzando l'adattatore di alimentazione DC5V Ci vorranno 4-5 ore per ottenere una carica completa. Quando la fotocamera è completamente carica, tutti i LED della durata della batteria sul retro della fotocamera rimarranno rossi. Domande Frequenti Q1: Perché non riesco a trovare il segnale WIFI della fotocamera sul mio telefono? A1: Ci sono 4 soluzioni a questo problema: 1. La fotocamera sta basandosi sulle batterie e si prega di ricaricarla prima dell'uso.
32 2. Ripristinare la fotocamera (vedere VI) e attendere che il SSID del segnale WIFI venga visualizzato. 3. Mantenete il telefono o il dispositivo mobile all'interno della gamma di hotspot WIFI della fotocamera, rinfrescando la pagina del segnale WIFI. Può richiedere fino a 2 minuti perché il punto di accesso diventi riconoscibile sul tuo telefono o sulla pagina di impostazione WIFI del dispositivo mobile. 4. Spegnere la funzione WIFI del telefono cellulare o del dispositivo mobile per un po ', quindi accenderlo per ricercare nuovamente. Q2: Perché la configurazione del modo WAN non è riuscita? A2: Assicurati che la rete sia in buone condizioni. Inoltre, la rete WIFI con la quale la telecamera è configurata non può essere la stessa con quella a cui si collega il telefono. Q3: Cosa posso fare se dimentico la password? A3: Ripristina la fotocamera. (Vedi VI) Q4: Perché lo schermo video in diretta mostra il nero e un cerchio cerchi spin nel centro, ma niente mostra mai? A4: Se la fotocamera è collegata a una rete WIFI lenta, attendere secondi per riprodurre il video dal vivo.
33 WIFI33 Guía del Usuario I. Descripción del Producto 1. Antena 2. Electrodo 3. LEDs de Autonomía de Batería 4. Interruptor de Encendido 5. Botón de Reseteo 6. Entrada de Alimentación 7. Indicadora Luminosa 8. Lente de la Cámara 9. LEDs IR
34 II. Qué hay en la caja -1 Coche de Juguete Cámara WIFI -1 DC5V Adaptador de Corriente -1 Base de Carga III. Empezando 3.1. Cerciórese de por favor que su cámara del coche del juguete esté completamente recargada antes de usar Escanee el código QR abajo para instalar la aplicación "CloudRover4" en su dispositivo Android o IOS Deslice el interruptor de encendido a la posición ON para encender la cámara. La luz indicadora parpadeará en verde. IV. Configuración de la red 4.1. Configuración de la conexión P2P (modo LAN) Vaya a la página WIFI o WLAN Setting en su teléfono o dispositivo móvil, conéctese a la señal WIFI de la cámara llamada "CC - *****". Espere a que el WIFI sea conectado y su barra de estado del teléfono aparecerá Símbolo de WIFI como abajo:
35 Inicie la aplicación y el UID de la cámara aparecerá automáticamente. Haga clic en el icono del coche, introduzca la contraseña predeterminada "admin" y pulse "Conectar" para conectarse a la cámara Tardará un momento en entrar en la página de video en vivo. Ahora el modo P2P (LAN) está completo y se puede ver el video localmente, dentro de los 15 metros (49 pies) de rango abierto. Compruebe la captura de pantalla de abajo para ver una explicación de la página de video en vivo.
36 4.2. Configuración de visualización remota (modo WAN) >> Antes de configurar la vista remota, asegúrese de que la cámara se ha agregado correctamente a la APP en modo P2P (LAN) Inicie la aplicación "CloudRover4" Haga clic en "Configurar el complemento de la nube". En la página siguiente, seleccione un hotspot WIFI deseable para inscribir la cámara y luego pulse "Siguiente" Cuando finalice la configuración, la cámara indicará "Configurar completado" Se le pedirá que acuda a la página principal y el icono de la cámara aparecerá en naranja. Haga clic en el icono de la cámara y luego ingrese la contraseña predeterminada "admin" para ingresar a la cámara. La luz indicadora permanecerá verde fijo.
37 [Nota]: 1). Una vez finalizada la configuración, la señal WIFI de la cámara denominada "CC - *****" desaparecerá en la página de configuración WIFI. 2). Si falló la configuración de la vista remota y necesita reiniciar la cámara (véase VI) y volver a configurarla. V. Detección de movimiento y grabación de video continua >> Antes de la configuración de detección de movimiento, asegúrese de que la cámara se ha agregado correctamente a la APP y está en línea en el modo P2P (LAN) Inicie la aplicación y, a continuación, inicie sesión en su cámara Vaya a la página de vídeo en directo, luego toque el ícono de rueda dentada y elija "Registro de detección de movimiento" en la página siguiente. Cuando se detecta movimiento, la cámara graba un video en la memoria interna incorporada de 8 GB automáticamente Vuelva a la página de configuración y haga clic en "REPRODUCCIÓN". En la página siguiente, toque un clip de vídeo y luego comenzará a grabar. También puede descargar los archivos de vídeo y hacer clic para ver el video clip.
38 5.4. Para la grabación continua de vídeo, vuelva a la página de ajustes y luego seleccione el modo "Grabación continua". La cámara comenzará a grabar vídeo continuamente en la memoria interna. Puede seguir 5.3. Para ver los videoclips. VI. Restablecimiento a los valores predeterminados de fábrica Si la cámara no inicia sesión o no funciona correctamente, un restablecimiento rápido volverá a su funcionamiento normal. Funcionamiento: Cuando la cámara esté encendida, utilice un pasador o clip de papel para pulsar y mantener plusado el botón de reseteo (en la parte inferior de la cámara) durante 10 segundos hasta que la cámara diga "Esperando la configuración".
39 VII. Cambio de contraseña >> Antes de cambiar la contraseña, asegúrese de que la cámara esté en línea en la aplicación Inicie la aplicación e inicie sesión en la cámara Vaya a la página de vídeo en directo y, a continuación, haga clic en el icono de rueda dentada. En la página de configuración, busque la sección "Cambiar contraseña" y luego ingrese una nueva contraseña. La próxima vez que inicie sesión en la cámara, ingrese la nueva contraseña. VIII. Cargando 8.1. Deslice el interruptor de encendido a la posición OFF y conecte la cámara a una toma de corriente alterna a través del adaptador de corriente DC5V y la base de carga o usando el adaptador de corriente DC5V directamente Tomará 4-5 horas para obtener una carga completa. Cuando la cámara está completamente cargada, todos los LED de vida de la batería en la parte posterior de la cámara permanecerán en rojo. Preguntas Frecuentes P1: Por qué no puedo encontrar la señal WIFI de la cámara en mi teléfono? R1: Hay cuatro soluciones a este problema:
40 1. La cámara está agotando las pilas y recárguela antes de usarla. 2. Restablezca la cámara (consulte VI) y espere a que aparezca la señal WIFI SSID. 3. Mantenga su teléfono o dispositivo móvil dentro del rango de puntos de acceso WIFI de la cámara, actualizando la página de señal WIFI. Puede tardar hasta 2 minutos en que el punto de acceso se reconozca en la página de configuración WIFI del teléfono o del dispositivo móvil. 4. Apague la función WIFI del teléfono o del dispositivo móvil durante un tiempo y luego enciéndala para buscar de nuevo. P2: Por qué falla la configuración del modo WAN? R2: Asegúrese de que su red esté en buenas condiciones. Además, la red WIFI con la que está configurada la cámara no puede ser la misma con la que conecta su teléfono. P3: Qué puedo hacer si olvido la contraseña? R3: Resetear la cámara. (Véase VI) P4: Por qué la pantalla de video en vivo aparece en negro y un círculo de búsqueda gira en el centro pero nada aparece? R4: Si su cámara está conectada a una red WIFI lenta, espere de 10 a 30 segundos para que vuelva a aparecer el vídeo en directo.
41 WIFI33
42
43
44 4.2. リモートビューセットアップ WANモード >>リモートビューを設定する前に カメラがP2P LAN モードでAPPに正常に追加されてい ることを確認してください CloudRover4 APPを起動します [クラウドコンパニオンを設定する]をクリックします 次のページで 望ましいWIFIホット スポットを選択してカメラを登録し 次へ をタップします 設定が完了すると Configure Completed と表示されます カメラアイコンがオレンジ色で表示されます カメラのアイコン ホーム画面が表示され をクリックし デフォルトのパスワード admin を入力してカメラにログインします インジケ ータランプは緑色のままです
45
46
47
48
WIFI27新说明书六国语言
 WIFI27 User Guide I. Product Overview 1. IR LEDs 2. Speaker 3. Camera Lens 4. Screw Port 5. RJ45 Ethernet Port 6. Reset Button 7. Power Input 8. Micro SD Card Slot II. What s in the Box -1 WIFI Toy Robot
1). The camera can be charged when it is powered on or off. When the camera is powered off, the indicator lights will not glow during the charging pro
. The camera can be charged when it is powered on or off. When the camera is powered off, the indicator lights will not glow during the charging pro") I. PRODUCT OVERVIEW WIFI 25 User Guide 1. Camera Lens 2. Battery 3. Power Switch 4. Reset Button 5. Micro SD card slot 6. USB Port II. WHAT S IN THE BOX -DC 5V Charging Adapter -USB Cable -Camera -Mini
I. PRODUCT OVERVIEW WIFI 25 User Guide 1. Camera Lens 2. Battery 3. Power Switch 4. Reset Button 5. Micro SD card slot 6. USB Port II. WHAT S IN THE BOX -DC 5V Charging Adapter -USB Cable -Camera -Mini
DVR P六国语言
 I. Product Overview DVR-0031-1080P User Guide 1. Power Switch 2. USB Port 3. Micro SD Card Slot 4. Camera Lens 5. Blue Indicator Light 6. Red Indicator Light 7. Power Button 8. Camera Button 9. Video Recording
T183说明书
 T183 User Guide I. Product Overview 1. Camera Lens 2. USB Port 3. Power Switch 4. Micro SD Card Slot 5. Red Indicator Light 6. Button A 7. Button C 8. Button B 9. Button D 10. Blue Indicator Light II.
AT002-黑色-修改
 AT002 User Guide I. Product Overview 1.Camera Lens 2.USB Port 3.Micro SD Card Slot 4.Green/Red Indicator Light 5.Power/Camera Button 6.Video Recording/Motion Detection Button II. What s in the Box -1 Photo
Q6说明书封面
 4K Ultra HD Action Cam Q6 This instruction also applies to Q6+. Waterproof 60m WiFi 170 wide angle LCD Screen Warning 1. Keep it from falling and dropping. 2. Keep it away from any strong magnetic interference
BOOK100六国语言
 I. Product Overview BOOK100 User Guide 1. Camera Lens 2. PIR Sensor 3. Micro SD Card Slot 4. Reset Button 5. USB Port 6. Blue Indicator Light 7. Red Indicator Light 8. Yellow Indicator Light 9. Audio Switch
Q2说明书
 Q3 4K Ultra HD Waterproof 40m 2.4G remote control Warning 1. Keep it from falling and dropping. 2. Keep it away from any strong magnetic interference objects like electrical machine to avoid strong radio
CUP200说明书六国语言
 CUP200 User Guide I. Product Overview 1. Micro SD Card Slot 2. Blue Indicator Light 3. USB Port 4. Power Button 5. Camera Lens II. What s in the Box -1 Spy Camera Water Bottle -1 16GB Micro SDHC Class
III. Charging 3.1. Connect the clock camera to a power outlet by using the USB cable and the DC5V charging adapter provided. The indicator light will
 User Guide Model Number: WIFI22 I. Overview 1. Camera Lens 2. Speaker 3. Indicator Light 4. Battery 5. USB interface 6. Reset Button 7. Power On/Off Switch 8. Micro SD card slot II. Accessories 1xUSB cable
by CASIO W61CA For Those Requiring an English/Chinese Instruction
 by CASIO W61CA http://www.au.kddi.com/torisetsu/index.html http://www.au.kddi.com/manual/index.html For Those Requiring an English/Chinese Instruction Manual English/Chinese Simple Manual can be read on
2. What s In the Box -HD Night Vision Camera -USB Cable 3. Charging 3.1. Connect the power bank to a PC computer using the USB cable. The indicator li
 1. Product Overview Wi-Fi24 User Guide 1. DC5V Power Output 2. Red Indicator Light 3. Blue Indicator Light 4. USB Interface/Power Input/Data Output 5. WAN Button 6. LAN Button 7. Camera Lens 8. Infrared
 L'amour suxuel dans la pensée russe ( I ) "La sonate à kreuzer" de L. Tolstoï AOUAMA Taro Dans "La sonate à Kreuzer" (1890) Tolstoï prêche l'abstinence complète de l'amour sexuel. L'acte sexuel est un
FFFA001430
 FFFA001430 ...3...3...3...4...4 Mac OS...4 Windows....4...5...5 Mac OS...6 Windows....6 Scarlett Solo...6 Scarlett Solo...7 DAW...7...9....9...10...12...12 Scarlett Solo...13...14...14...15...16...16...17
Mac OS...4 Windows Scarlett 6i USB...8 Mac OS...8 Windows....8 DAW FOCU
 FFFA001426-01 ...3...3...3...4...4 Mac OS...4 Windows....4...5...5...6...6...7 Scarlett 6i6...8...8 USB...8 Mac OS...8 Windows....8 DAW...9...11...11...12...14 FOCUSRITE CONTROL...16...18...18...20...21...21
2
 L C -24K 9 L C -22K 9 2 3 4 5 6 7 8 9 10 11 12 11 03 AM 04 05 0 PM 1 06 1 PM 07 00 00 08 2 PM 00 4 PM 011 011 021 041 061 081 051 071 1 2 4 6 8 5 7 00 00 00 00 00 00 00 00 30 00 09 00 15 10 3 PM 45 00
u8 英德法意西日
 U8 User Guide 1. Overview 1) USB Connector 2) Micro SD Card Slot 3) Power On/Off Button 4) Video/Photo Button 5) Indicator Light 6) Motion Detection Button 7) Camera Lens 8) Microphone 2. Operation >>Please
RR-US470 (RQCA1588).indd
.indd") RR-US470 Panasonic Corporation 2006 2 3 4 http://www.sense.panasonic.co.jp/ 1 2 3 ( ) ZOOM 5 6 7 8 9 10 4 2 1 3 4 2 3 1 3 11 12 1 4 2 5 3 1 2 13 14 q φ φ 1 2 3 4 3 1 2 3 4 2 3 15 16 1 2 3 [/]p/o 17 1 2
RR-US470 Panasonic Corporation 2006 2 3 4 http://www.sense.panasonic.co.jp/ 1 2 3 ( ) ZOOM 5 6 7 8 9 10 4 2 1 3 4 2 3 1 3 11 12 1 4 2 5 3 1 2 13 14 q φ φ 1 2 3 4 3 1 2 3 4 2 3 15 16 1 2 3 [/]p/o 17 1 2
FFFA
 FFFA001448-01 ...3...3...3...4...4 Mac OS X...4 Windows....4...5...5...6...6...8 Scarlett 18i20...9...9 USB...9 Mac OS X...9 Windows....9 DAW...10...12...12...13...14 ADAT...16.......................................................
Microsoft Word - Win-Outlook.docx
 Microsoft Office Outlook での設定方法 (IMAP および POP 編 ) How to set up with Microsoft Office Outlook (IMAP and POP) 0. 事前に https://office365.iii.kyushu-u.ac.jp/login からサインインし 以下の手順で自分の基本アドレスをメモしておいてください Sign
GP05取説.indb
 E -G V P 05D L V E -G P 05D W Ni-MH + + + + + + + + + + + + + + + + + + + + + + + + + + + + + + + + + + 1 + 2 + 3 + 4 + 5 + 6 1 2 3 4 5 6 + + + 1 + + + + + + + + + + + + + + + + + + 1 A B C + D + E
VE-GP32DL_DW_ZA
 VE-GP32DL VE-GP32DW 1 2 3 4 5 6 1 2 3 4 1 1 2 3 2 3 1 1 2 2 2006 Copyrights VisionInc. @. _ & $ % + = ^ @. _ & $ % + = ^ D11 D12 D21
4. Advanced Options をクリックする 5. Startup Settings をクリックする 6. Restart をクリックする
 注意 : 本取扱説明書はメーカ (ROTRONIC AG / スイス ) から発行されている次の書類 ( 原文 ) の和訳を基に作成さ れています 原文と和訳とで解釈が異なる部分があれば原本を参照いただけますようお願いします 原文 How to install unsinged drivers in WIN8 (SD_HW4_0067.docx) 本書最後尾に添付 症状 Windows 8 において
2 3
 RR-XR330 C Matsushita Electric Industrial Co., Ltd.2001 2 3 4 + - 5 6 1 2 3 2 1-3 + + - 22 +- 7 22 8 9 1 2 1 2 1 2 3 12 4 1 2 5 12 1 1 2 3 1 2 1 2 10 11 1 2 $% 1 1 2 34 2 % 3 % 1 2 1 2 3 1 2 12 13 1 2
GL1900A
 GL1900A User Guide I. Product Overview 1. Camera Lens 2. Power/Camera/Video Recording Button 3. USB Port 5. Blue Indicator Light 6. Reset Button 7. Red/Green Indicator Light 4. Micro SD Card Slot II. What
PFQX2227_ZA
 V E -G P 05D B Ni-MH 1 2 3 4 5 6 1 2 3 4 5 6 A B C D E F 1 2 A B C 1 2 3 2 0 7 9 4 6 6 4 7 9 1 2 3 # 6 6 2 D11 D12 D21 D22 19 # # # # Ni-MH Ω Ω
BT200
 BT200 User Guide I. Product Overview 1. USB Port 2. Power Button 3. Red Indicator Light 4. Blue Indicator Light 5. Camera Button 6. Video Recording Button 7. Micro SD Card Slot 8. Camera Lens II. What
 L C -6D Z3 L C -0D Z3 3 4 5 6 7 8 9 10 11 1 13 14 15 16 17 OIL CLINIC BAR 18 19 POWER TIMER SENSOR 0 3 1 3 1 POWER TIMER SENSOR 3 4 1 POWER TIMER SENSOR 5 11 00 6 7 1 3 4 5 8 9 30 1 3 31 1 3 1 011 1
Microsoft Word - PrivateAccess_UM.docx
 `````````````````SIRE Page 1 English 3 日本語 7 Page 2 Introduction Welcome to! is a fast, simple way to store and protect critical and sensitive files on any ixpand Wireless Charger. Create a private vault
C-720 Ultra Zoom 取扱説明書
 C-720 Ultra Zoom 2 3 4 1 2 3 4 5 5 6 7 6 8 9 7 10 8 ~ ~ 9 ~ ~ ~ ~ ~ ~ ~ ~ ~ ~ 10 ~ ~ ~ 11 12 13 14 ÑñÉí 15 16 ~ 8 1 2 3 4 5 6 7 $ % ^ & 9 ISO 100 0! @ # 1 2 3 4 5 6 7 8 17 $ % ^ & 9 ISO 100 0! @ # 9 0!
FSLC.indd
 FSLC/FSLD/FSLH/FSLJ FSCC/FSCD/FSCH Accessory Electric Blinds VAS 453786-2015-12 ENGLISH: Instructions for control keypad - Simple set-up ESPAÑOL: Instrucciones para el teclado de control - Simple set-up
取説_VE-PV11L(応用編)
") * 0 # VE-PV11L VE-PVC11L VE-PS109N 1 2 3 4 5 6 7 8 9 C H H H C H H H C C CAUTION:These telephones are for use in Japan only. They cannot be used in other countries because of differences in voltages, telephone
* 0 # VE-PV11L VE-PVC11L VE-PS109N 1 2 3 4 5 6 7 8 9 C H H H C H H H C C CAUTION:These telephones are for use in Japan only. They cannot be used in other countries because of differences in voltages, telephone
2
 L C -60W 7 2 3 4 5 6 7 8 9 0 2 3 OIL CLINIC BAR 4 5 6 7 8 9 2 3 20 2 2 XXXX 2 2 22 23 2 3 4 5 2 2 24 2 2 25 2 3 26 2 3 6 0 2 3 4 5 6 7 8 9 2 3 0 2 02 4 04 6 06 8 08 5 05 2 3 4 27 2 3 4 28 2 3 4 5 2 2
HA8000シリーズ ユーザーズガイド ~BIOS編~ HA8000/RS110/TS10 2013年6月~モデル
 P1E1M01500-3 - - - LSI MegaRAID SAS-MFI BIOS Version x.xx.xx (Build xxxx xx, xxxx) Copyright (c) xxxx LSI Corporation HA -0 (Bus xx Dev
Microsoft Word - KUINS-Air_W10_ docx
 KUINS-Air 無線 LAN への接続 (Windows10) How to connect to Wi-Fi KUINS-Air (Windows10) 2019 年 7 月 KUINS-Air への接続には A ID パスワードを使用した接続 もしくは B クライアント証明書を使用した接続方法の 2 種類があります There are 2 ways to connect to KUINS-Air,
L300
 I. Product Overview L300 User Guide 1. Reset Button 2. Microphone 3. Camera Lens 4. Power On/Off Button 5. Ignition Source 6. USB Port 7. Micro SD Card Slot 8. Indicator Light II. Charging 2.1. Insert
C H H H C H H H C C CUTION:These telephones are for use in Japan only. They cannot be used in other countries because of differences in voltages, tele
 VE-PV01LVE-PVW01LVE-PVC01L 1 4 7 2 3 5 6 8 9 * 0 # C H H H C H H H C C CUTION:These telephones are for use in Japan only. They cannot be used in other countries because of differences in voltages, telephone
VE-GD21DL_DW_ZB
 V E-G D21D L V E-G D21D W 1 2 3 4 1 2 1 2 1 2 2 1 2 3 1 2 3 1 2 3 1 4 4 2 3 5 5 1 2 3 4 1 2 3 1 2 3 4 1 2 3 2006 Copyrights VisionInc. @. _ & $ % + = ^ 2011
DiMAGE7/5
 9223-2773-61 P-B108 Conformité Européenne 9229-2773-21 P-B108 Minolta DiMAGE 7 / DiMAGE 5 NOTE ABOUT
NSR-500 Installation Guide
 NSR Installation Guide This information has been prepared for the professional installers not for the end users. Please handle the information with care. Overview This document describes HDD installation
FFFA
 FFFA001411-01 ...3...3...3...4...4 Mac OS X...4 Windows....4...5...5...6...6...8 Scarlett 18i8...9...9 USB...9 Mac OS X...9 Windows....9 DAW...10...12....12...13...15 ADAT...16...17 FOCUSRITE CONTROL...18...20...20...22...23...23
Connections USB 3.0 Devices Front Connections DV USB Enclosure SuperSpeed (5Gbps) to transfer files Headphones & MIC USB 2.0 Devices Back Connections
 to transfer files Headphones & MIC USB 2.0 Devices Back Connections") SuperSpeed USB 3.0 Dual Monitor Docking Station Quick Installation Guide English Deutsch Français 日本語 For information on Drivers, FAQ, and Support, visit: Recyclable Material 2015 Plugable Technologies
SuperSpeed USB 3.0 Dual Monitor Docking Station Quick Installation Guide English Deutsch Français 日本語 For information on Drivers, FAQ, and Support, visit: Recyclable Material 2015 Plugable Technologies
dv-08
 DV-08 User Guide I. Product Overview 1. Power Button 2. Blue Indicator Light 3. Yellow Indicator Light 4. Microphone 5. Camera Lens 6. Camera Button 7. Reset Button 8. Micro SD Card Slot 9. Mini USB Port
00_VC_C4Cover1
 INSTRUCTION MANUAL MODE D EMPLOI VC-C4 COMMUNICATION CAMERA f:4-64mm 1:1.4-2.8 ENGLISH a FRANÇAIS Please read this instruction manual carefully before operation. Be sure to read the asafe Use of Equipment
SDR-S7_J(80).indb
.indb") SDR-S7 SDR-S7 C 2008 Matsushita Electric Industrial Co., Ltd.All Rights Reserved. F0408KS0 (700 ) VQT1R80 The English Quick guide is indicated on P100 to P103. Refer to the pages if you prefer English.
SDR-S7 SDR-S7 C 2008 Matsushita Electric Industrial Co., Ltd.All Rights Reserved. F0408KS0 (700 ) VQT1R80 The English Quick guide is indicated on P100 to P103. Refer to the pages if you prefer English.
fx-9860G Manager PLUS_J
 fx-9860g J fx-9860g Manager PLUS http://edu.casio.jp k 1 k III 2 3 1. 2. 4 3. 4. 5 1. 2. 3. 4. 5. 1. 6 7 k 8 k 9 k 10 k 11 k k k 12 k k k 1 2 3 4 5 6 1 2 3 4 5 6 13 k 1 2 3 1 2 3 1 2 3 1 2 3 14 k a j.+-(),m1
NSR-500 Software Update Installation Procedures
 NSR Software Update Installation Procedures Overview Handle this information with care because this installation procedure is not intended for use by customers. This document describes software update
Microsoft Word - KUINS-Air_W8.1_ docx
 KUINS-Air 無線 LAN への接続 (Windows8.1) How to connect to Wi-Fi KUINS-Air (Windows8.1) 2019 年 7 月 KUINS-Air への接続には A ID パスワードを使用した接続 もしくは B クライアント証明書を使用した接続方法の 2 種類があります There are 2 ways to connect to KUINS-Air,
 6 4 4 9RERE6RE 5 5 6 7 8 9 4 5 6 4 4 5 6 8 4 46 5 7 54 58 60 6 69 7 8 0 9 9 79 0 4 0 0 4 4 60 6 9 4 6 46 5 4 4 5 4 4 7 44 44 6 44 8 44 46 44 44 4 44 0 4 4 5 4 8 6 0 4 0 4 4 5 45 4 5 50 4 58 60 57 54
 VE-SV03DL VE-SV03DW Ni-MH Ni-MH Ni-MH 1 2 3 1 2 Ni-MH 3 4 5 I H 3 IH IH IH IH 2 0 4 6 6 1 2 3 # 6 6 4 I H I H I H I H I H I H I H NTT Ni-MH Ni-MH Ni-MH Ω 0570-087-087
Ensemble en français
 17. Ça te dit d aller au cinéma? - faire une proposition - 1. Avec «vous» A : Que faites-vous vendredi soir? B : Rien de spécial. Pourquoi? A : Ça vous dirait de dîner ensemble? B : Oui, volontiers. A
F7000
 F7000 User Guide 1. Overview 1. Camera Lens 2. Infrared LEDs 3. Microphone 4. Indicator Light 5. Mode Button 6. Power On/Off Button 7. USB Interface 8. Micro SD card slot 2. Accessories USB cable 3. Operation
H8000操作編
 8 26 35 32H800037H800042H8000 49 55 60 72 2 3 4 48 7 72 32 28 7 8 9 5 7 9 22 43 20 8 8 8 8 73 8 13 7 7 7 55 10 49 49 13 37 49 49 49 49 49 49 12 50 11 76 8 24 26 24 24 6 1 2 3 18 42 72 72 20 26 32 80 34
取説_KX-PW38CL_PW48CL
 KX-PW38CL KX-PW48CL See pages 260 and 261 for English Guide. 2 3 1 2 NTT NTT Ni-Cd Ni-Cd 1 2 3 4 5 6 7 8 9 0 1 2 3 4 5 6 7 8 9 0 1 2 3 4 5 6 7 8 9 0 0 6 1 2 3
BS・110度CSデジタルハイビジョンチューナー P-TU1000JS取扱説明書
 C S0 CS Digital Hi-Vision Tuner C C C C S0-0A TQZW99 0 C C C C 4 5 6 7 8 9 C C C C C C C C C C C C C C C C C C C C C C C 0 FGIH C 0 FGIH C C C FGIH FG IH FGIH I H FGIH FGIH 0 C C # $ IH F G 0 # $ # $
*Ł\”ƒ‚ä(CV03)
") VE-CV03 VE-CVW03 VE-CV03 VE-CVW03 Ni-Cd C C BC BC C C C C C C C C C C A C C C A A # $ % & ' # $ 64 A A A A ( A % & ' ( ) ) A * A + A * +, - /. 0/ 10 21 32 53, A - A A. A A / A 0 A 1 A 2 A A A A 3 4 #
VE-CV03 VE-CVW03 VE-CV03 VE-CVW03 Ni-Cd C C BC BC C C C C C C C C C C A C C C A A # $ % & ' # $ 64 A A A A ( A % & ' ( ) ) A * A + A * +, - /. 0/ 10 21 32 53, A - A A. A A / A 0 A 1 A 2 A A A A 3 4 #
Z7000操作編_本文.indb
 2 8 17 37Z700042Z7000 46Z7000 28 42 52 61 72 87 2 3 12 13 6 7 3 4 11 21 34 61 8 17 4 11 4 53 12 12 10 75 18 12 42 42 13 30 42 42 42 42 10 62 66 44 55 14 25 9 62 65 23 72 23 19 24 42 8 26 8 9 9 4 11 18
53 image Le Musée imaginaire La Tentation de l Occident La Voie royale, pp. -. Le Musée imaginaire «imaginaire», p.. Ibid., pp. -. André Malraux, Œuvr
 Title Author(s) アンドレ マルロー作品におけるモノクローム写真についての考察 井上, 俊博 Citation Gallia. 50 P.53-P.62 Issue Date 2011-03-03 Text Version publisher URL http://hdl.handle.net/11094/11819 DOI rights 53 image Le Musée imaginaire
Introduction Purpose This training course demonstrates the use of the High-performance Embedded Workshop (HEW), a key tool for developing software for
, a key tool for developing software for") Introduction Purpose This training course demonstrates the use of the High-performance Embedded Workshop (HEW), a key tool for developing software for embedded systems that use microcontrollers (MCUs)
Introduction Purpose This training course demonstrates the use of the High-performance Embedded Workshop (HEW), a key tool for developing software for embedded systems that use microcontrollers (MCUs)
Taro11-OA0000_ jtd
 Application Form for Certificate of Criminal Record I apply for a certificate of criminal record for the reason stated below. I'll submit a digital record of my fingerprints or a sheet with my fingerprints
 15 15 10 10 1 2 3 4 VOL KSTN ZOOM TIMER ASPECT CANCEL QUICK FREEZE MUTE LAMP MODE AUTO Q ENTER VIDEO RGB OPEN STATUS SOURCE AUTO QUICK QUICK AUTO SOURCE STATUS STATUS SOURCE AUTO QUICK STATUS AUTO SOURCE
How to Use In-flight Wi-Fi service ご利用ガイド 3 Flight Plan will be available for international connecting flights within 24 hours. 3 フライトプランは24時間以内であれば 国際
 How to Use In-flight Wi-Fi service ご利用ガイド 3 Flight Plan will be available for international connecting flights within 24 hours. 3 フライトプランは24時間以内であれば 国際線のお乗り継ぎの便でもご利用いただけます When downloading large amounts
取扱説明書_KX-PW100CL
 See pages 236 238 for English Guide. KX-PW100CL Ni-MH KX-PW100CL-W KX-FKN100-W 1 2 NTT NTT 1 4 3 4 5 6
 6 4 45 ZS7ZS4ZS 5 59 7 8 94 05 4 5 6 4 5 5 6 8 8 40 45 48 56 60 64 66 66 68 7 78 80 8 7 8 0 0 0 90 0 0 4 4 4 4 6 57 64 69 66 66 66 69 4 0 7 48 5 4 4 5 4 4 4 7 46 46 6 46 8 46 48 46 46 4 46 46 4 4 5 4
Introduction 1. The difference between the MusicCast Smart Home skill and the MusicCast skill MusicCast Smart Home skill The MusicCast Smart Home skil
 Setup Manual 設定手順書 Anleitung zur Konfiguration Tap your language English 日本語 1 Introduction 1. The difference between the MusicCast Smart Home skill and the MusicCast skill MusicCast Smart Home skill The
C FGIH C C C C C C C C C C C C C C C C C C C C C C C C C C C C C C C C C C C C C C C C C C C C C C C C C C C C C C C
 TUDSR5SET TUDSR5 C 7 8 9 ch DIGITAL CS TUNER C C C C S-A C FGIH C C C C C C C C C C C C C C C C C C C C C C C C C C C C C C C C C C C C C C C C C C C C C C C C C C C C C C C C C C C C C C C C C C C C C
 6 4 45 7ZS 5 59 7 8 94 05 4 5 6 4 5 5 6 8 8 40 45 48 56 60 64 66 66 68 7 78 80 8 7 8 0 0 0 90 0 57 64 69 66 66 69 0 4 4 4 4 4 0 7 48 5 4 4 5 4 4 4 7 46 46 6 46 8 46 48 46 46 4 46 46 4 4 5 4 6 4 9 9 0
学部ゼミ新規申請方法 (Blackboard 9.1) Seminar Application Method for Undergraduate Seminar Courses ゼミ新規申請は Blackboard で受け付けます! 次セメスターにゼミ履修を希望する学生は 下記マニュアルに従ってゼミ
 Seminar Application Method for Undergraduate Seminar Courses ゼミ新規申請は Blackboard で受け付けます! 次セメスターにゼミ履修を希望する学生は 下記マニュアルに従ってゼミ") ゼミ新規申請は Blackboard で受け付けます! 次セメスターにゼミ履修を希望する学生は 下記マニュアルに従ってゼミ新規申請を行ってください 現在 ゼミを履修している場合は 同一ゼミが次セメスター以降も自動登録されます ゼミのキャンセル 変更を希望する場合の手続きは アカデミック オフィス HP を確認してください ( サブゼミはセメスター毎に申請を行う必要があります 自動登録されません )
ゼミ新規申請は Blackboard で受け付けます! 次セメスターにゼミ履修を希望する学生は 下記マニュアルに従ってゼミ新規申請を行ってください 現在 ゼミを履修している場合は 同一ゼミが次セメスター以降も自動登録されます ゼミのキャンセル 変更を希望する場合の手続きは アカデミック オフィス HP を確認してください ( サブゼミはセメスター毎に申請を行う必要があります 自動登録されません )
2 3 12 13 6 7
 2 8 17 42ZH700046ZH700052ZH7000 28 43 54 63 74 89 2 3 12 13 6 7 3 4 11 21 34 63 65 8 17 4 11 4 55 12 12 10 77 56 12 43 43 13 30 43 43 43 43 10 45 14 25 9 23 74 23 19 24 43 8 26 8 9 9 4 8 30 42 82 18 43
ユーザーガイド
 SWR12 ...4...4...4...5...5... 5... 5... 5...6...7... 7 LED... 7... 7... 8... 8... 9... 9 SmartBand 2 Android...10... 10... 10... 11 LED... 12... 12... 13... 13... 13 Google Fit... 13 STAMINA... 14 STAMINA...
LC-24_22_19K30.indb
 L C -24K 30 L C -22K 30 L C -19K 30 http://www.sharp.co.jp/support/aquos/ 2 3 4 5 6 7 8 LC-24K30 9 10 11 12 LC-24K30 8 10 PM 11 12 9 PM 13 10 PM 14 11 15 PM 16 0 17 AM 1 3 101 103 00 00 30 50 00 00 00
_TT-BA09 UM_说明书_ _1.3
 TT-BA09 www.taotronics.com NORTH AMERICA E-mail: support@taotronics.com (US) support.ca@taotronics.com(ca) Tel: 1-888-456-8468 (Monday-Friday: 9:00 17:00 PST) Address: 46724 Lakeview Blvd, Fremont, CA
国際恋愛で避けるべき7つの失敗と解決策
 7 http://lovecoachirene.com 1 7! 7! 1 NOT KNOWING WHAT YOU WANT 2 BEING A SUBMISSIVE WOMAN 3 NOT ALLOWING THE MAN TO BE YOUR HERO 4 WAITING FOR HIM TO LEAD 5 NOT SPEAKING YOUR MIND 6 PUTTING HIM ON A PEDESTAL
取説_KX-PW101CL_PW102CW
 See pages 270 and 271 for English Guide. KX-PW101CL KX-PW102CW Ni-Cd F1 F1 F2 F4 F1 F2 F4 F1 F2 F4 2 1 2 Ni-Cd Ni-Cd NTT NTT F1 F1 F1 F1 F1 F1 F1 F1 F4 F4 F4 F1 F4 F1
UK D Kick off your smartest training session J Table of contents: What you ll need Get started Kicking rules Find out more
 62690503 Quick Start Guide SMART BALL UK D Kick off your smartest training session J Table of contents: What you ll need Get started Kicking rules Find out more 4 6 10 11 2 3 What you ll need UK In the
19_22_26R9000操作編ブック.indb
 8 19R900022R900026R9000 25 34 44 57 67 2 3 4 10 37 45 45 18 11 67 25 34 39 26 32 43 7 67 7 8 7 9 8 5 7 9 21 18 19 8 8 70 8 19 7 7 7 45 10 47 47 12 47 11 47 36 47 47 36 47 47 24 35 8 8 23 12 25 23 OPEN
2
 8 23 32A950S 30 38 43 52 2 3 23 40 10 33 33 11 52 4 52 7 28 26 7 8 8 18 5 6 7 9 8 17 7 7 7 38 10 12 9 23 22 22 8 53 8 8 8 8 1 2 3 17 11 52 52 19 23 29 71 29 41 55 22 22 22 22 22 55 8 18 31 9 9 54 71 44
0 C C C C C C C
 C * This device can only be used inside Japan in areas that are covered by subscription cable TV services. ecause of differences in broadcast formats and power supply voltages, it cannot be used in overseas
% + RP-BC30 BATTERY CHARGER STAND K -! # % $ $ % % # $ $ $ %
 i C /RF-ND70R/RF-ND70R 3 4 3 4 5 6 7 % 8 5 6 7 8 9 : ;! # < = > #? @ 9 : ; < = >? @ % + RP-BC30 BATTERY CHARGER STAND K -! % @ # % $ $ % %! @ % # $ $ $ % % % % 3 %! @ % # $ % % % @ $ ! @ % # $ % ^ % ^
Ensemble en français
 Voyage de 7 jours en France Cinquième jour 3 : Annuler / Changer sa réservation 1. Annuler sa réservation 予約をキャンセルする A (Réceptionniste) : Hôtel Concorde, bonjour! : Bonjour, je voudrais annuler ma réservation.
REV. A MUSTANG GT40 MUSTANG GT100 MUSTANG GT200
 REV. A MUSTANG GT40 MUSTANG GT100 MUSTANG GT200 1 AUX INPUT GAIN VOLUME TREBLE MIDDLE BASS MASTER A. B. C. D. E. F. G. H. I. J. K. L. 2 M. GAIN VOLUME TREBLE MIDDLE BASS MASTER N. O. P. Q. R. S. 3 ENCODER
Rangänderung bei Teilhypotheken Wird die Forderung geteilt, so ist zur Änderung des Rangverhältnisses der Teilhypotheken untereinander die Zustimmung
 Rangänderung bei Teilhypotheken Wird die Forderung geteilt, so ist zur Änderung des Rangverhältnisses der Teilhypotheken untereinander die Zustimmung des Eigentümers nicht erforderlich. BGB BGB 175 BGB
MOTIF XF 取扱説明書
 MUSIC PRODUCTION SYNTHESIZER JA 2 (7)-1 1/3 3 (7)-1 2/3 4 (7)-1 3/3 5 http://www.adobe.com/jp/products/reader/ 6 NOTE http://japan.steinberg.net/ http://japan.steinberg.net/ 7 8 9 A-1 B-1 C0 D0 E0 F0 G0
 5 30 B36B3 4 5 56 6 7 3 4 39 4 69 5 56 56 60 5 8 3 33 38 45 45 7 8 4 33 5 6 8 8 8 57 60 8 3 3 45 45 8 9 4 4 43 43 43 43 4 3 43 8 3 3 7 6 8 33 43 7 8 43 40 3 4 5 9 6 4 5 56 34 6 6 6 6 7 3 3 3 55 40 55
0 C C C C C C
 C TU-HD50 TUNER TU - HD50 0 TU-HD50 C C C C S00-06C D D D 0 C C C C 4 5 6 7 8 9 C C C C C C C C C C C C C C C C C C C C C C TUNER TU - HD50 FGIH 0 C C C 0 FGIH C C C C C C FGIH FG IH FGIH I H FGIH FGIH
2
 8 23 26A800032A8000 31 37 42 51 2 3 23 37 10 11 51 4 26 7 28 7 8 7 9 8 5 6 7 9 8 17 7 7 7 37 10 13 12 23 21 21 8 53 8 8 8 8 1 2 3 17 11 51 51 18 23 29 69 30 39 22 22 22 22 21 56 8 9 12 53 12 56 43 35 27
2
 8 22 19A800022A8000 30 37 42 49 2 3 22 37 10 11 49 4 24 27 7 49 7 8 7 9 8 5 6 7 9 8 16 7 7 7 37 10 11 20 22 20 20 8 51 8 8 9 17 1 2 3 16 11 49 49 17 22 28 48 29 33 21 21 21 21 20 8 10 9 28 9 53 37 36 25
2
 8 24 32C800037C800042C8000 32 40 45 54 2 3 24 40 10 11 54 4 7 54 30 26 7 9 8 5 6 7 9 8 18 7 7 7 40 10 13 12 24 22 22 8 55 8 8 8 8 1 2 3 18 11 54 54 19 24 30 69 31 40 57 23 23 22 23 22 57 8 9 30 12 12 56
1 2 3 4
 LC-32GH1 LC-32GH2 1 2 3 4 5 4 6 7 8 9 10 11 1 2 3 4444444444 4444444 444444444 OIL BAR BAR CLINIC CLINIC 1 2 1 2 1 2 3 4 1 2 1 2 See page 44 if you wish to display menu screens
GL5000六国语言
 GL5000 User Guide I. Overview 1. Camera Lens 2. Indicator Light 3. Power On/Off Button 4. USB Port 5. Reset Button 6. SD Card Slot II. Product Accessories -1 USB Cable -1 Glasses Carrying Bag -1 User Guide
4 How to Print Cards When you want to print Select the cards you would like to print from your WORD LIST. About the WORD LIST To print multiple cards,
 5 Flash Cards Maker APRICOT Publishing www.apricot-plaza.co.jp 4 How to Print Cards When you want to print Select the cards you would like to print from your WORD LIST. About the WORD LIST To print multiple
V300 UserManual
 USER MANUAL V300 Dash Camera CONTENTS 01-10 11-0 1-30 31-40 41-50 51-60 Please tear off the film before installing it. 1 3 4 V300 Car Dash Camera English WHAT S IN THE BOX? 1 5 V300 Dash Camera Bracket
TT-BA07-说明书 v1.6-新版-改尺寸
 TT-BA07 www.taotronics.com NORTH AMERICA E-mail: support@taotronics.com (US) support.ca@taotronics.com(ca) Tel: 1-888-456-8468 (Monday-Friday: 9:00 17:00 PST) Address: 46724 Lakeview Blvd, Fremont, CA
2 3 12 13 6 7
 02 08 22AV55026AV550 17 25 32 22AV550 26AV550 39 50 2 3 12 13 6 7 3 4 11 8 8 9 9 8 9 23 8 9 17 4 11 4 33 12 12 11 24 18 12 10 21 39 21 4 18 18 45 45 11 5 6 7 76 39 32 12 14 18 8 1 2 32 55 1 2 32 12 54
打印
 USER MANUAL Vision 3 Action Camera CONTENTS 01-22 25-28 29-32 33-36 37-40 42-44 English YOUR VISION 3 13 14 1 2 144 5 3 6 7 8 11 1. Shutter / Select Button 2. Working Indicator 3. Power / Mode / Exit Button
TT-SK018-说明书 v1.2
 TT-SK018 www.taotronics.com NORTH AMERICA ASIA PACIFIC E-mail : support@taotronics.com(us) support.ca@taotronics.com(ca) Tel : 1-888-456-8468 (Monday-Friday: 9:00 17:00 PST) Address: 46724 Lakeview Blvd,
2
 8 26 38 37Z800042Z800047Z8000 54 65 72 83 101 2 3 4 7 101 53 27 33 7 8 9 5 7 9 22 47 72 8 8 8 8 102 8 13 7 7 7 65 10 67 67 13 71 40 67 67 67 67 43 67 12 55 55 11 104 8 24 26 24 20 25 6 1 2 3 18 46 101
BL57-NE
 (J) (1) 1 CLASS 1 LASER PRODUCT CLASS 1 LASER PRODUCT LASERSCHUTZKLASSE 1 PRODUKT TO EN 60825 (2) (J) (J) (3) C (4) (J) (J) (5) [For U.S.A. and Canada] THIS CLASS A DIGITAL DEVICE COMPLIES WITH PART15
10 11 12 33.4 1 open / window / I / shall / the? 79.3 2 something / want / drink / I / to. 43.5 3 the way / you / tell / the library / would / to / me
 -1- 10 11 12 33.4 1 open / window / I / shall / the? 79.3 2 something / want / drink / I / to. 43.5 3 the way / you / tell / the library / would / to / me? 28.7 4 Miyazaki / you / will / in / long / stay