Sliding Rack Mount Kit Installation
|
|
|
- ともみ なかじゅく
- 5 years ago
- Views:
Transcription
1 Sliding Rack Mount Kit Installation HP Workstation xw8200 This document describes how to install the sliding rack mount kit on an HP Workstation xw8200 and how to install the unit into a rack. This sliding rack mount kit works with HP, Compaq, and some third-party racks. The rack mount slides can fit racks inches deep. Kit Contents This product is shipped with the necessary supplies for installing the Sliding Rack Mount Kit on an HP Workstation xw8200 in a round hole, square hole, threaded hole, and earlier HP racks. The following list describes all of the included parts. Not all parts are used with every installation. Slide assembly (x2) (adjustable from inches) Left and right mounting flanges M5 hardware packet M5 screws (x12) and M5 clip nuts (x12) M6 hardware packet M6 screws (x12) and M6 clip nuts (x12) hardware packet screws (x12) and clip nuts (x12) Tools Required T-15 Torx driver T-25 Torx driver Phillips driver Flathead driver (possibly for third-party racks)
 and tilting the panel down. Then, lift the access panel away from the chassis. 3.")
 the plastic boss 1 out of its retention hole and sliding the cover toward the rear and off.")
2 Remove the Top Cover and Foot 1. Turn off the system and disconnect the power cable and all other cables from the back of the system. 2. Remove the access panel by lifting up on the handle (unlocking if necessary) and tilting the panel down. Then, lift the access panel away from the chassis. 3. Remove the foot by first removing the screw on the bottom (using a T-15 Torx driver or flat blade screwdriver) then pulling outward on the finger notch while sliding the foot toward the front of the workstation and lifting it off. 4. Remove the top cover by pushing (use a screwdriver) the plastic boss 1 out of its retention hole and sliding the cover toward the rear and off. 1 NOTE: If the top cover is difficult to remove: Remove the right side cover by removing the two screws attaching the side cover to the rear of chassis. Then push the side cover toward the top of the workstation. Be sure to the replace the right side cover and front bezel after removing the top cover. 5. Replace the access panel by aligning the guide rail on the bottom inside edge of the panel with the bottom edge of the workstation chassis. Then close the access panel.
3 Install the Inner Rails and Flanges 1. Align the left mounting flange with the screw holes on the left side (bottom) of the chassis. L R 2. Use a T-15 Torx driver and two M4 screws to attach the flange. 3. Remove the inner slide members from each slide. 4. Align the inner slide with the two screw holes on the left side (bottom) of the chassis. 5. Use a T-15 Torx driver and two M4 screws to attach the slide. 6. Repeat this process for the right side (top) of the chassis. Be sure to attach the right mounting flange first, then the inner slide.
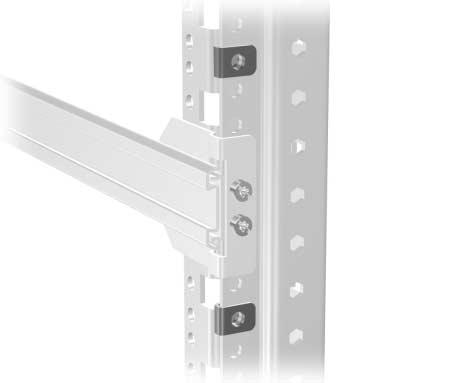
4 Install the Rails to the Rack 1. Use the mounting aid at the end of this document to determine a 5U space and mark the slide locations on the rack. 2. Install the appropriate clip nuts in the positions indicated if the rack does not have threaded holes. There will be four clip nuts on each front column and two on each rear column. Refer to the mounting aid at the end of this document for more information. NOTE: HP racks use M5 screws and clip nuts. Compaq racks use M6 screws and clip nuts, and many third-party racks use #10-32 screws and clip nuts. 3. Adjust the length of the rails to fit the rack using a Phillips driver. Only the rear mounting bracket should be adjusted. Loosen the rear slide bracket and adjust the rack depth by putting the mounting brackets to the outside of the front and rear columns and sliding inwards to fit the rack. Re-tighten the screws. 4. Attach rails to where marked in step 1. Secure the rails to the rack by inserting two appropriate screws for your rack (see previous note). Be sure the slide extends to the front but do not extend the slide. Threaded rack (clips not required) Front column on unthreaded rack (with necessary clips)
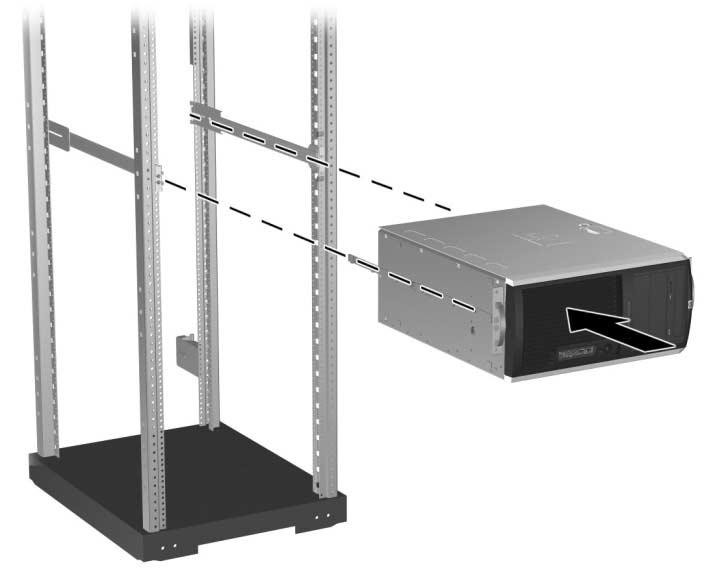
5 5. Slide the workstation into the rack by engaging the inner slides with the outer slide mechanism. CAUTION: This step requires two people. 6. Slide the workstation into the rack until it stops. Then, fully extend the slides, press the release button, and slide the unit all the way back into the rack.
6 7. Secure the workstation to the rack using four of the same screws that were used to attach the slide assemblies. Use two screws in each mounting flange. Mounting Aid 1. Place the next page on the bottom of the rack (or on top of an already installed unit in a rack). 2. Align the outlined holes with the rack holes to determine a 5U space. 3. The 5U space will be the top of the workstation after it is installed. 4. Mark the two spaces below the 3U line. This will be the center line of the slides.
7
8 Hewlett-Packard Development Company, L.P. The HP Invent logo is a registered trademark of Hewlett-Packard Development Company, L.P.
9 スライディングラックマウントキットの取り付け HP Workstation xw8200 本書では HP ワークステーション xw8200 にスライディングラックマウントキットを取り付ける方法とラックにユニットを取り付ける方法について説明します このスライディングラックマウントキットは HP Compaq およびサードパーティ製のラックに使えます ラックマウントスライドは 奥行きが 61 ~ 76 センチメートル (24 ~ 30 インチ ) のラックに納めることができます キットの内容 本製品は 丸穴 角穴 ネジ穴のあるラック および HP の初期型ラックに HP Workstation xw8200 のスライディングラックマウントキットを取り付けるために必要な部品といっしょに出荷されます 以下のリストでは 添付されるすべての部品を説明しています 必ずしもすべての部品を取り付けに使うというわけではありません スライドアセンブリ (x2) (61 ~ 76 センチメートル (24 ~ 30 インチ ) の間で調整可能 ) 左右マウントフランジ M5 ハードウェアパケット M5 ネジ (x12) と M5 クリップナット (x12) M6 ハードウェアパケット M6 ネジ (x12) と M6 クリップナット (x12) ハードウェアパケット ネジ (x12) と クリップナット (x12) 必要な工具 T-15 トルクスドライバ T-25 トルクスドライバ プラスドライバ マイナスドライバ ( サードパーティ製の場合必要となる可能性がある )
10 トップカバーと脚の取り外し 1. システムの電源を切り システムの背面から電源ケーブルとその他すべてのケーブルを切り離します 2. ハンドルを引き上げ ( 必要に応じてロックを解除 ) パネルを下に傾けてアクセスパネルを取り外します 次に アクセスパネルをシャーシから持ち上げます 3. 底面のネジを (T-15 トルクスドライバまたはマイナスドライバを使って ) 取り外してから フィンガーノッチで外側に引き出し ワークステーションの前方にスライドさせながら脚を取り外します 4. プラスティックの突起 1 を ( ドライバを使って ) 固定穴から押し出し 後ろへカバーをスライドさせて トップカバーを取り外します 1 注記 : トップカバーを取り外すのが難しい場合は シャーシの後ろ側にサイドカバーを取り付けている 2 本のネジを外して 右のサイドカバーを取り外します 次に ワークステーションの上方向へサイドカバーを押します トップカバーを取り外した後 右のサイドカバーとフロントベゼルを必ず元に戻してください
 にあるネジ穴に合わせます L R 2. T-15 トルクスドライバと 2 本の M4 ネジを使用し フランジを取り付けます 3.")

11 5. パネルのエッジ内側底面のガイドレールをワークステーションのシャーシの底部エッジに合わせて アクセスパネルを元に戻し 閉じます 内側のレールとフランジを取り付ける 1. 左マウントフランジを シャーシの左側 ( 底部 ) にあるネジ穴に合わせます L R 2. T-15 トルクスドライバと 2 本の M4 ネジを使用し フランジを取り付けます 3. 各スライドから内部スライドのメンバを取り外します 4. シャーシの左側 ( 底部 ) の 2 つのネジ穴に内側のスライドを合わせます 5. T-15 トルクスドライバと 2 本の M4 ネジを使用し スライドを取り付けます 6. シャーシの右側 ( 上面 ) についても この手順を繰り返します 必ず 右側のマウントフランジ 内側のスライドの順に取り付けしてください

12 ラックへのレールの取り付け 1. 巻末のマウントエイドを使って 5U スペースを決定し ラックにスライド位置の印をつけます 2. ラックにネジ穴がない場合は 印のついている位置にクリップナットを正しく取り付けます 前の各カラムにはそれぞれ4 個 後ろの各カラムにはそれぞれ2 個のクリップナットがあります 詳細については 巻末のマウントエイドを参照してください 注記 : HP のラックは M5 ネジとクリップナットを使用します Compaq のラックは M6 ネジとクリップナットを 多くのサードパーティ製のラックは #10-32 ネジとクリップナットを使用します 3. プラスドライバを使用して ラックに合うようにレールの長さを調整します 後側のマウントブラケットだけを調整します フロントとリアのカラムの外側へマウントブラケットを置き 内側へスライドさせてラックを合わせ 後側のスライドブラケットを緩め ラックの奥行きを調整します ネジを締め直します 4. 手順 1 で印を付けた場所へレールを取り付けます お使いのラックに適正なネジを 2 本挿入し レールをラックに固定します ( 前述の注記を参照してください ) スライドは前に伸びますが 決して伸ばさないでください

13 ネジ穴ラック ( クリップ不要 ) ネジ穴のないラックのフロントカラム ( クリップが必要 ) 5. 内側のスライドを外側のスライド構造にはめ込んで ワークステーションをラックにスライドさせます 注意 : この作業は 二人で行ってください

 穴の輪郭を合わせて 5U スペースを決定します 3. 5U スペースは ワークステーションが取り付けられた後は その上部にあります 4.")
14 6. ワークステーションが止まるまでラックにスライドさせます 次にスライドを完全に引き出し リリースボタンを押して ラックの後ろまでユニットをスライドさせます 7. スライドアセンブリを取り付けるために使用したものと同じネジを 4 本使用してワークステーションをラックに固定します 各マウントフランジにそれぞれ 2 本のネジを使用します マウントエイド 1. 次ページをラック底部 ( またはラックにすでに取り付けられたユニットの上部 ) に貼ります 2. ラックの穴に ( 次ページの ) 穴の輪郭を合わせて 5U スペースを決定します 3. 5U スペースは ワークステーションが取り付けられた後は その上部にあります 4. 3U ラインの下に2 つのスペースの印をつけます これがスライドの中央線になります
15
16 Hewlett-Packard Development Company, L.P. The HP Invent logo is a registered trademark of Hewlett-Packard Development Company, L.P.
Diskette Drive Installation
 Diskette Drive Installation HP Workstation xw Series This document describes how to install a diskette drive. Kit Contents This product is shipped with the necessary supplies for installing a diskette
Diskette Drive Installation
 Diskette Drive Installation HP xw Series Workstation This document describes how to install a diskette drive. Kit Contents This product is shipped with the necessary supplies for installing a diskette
PCI Express Graphics Products
 PCI Express Graphics Products This graphics card uses the PCI Express hardware interconnect standard. It is designed to work using your PCI Express x16 I/O slot. PCI Express is the successor to the PCI,
スライディング ラック マウント キットの取り付け
 スライディングラックマウントキットの取り付け 概要 このマニュアルでは HP 600 ワークステーションおよび HP 800 ワークステーションでのスライディングラックマウントキットの取り付け方法を説明します また ワークステーションをラックに取り付ける方法についても説明します キットの内容 この製品には HP ラウンドホールおよびスクエアホールラック 従来の HP ラック スレッドホール付きのラックなどのサードパーティ製ラックにスライディングラックキットを取り付けるために必要になる部品が含まれています
ラック マウント トレイの取り付け
 ラックマウントトレイの取り付け 601530-293 2012 Hewlett-Packard Development Company, L.P. ラックマウントトレイの取り付け はじめに このガイドでは ラックマウントトレイを HP Z2x0 CMT Z4x0 および xw4x00 ワークステーションシリーズに取り付ける方法について説明します また トレイを取り付けたワークステーションをラックに設置する方法についても説明します
Creative Sound Blaster Audigy 2 ZS Quick Start Guide
 Creative Sound Blaster Audigy 2 ZS Quick Start Guide This document describes the hardware and software installation of the Creative Sound Blaster Audigy 2 ZS. For more information, refer to the Installation
NSR-500 Installation Guide
 NSR Installation Guide This information has been prepared for the professional installers not for the end users. Please handle the information with care. Overview This document describes HDD installation
Creative Sound Blaster Audigy 2 ZS クイック スタート ガイド
 Creative Sound Blaster Audigy 2 ZS クイックスタートガイド This document describes the hardware and software installation of the Creative Sound Blaster Audigy 2 ZS. For more information, refer to the Installation
 6 50G5S 3 34 47 56 63 http://toshibadirect.jp/room048/ 74 8 9 3 4 5 6 3446 4755 566 76373 7 37 3 8 8 3 3 74 74 79 8 30 75 0 0 4 4 0 7 63 50 50 3 3 6 3 5 4 4 47 7 48 48 48 48 7 36 48 48 3 36 37 6 3 3 37
 6 3 34 50G5 47 56 63 74 8 9 3 4 5 6 3446 4755 566 76373 7 37 3 8 8 3 3 74 74 79 8 30 75 0 0 4 4 0 7 63 50 50 3 3 6 3 5 4 4 47 7 48 48 48 48 7 36 48 48 3 36 37 6 3 3 37 9 00 5 45 3 4 5 5 80 8 8 74 60 39
2
 8 23 32A950S 30 38 43 52 2 3 23 40 10 33 33 11 52 4 52 7 28 26 7 8 8 18 5 6 7 9 8 17 7 7 7 38 10 12 9 23 22 22 8 53 8 8 8 8 1 2 3 17 11 52 52 19 23 29 71 29 41 55 22 22 22 22 22 55 8 18 31 9 9 54 71 44
2
 8 23 26A800032A8000 31 37 42 51 2 3 23 37 10 11 51 4 26 7 28 7 8 7 9 8 5 6 7 9 8 17 7 7 7 37 10 13 12 23 21 21 8 53 8 8 8 8 1 2 3 17 11 51 51 18 23 29 69 30 39 22 22 22 22 21 56 8 9 12 53 12 56 43 35 27
2
 8 22 19A800022A8000 30 37 42 49 2 3 22 37 10 11 49 4 24 27 7 49 7 8 7 9 8 5 6 7 9 8 16 7 7 7 37 10 11 20 22 20 20 8 51 8 8 9 17 1 2 3 16 11 49 49 17 22 28 48 29 33 21 21 21 21 20 8 10 9 28 9 53 37 36 25
2
 8 24 32C800037C800042C8000 32 40 45 54 2 3 24 40 10 11 54 4 7 54 30 26 7 9 8 5 6 7 9 8 18 7 7 7 40 10 13 12 24 22 22 8 55 8 8 8 8 1 2 3 18 11 54 54 19 24 30 69 31 40 57 23 23 22 23 22 57 8 9 30 12 12 56
fx-9860G Manager PLUS_J
 fx-9860g J fx-9860g Manager PLUS http://edu.casio.jp k 1 k III 2 3 1. 2. 4 3. 4. 5 1. 2. 3. 4. 5. 1. 6 7 k 8 k 9 k 10 k 11 k k k 12 k k k 1 2 3 4 5 6 1 2 3 4 5 6 13 k 1 2 3 1 2 3 1 2 3 1 2 3 14 k a j.+-(),m1
 5 7 3AS40AS 33 38 45 54 3 4 5 4 9 9 34 5 5 38 6 8 5 8 39 8 78 0 9 0 4 3 6 4 8 3 4 5 9 5 6 44 5 38 55 4 4 4 4 5 33 3 3 43 6 6 5 6 7 3 6 0 8 3 34 37 /78903 4 0 0 4 04 6 06 8 08 /7 AM 9:3 5 05 7 07 AM 9
untitled
 Neo-Flex Mobile Media Center, LD with 90 Portrait/Landscape rotation Holds displays with the following VESA mounting hole pattern: 100 x 100 mm 200 x 200 mm 200 x 300 mm 300 x 200 mm 300 x 300 mm 400 x
 5 30 B36B3 4 5 56 6 7 3 4 39 4 69 5 56 56 60 5 8 3 33 38 45 45 7 8 4 33 5 6 8 8 8 57 60 8 3 3 45 45 8 9 4 4 43 43 43 43 4 3 43 8 3 3 7 6 8 33 43 7 8 43 40 3 4 5 9 6 4 5 56 34 6 6 6 6 7 3 3 3 55 40 55
H8000操作編
 8 26 35 32H800037H800042H8000 49 55 60 72 2 3 4 48 7 72 32 28 7 8 9 5 7 9 22 43 20 8 8 8 8 73 8 13 7 7 7 55 10 49 49 13 37 49 49 49 49 49 49 12 50 11 76 8 24 26 24 24 6 1 2 3 18 42 72 72 20 26 32 80 34
Creative Sound Blaster Audigy 2 ZS
 Creative Sound Blaster Audigy 2 ZS Quick Start Guide This document describes the hardware and software installation of the Creative Sound Blaster Audigy 2 ZS. For more information, refer to the Installation
注意 Caution 1) AMT-KS を溶接ロボット等に取り付ける際には 必ず溶接機の電源を OFF にし 電気が流れていないことを確認した後 作業を行ってください Keep off of the welding power source during AMT-KS installation w
 AMT-KS を溶接ロボット等に取り付ける際には 必ず溶接機の電源を OFF にし 電気が流れていないことを確認した後 作業を行ってください Keep off of the welding power source during AMT-KS installation w") 溶業資 No.012015-L001 溶接ワイヤ用矯正機 Welding wire straightener 取扱説明書 Instruction manual Ver.1.0-1- 注意 Caution 1) AMT-KS を溶接ロボット等に取り付ける際には 必ず溶接機の電源を OFF にし 電気が流れていないことを確認した後 作業を行ってください Keep off of the welding power
溶業資 No.012015-L001 溶接ワイヤ用矯正機 Welding wire straightener 取扱説明書 Instruction manual Ver.1.0-1- 注意 Caution 1) AMT-KS を溶接ロボット等に取り付ける際には 必ず溶接機の電源を OFF にし 電気が流れていないことを確認した後 作業を行ってください Keep off of the welding power
19_22_26R9000操作編ブック.indb
 8 19R900022R900026R9000 25 34 44 57 67 2 3 4 10 37 45 45 18 11 67 25 34 39 26 32 43 7 67 7 8 7 9 8 5 7 9 21 18 19 8 8 70 8 19 7 7 7 45 10 47 47 12 47 11 47 36 47 47 36 47 47 24 35 8 8 23 12 25 23 OPEN
ACY-RKSL
 2-634-743-01 (1) Rack Mounting Kit 取扱説明書 Page 2 JP Operating Instructions Page 9 GB お買い上げいただきありがとうございます 電気製品は安全のための注意事項を守らないと 火災や人身事故になることがあります この取扱説明書には 事故を防ぐための重要な注意事項と製品の取り扱いかたを示してあります この取扱説明書をよくお読みのうえ
Page 1 of 6 B (The World of Mathematics) November 20, 2006 Final Exam 2006 Division: ID#: Name: 1. p, q, r (Let p, q, r are propositions. ) (10pts) (a
 November 20, 2006 Final Exam 2006 Division: ID#: Name: 1. p, q, r (Let p, q, r are propositions. ) (10pts) (a") Page 1 of 6 B (The World of Mathematics) November 0, 006 Final Exam 006 Division: ID#: Name: 1. p, q, r (Let p, q, r are propositions. ) (a) (Decide whether the following holds by completing the truth
Page 1 of 6 B (The World of Mathematics) November 0, 006 Final Exam 006 Division: ID#: Name: 1. p, q, r (Let p, q, r are propositions. ) (a) (Decide whether the following holds by completing the truth
1 2 3
 INFORMATION FOR THE USER DRILL SELECTION CHART CARBIDE DRILLS NEXUS DRILLS DIAMOND DRILLS VP-GOLD DRILLS TDXL DRILLS EX-GOLD DRILLS V-GOLD DRILLS STEEL FRAME DRILLS HARD DRILLS V-SELECT DRILLS SPECIAL
MA-L/MA-T Owner's manual
 KKS Mounting Adapters Owner s manual Thank you for purchasing the Korg MA-T rack tray (Mounting Adapter - Tray) and/or MA-L locking support (Mounting Adapter - Locking support). These product will allow
VE-GP32DL_DW_ZA
 VE-GP32DL VE-GP32DW 1 2 3 4 5 6 1 2 3 4 1 1 2 3 2 3 1 1 2 2 2006 Copyrights VisionInc. @. _ & $ % + = ^ @. _ & $ % + = ^ D11 D12 D21
警告および注意 警告! 装置の表面または領域にこの記号が貼付されている場合は 高温の表面または高温の部品が存在することを示しています この表面に触れると 火傷をするおそれがあります 高温の部品による火傷の危険を防ぐため 必ず 表面の温度が十分に下がってから手を触れてください 警告! 装置の表面または
 IEEE-1394 カードの取り付け HP xw シリーズワークステーション このマニュアルでは ワークステーションで使用する IEEE-1394 カードの取り付け方法を説明します キットの内容 IEEE-1394 カードキットには次のコンポーネントが含まれています IEEE-1394(A または B) カード Y アダプタ電源ケーブル ( 一部のキットで使用 ) 保証書 インストール手順 お使いになる前に
VE-GD21DL_DW_ZB
 V E-G D21D L V E-G D21D W 1 2 3 4 1 2 1 2 1 2 2 1 2 3 1 2 3 1 2 3 1 4 4 2 3 5 5 1 2 3 4 1 2 3 1 2 3 4 1 2 3 2006 Copyrights VisionInc. @. _ & $ % + = ^ 2011
 6 4 4 9RERE6RE 5 5 6 7 8 9 4 5 6 4 4 5 6 8 4 46 5 7 54 58 60 6 69 7 8 0 9 9 79 0 4 0 0 4 4 60 6 9 4 6 46 5 4 4 5 4 4 7 44 44 6 44 8 44 46 44 44 4 44 0 4 4 5 4 8 6 0 4 0 4 4 5 45 4 5 50 4 58 60 57 54
2 3 12 13 6 7
 2 8 17 42ZH700046ZH700052ZH7000 28 43 54 63 74 89 2 3 12 13 6 7 3 4 11 21 34 63 65 8 17 4 11 4 55 12 12 10 77 56 12 43 43 13 30 43 43 43 43 10 45 14 25 9 23 74 23 19 24 43 8 26 8 9 9 4 8 30 42 82 18 43
 6 4 45 ZS7ZS4ZS 5 59 7 8 94 05 4 5 6 4 5 5 6 8 8 40 45 48 56 60 64 66 66 68 7 78 80 8 7 8 0 0 0 90 0 0 4 4 4 4 6 57 64 69 66 66 66 69 4 0 7 48 5 4 4 5 4 4 4 7 46 46 6 46 8 46 48 46 46 4 46 46 4 4 5 4
How to read the marks and remarks used in this parts book. Section 1 : Explanation of Code Use In MRK Column OO : Interchangeable between the new part
 Reservdelskatalog MIKASA MVB-85 rullvibrator EPOX Maskin AB Postadress Besöksadress Telefon Fax e-post Hemsida Version Box 6060 Landsvägen 1 08-754 71 60 08-754 81 00 info@epox.se www.epox.se 1,0 192 06
GP05取説.indb
 E -G V P 05D L V E -G P 05D W Ni-MH + + + + + + + + + + + + + + + + + + + + + + + + + + + + + + + + + + 1 + 2 + 3 + 4 + 5 + 6 1 2 3 4 5 6 + + + 1 + + + + + + + + + + + + + + + + + + 1 A B C + D + E
How to read the marks and remarks used in this parts book. Section 1 : Explanation of Code Use In MRK Column OO : Interchangeable between the new part
 Reservdelskatalog MIKASA MT65H vibratorstamp EPOX Maskin AB Postadress Besöksadress Telefon Fax e-post Hemsida Version Box 6060 Landsvägen 1 08-754 71 60 08-754 81 00 info@epox.se www.epox.se 1,0 192 06
内蔵ハードディスクユニット-20GB (PG-HD2E4H) 内蔵ハードディスクユニット-40GB (PG-HD4E4H)取扱説明書 HARD DISK DRIVE 20GB(PG-HD2E4H) HARD DISK DRIVE 40GB(PG-HD4E4H) USER'S GUIDE
 内蔵ハードディスクユニット-40GB (PG-HD4E4H)取扱説明書 HARD DISK DRIVE 20GB(PG-HD2E4H) HARD DISK DRIVE 40GB(PG-HD4E4H) USER'S GUIDE") B7FY-0351-02 J E J 1 J 1 2 3 2 4 J 3 4 Preface Thank you very much for purchasing the hard disk drive. This hard disk drive provides a IDE interface and can be installed in the 3.5-inch storage bay of
B7FY-0351-02 J E J 1 J 1 2 3 2 4 J 3 4 Preface Thank you very much for purchasing the hard disk drive. This hard disk drive provides a IDE interface and can be installed in the 3.5-inch storage bay of
How to read the marks and remarks used in this parts book. Section 1 : Explanation of Code Use In MRK Column OO : Interchangeable between the new part
 Reservdelskatalog MIKASA MVC-50 vibratorplatta EPOX Maskin AB Postadress Besöksadress Telefon Fax e-post Hemsida Version Box 6060 Landsvägen 1 08-754 71 60 08-754 81 00 info@epox.se www.epox.se 1,0 192
 6 4 45 7ZS 5 59 7 8 94 05 4 5 6 4 5 5 6 8 8 40 45 48 56 60 64 66 66 68 7 78 80 8 7 8 0 0 0 90 0 57 64 69 66 66 69 0 4 4 4 4 4 0 7 48 5 4 4 5 4 4 4 7 46 46 6 46 8 46 48 46 46 4 46 46 4 4 5 4 6 4 9 9 0
How to read the marks and remarks used in this parts book. Section 1 : Explanation of Code Use In MRK Column OO : Interchangeable between the new part
 Reservdelskatalog MIKASA MCD-L14 asfalt- och betongsåg EPOX Maskin AB Postadress Besöksadress Telefon Fax e-post Hemsida Version Box 6060 Landsvägen 1 08-754 71 60 08-754 81 00 info@epox.se www.epox.se
PFQX2227_ZA
 V E -G P 05D B Ni-MH 1 2 3 4 5 6 1 2 3 4 5 6 A B C D E F 1 2 A B C 1 2 3 2 0 7 9 4 6 6 4 7 9 1 2 3 # 6 6 2 D11 D12 D21 D22 19 # # # # Ni-MH Ω Ω
2
 L C -24K 9 L C -22K 9 2 3 4 5 6 7 8 9 10 11 12 11 03 AM 04 05 0 PM 1 06 1 PM 07 00 00 08 2 PM 00 4 PM 011 011 021 041 061 081 051 071 1 2 4 6 8 5 7 00 00 00 00 00 00 00 00 30 00 09 00 15 10 3 PM 45 00
メモリ モジュールの着脱
 Removing or Inserting a Memory Module HP Compaq Business Notebook nx7000 Compaq Presario X1000 Notebook PC Series Compaq Presario X1200 Notebook PC Series HP Pavilion zt3000 Notebook PC RTF Title (GR)
 L C -6D Z3 L C -0D Z3 3 4 5 6 7 8 9 10 11 1 13 14 15 16 17 OIL CLINIC BAR 18 19 POWER TIMER SENSOR 0 3 1 3 1 POWER TIMER SENSOR 3 4 1 POWER TIMER SENSOR 5 11 00 6 7 1 3 4 5 8 9 30 1 3 31 1 3 1 011 1
2 3
 * This device can only be used inside Japan in areas that are covered by subscription cable TV services. Because of differences in broadcast formats and power supply voltages, it cannot be used in overseas
NSR-500 Create DVD Installer Procedures
 Creating NSR-500 DVD Installer Overview This document describes how to create DVD installer for the NSR-500 series. Applicable Model NSR-500 Series To be required * Windows (XP, Vista or 7) installed PC
Canofix_Manual_JP 1805
 Installation Manual Thank you for purchasing CANOFIX. Please give us a call or email if you have any questions regards toinstallation. (* canofixjapan@gmail.com *Required Tools Copyright 2015 Mr. Can All
03-01 Senyouki.pdf
 Special Surface Treatment Rust-free under normal use conditions. No loss of precision due to rust. Minimum maintenance required. Stub Holder KH-E KH-EC1 Stub Holder KH-A 406 KH-E Quick Change Stub Holder
% + RP-BC30 BATTERY CHARGER STAND K -! # % $ $ % % # $ $ $ %
 i C /RF-ND70R/RF-ND70R 3 4 3 4 5 6 7 % 8 5 6 7 8 9 : ;! # < = > #? @ 9 : ; < = >? @ % + RP-BC30 BATTERY CHARGER STAND K -! % @ # % $ $ % %! @ % # $ $ $ % % % % 3 %! @ % # $ % % % @ $ ! @ % # $ % ^ % ^
I N S T R U M E N T A T I O N & E L E C T R I C A L E Q U I P M E N T Pressure-resistant gasket type retreat method effective bulk compressibility Fro
 Cable Gland This is the s to use for Cable Wiring in the hazardous location. It is much easier to install and maintenance and modification compared with Conduit Wiring with Sealing Fitting. The Standard
2 3
 RR-XR330 C Matsushita Electric Industrial Co., Ltd.2001 2 3 4 + - 5 6 1 2 3 2 1-3 + + - 22 +- 7 22 8 9 1 2 1 2 1 2 3 12 4 1 2 5 12 1 1 2 3 1 2 1 2 10 11 1 2 $% 1 1 2 34 2 % 3 % 1 2 1 2 3 1 2 12 13 1 2
取説_KX-PW101CL_PW102CW
 See pages 270 and 271 for English Guide. KX-PW101CL KX-PW102CW Ni-Cd F1 F1 F2 F4 F1 F2 F4 F1 F2 F4 2 1 2 Ni-Cd Ni-Cd NTT NTT F1 F1 F1 F1 F1 F1 F1 F1 F4 F4 F4 F1 F4 F1
How to read the marks and remarks used in this parts book. Section 1 : Explanation of Code Use In MRK Column OO : Interchangeable between the new part
 Reservdelskatalog MIKASA MVC-88 vibratorplatta EPOX Maskin AB Postadress Besöksadress Telefon Fax e-post Hemsida Version Box 6060 Landsvägen 1 08-754 71 60 08-754 81 00 info@epox.se www.epox.se 1,0 192
取説_KX-PW38CL_PW48CL
 KX-PW38CL KX-PW48CL See pages 260 and 261 for English Guide. 2 3 1 2 NTT NTT Ni-Cd Ni-Cd 1 2 3 4 5 6 7 8 9 0 1 2 3 4 5 6 7 8 9 0 1 2 3 4 5 6 7 8 9 0 0 6 1 2 3
Bead Instructions First, locate the acupressure point you wish to stimulate. Next, remove a plastic bead from the bag. Remove the backing from the adh
 icewave Instructions Bead Instructions First, locate the acupressure point you wish to stimulate. Next, remove a plastic bead from the bag. Remove the backing from the adhesive plastic patch included.
平成29年度英語力調査結果(中学3年生)の概要
の概要") 1 2 3 1 そう思う 2 どちらかといえば そう思う 3 どちらかといえば そう思わない 4 そう思わない 4 5 楽しめるようになりたい 6 1 そう思う 2 どちらかといえば そう思う 3 どちらかといえば そう思わない 4 そう思わない 7 1 そう思う 2 どちらかといえば そう思う 3 どちらかといえば そう思わない 4 そう思わない 8 1 そう思う 2 どちらかといえば そう思う
1 2 3 1 そう思う 2 どちらかといえば そう思う 3 どちらかといえば そう思わない 4 そう思わない 4 5 楽しめるようになりたい 6 1 そう思う 2 どちらかといえば そう思う 3 どちらかといえば そう思わない 4 そう思わない 7 1 そう思う 2 どちらかといえば そう思う 3 どちらかといえば そう思わない 4 そう思わない 8 1 そう思う 2 どちらかといえば そう思う
2
 8 26 38 37Z800042Z800047Z8000 54 65 72 83 101 2 3 4 7 101 53 27 33 7 8 9 5 7 9 22 47 72 8 8 8 8 102 8 13 7 7 7 65 10 67 67 13 71 40 67 67 67 67 43 67 12 55 55 11 104 8 24 26 24 20 25 6 1 2 3 18 46 101
Installing an IEEE-1394 card
 Installing an IEEE-1394 card Installing an IEEE-1394 card Kit contents This document describes how to install an IEEE-1394 card in your HP workstation. The following components are included in your processor
1) 1) Props of preparation. Wire Scale Spike Cutter Hammer Tape Marker (, ) Rope(For Sezing) 2) 2) Marking A 22 A point Position of twenty-two times t
 1) Props of preparation. Wire Scale Spike Cutter Hammer Tape Marker (, ) Rope(For Sezing) 2) 2) Marking A 22 A point Position of twenty-two times t") 1) 1) Props of preparation. Wire Scale Spike Cutter Hammer Tape Marker (, ) Rope(For Sezing) 2) 2) Marking A 22 A point Position of twenty-two times the Dia, from the end of the rope. B A B point Position
1) 1) Props of preparation. Wire Scale Spike Cutter Hammer Tape Marker (, ) Rope(For Sezing) 2) 2) Marking A 22 A point Position of twenty-two times the Dia, from the end of the rope. B A B point Position
*Ł\”ƒ‚ä(DCH800)
") B B B B B B B B B C * This device can only be used inside Japan in areas that are covered by subscription cable TV services. Because of differences in broadcast formats and power supply voltages, it cannot
B B B B B B B B B C * This device can only be used inside Japan in areas that are covered by subscription cable TV services. Because of differences in broadcast formats and power supply voltages, it cannot
00_1512_SLIMLINE_BOOK.indb
 PIECE type SLIM type Imbalance value Less interference type, ideal for deep machining Ideal for drilling 2 PIECE REGULAR type Rigidity value Nozzle type When compared to the slim type, it has more rigidity
C H H H C H H H C C CUTION:These telephones are for use in Japan only. They cannot be used in other countries because of differences in voltages, tele
 VE-PV01LVE-PVW01LVE-PVC01L 1 4 7 2 3 5 6 8 9 * 0 # C H H H C H H H C C CUTION:These telephones are for use in Japan only. They cannot be used in other countries because of differences in voltages, telephone
取説_VE-PV11L(応用編)
") * 0 # VE-PV11L VE-PVC11L VE-PS109N 1 2 3 4 5 6 7 8 9 C H H H C H H H C C CAUTION:These telephones are for use in Japan only. They cannot be used in other countries because of differences in voltages, telephone
* 0 # VE-PV11L VE-PVC11L VE-PS109N 1 2 3 4 5 6 7 8 9 C H H H C H H H C C CAUTION:These telephones are for use in Japan only. They cannot be used in other countries because of differences in voltages, telephone
C FGIH C C C C C C C C C C C C C C C C C C C C C C C C C C C C C C C C C C C C C C C C C C C C C C C C C C C C C C C
 TUDSR5SET TUDSR5 C 7 8 9 ch DIGITAL CS TUNER C C C C S-A C FGIH C C C C C C C C C C C C C C C C C C C C C C C C C C C C C C C C C C C C C C C C C C C C C C C C C C C C C C C C C C C C C C C C C C C C C
Z7000操作編_本文.indb
 2 8 17 37Z700042Z7000 46Z7000 28 42 52 61 72 87 2 3 12 13 6 7 3 4 11 21 34 61 8 17 4 11 4 53 12 12 10 75 18 12 42 42 13 30 42 42 42 42 10 62 66 44 55 14 25 9 62 65 23 72 23 19 24 42 8 26 8 9 9 4 11 18
 VE-SV03DL VE-SV03DW Ni-MH Ni-MH Ni-MH 1 2 3 1 2 Ni-MH 3 4 5 I H 3 IH IH IH IH 2 0 4 6 6 1 2 3 # 6 6 4 I H I H I H I H I H I H I H NTT Ni-MH Ni-MH Ni-MH Ω 0570-087-087
MINAS取説アブソ警告クリア方法記載ミス_モータニュース…
 194 201 228 235 268 275 Absolute System Battery installation Initial installation Connect the lead wire from the battery unit top to its own connector. Wait for 5 minutes and then install the battery to
2
 L C -60W 7 2 3 4 5 6 7 8 9 0 2 3 OIL CLINIC BAR 4 5 6 7 8 9 2 3 20 2 2 XXXX 2 2 22 23 2 3 4 5 2 2 24 2 2 25 2 3 26 2 3 6 0 2 3 4 5 6 7 8 9 2 3 0 2 02 4 04 6 06 8 08 5 05 2 3 4 27 2 3 4 28 2 3 4 5 2 2
Nvidia Quadro FX5800 グラフィックスカードおよび補助電源アダプタケーブルの取り付け 概要 このマニュアルでは Nvidia Quadro FX5800 グラフィックスカードおよび補助電源アダプタケーブルを HP xw8600 ワークステーションと xw9400 ワークステーション
 Nvidia Quadro FX5800 グラフィックスカードおよび補助電源アダプタケーブルの取り付け 概要 このマニュアルでは Nvidia Quadro FX5800 グラフィックスカードおよび補助電源アダプタケーブルを HP xw8600 ワークステーションと xw9400 ワークステーションに取り付ける方法を説明します キットの内容 FX5800 グラフィックスカード 補助電源アダプタケーブル
*Ł\”ƒ‚ä(CV03)
") VE-CV03 VE-CVW03 VE-CV03 VE-CVW03 Ni-Cd C C BC BC C C C C C C C C C C A C C C A A # $ % & ' # $ 64 A A A A ( A % & ' ( ) ) A * A + A * +, - /. 0/ 10 21 32 53, A - A A. A A / A 0 A 1 A 2 A A A A 3 4 #
VE-CV03 VE-CVW03 VE-CV03 VE-CVW03 Ni-Cd C C BC BC C C C C C C C C C C A C C C A A # $ % & ' # $ 64 A A A A ( A % & ' ( ) ) A * A + A * +, - /. 0/ 10 21 32 53, A - A A. A A / A 0 A 1 A 2 A A A A 3 4 #
ドライバインストールガイド
 PRIMERGY Single Port ファイバーチャネルカード (8Gbps) Dual Port ファイバーチャネルカード (8Gbps) (PG-FC205/PG-FC205L) (PG-FC206/PG-FC206L) CA092276-8938-01 ドライバインストールガイド i 目次 1. ドライバのインストール / アンインストール方法... 3 1.1. ドライバのダウンロード
TB-2606 Terminal Block Installation Guide (Multilingual)
") INSTALLATION GUIDE TB-2606 Terminal Block Contents Introduction This installation guide describes how to install and connect signals to the TB-2606 terminal block for use with the NI 2501 and NI 2503 PXI
INSTALLATION GUIDE TB-2606 Terminal Block Contents Introduction This installation guide describes how to install and connect signals to the TB-2606 terminal block for use with the NI 2501 and NI 2503 PXI
Microsoft Word - KUINS-Air_W10_ docx
 KUINS-Air 無線 LAN への接続 (Windows10) How to connect to Wi-Fi KUINS-Air (Windows10) 2019 年 7 月 KUINS-Air への接続には A ID パスワードを使用した接続 もしくは B クライアント証明書を使用した接続方法の 2 種類があります There are 2 ways to connect to KUINS-Air,
TK-M700…p†[…c…−…X…g
 TK Tape cutter device Machine models M700 Series / TK Series Parts Catalog INTRODUCTION This parts catalog covers the TK Series device. On pages 3-12, each mechanism is arranged on facing pages, the first
WARNING To reduce the risk of fire or electric shock,do not expose this apparatus to rain or moisture. To avoid electrical shock, do not open the cabi
 ES-600P Operating Instructions WARNING To reduce the risk of fire or electric shock,do not expose this apparatus to rain or moisture. To avoid electrical shock, do not open the cabinet. Refer servicing
ラックの取り付け
 EFT ドラフト APPENDIX A この付録では について説明します 内容は次のとおりです ラックに関する要件 (P.A-1) ラックマウントに関する事項 (P.A-2) ラックへの Cisco MDS 9250i スイッチの取り付け (P.A-6) ラックに関する要件 ここでは 周囲温度が 32 ~ 104 F(0 ~ 40 C) であると想定し 次のラックに設置する場合の要件を示します Cisco
取扱説明書_KX-PW100CL
 See pages 236 238 for English Guide. KX-PW100CL Ni-MH KX-PW100CL-W KX-FKN100-W 1 2 NTT NTT 1 4 3 4 5 6
EP82レスポフロント
 86 LED Tail Lamp Installation Manual 86/FR-S/BRZ 用 このたびは 86LED テールランプをお買い上げ頂き 誠にありがとうございます 本製品の取付け を以下に記します 正しい取付けをお願いいたします 本取付け説明書は 自動車整備技能検定 3 級合格者 程度の方を対象に記述してあります 用語等で不明な点は 整備解説書等をご参照くださ い なお 取付け等に関するお問い合わせは
A5 PDF.pwd
 Kwansei Gakuin University Rep Title Author(s) 家 族 にとっての 労 働 法 制 のあり 方 : 子 どもにとっての 親 の 非 正 規 労 働 を 中 心 に Hasegawa, Junko, 長 谷 川, 淳 子 Citation 法 と 政 治, 65(3): 193(825)-236(868) Issue Date 2014-11-30 URL
25 II :30 16:00 (1),. Do not open this problem booklet until the start of the examination is announced. (2) 3.. Answer the following 3 proble
,. Do not open this problem booklet until the start of the examination is announced. (2) 3.. Answer the following 3 proble") 25 II 25 2 6 13:30 16:00 (1),. Do not open this problem boolet until the start of the examination is announced. (2) 3.. Answer the following 3 problems. Use the designated answer sheet for each problem.
25 II 25 2 6 13:30 16:00 (1),. Do not open this problem boolet until the start of the examination is announced. (2) 3.. Answer the following 3 problems. Use the designated answer sheet for each problem.
Contents Logging in 3-14 Downloading files from e-ijlp 15 Submitting files on e-ijlp Sending messages to instructors Setting up automatic
 e-ijlp(lms) の使い方 How to Use e-ijlp(lms) 学生用 / Guidance for Students (ver. 2.1) 2018.3.26 金沢大学総合日本語プログラム Integrated Japanese Language Program Kanazawa University Contents Logging in 3-14 Downloading files
I N S T R U M E N T A T I O N & E L E C T R I C A L E Q U I P M E N T STW Symbol Symbol otary switch) 05 otary switch Symbol angle of notch 181
 05 otary switch Symbol angle of notch 181") These items are using an aluminum alloy cast, so the weight is corrosion-resistant and excel halo tolerance and is light-weight and it's about 1/3 compared with conventional cast iron and made of steel
These items are using an aluminum alloy cast, so the weight is corrosion-resistant and excel halo tolerance and is light-weight and it's about 1/3 compared with conventional cast iron and made of steel
PCI Express グラフィックス カードの取り付け
 PCI Express graphics card installation HP xw Workstation series This document describes how to install a PCI Express graphics card in your workstation. This graphics card uses the PCI Express hardware
PCSK-R1 設定マニュアル (A)
") 設定マニュアル (A) 対応コンピュータ HP Z2 mini G3 Workstation / G4 Workstation HP EliteDesk 800 G3 DM HP Elite Slice HP t310 G2 Zero Client HP t530 Thin Client Dell Wyse 3010TC Dell Wyse 5010TC / 5020 Dell Wyse 5030PCoIP
設定マニュアル (A) 対応コンピュータ HP Z2 mini G3 Workstation / G4 Workstation HP EliteDesk 800 G3 DM HP Elite Slice HP t310 G2 Zero Client HP t530 Thin Client Dell Wyse 3010TC Dell Wyse 5010TC / 5020 Dell Wyse 5030PCoIP
P3FY J E
 P3FY-1490-01 J E J 1 J 1 2 2 J 3 3 4 4 5 J 5 Preface Thank you very much for purchasing the hard disk drive. This hard disk drive provides a IDE interface and can be installed in the 3.5-inch storage
WE WESB WENB WESNB 428
 KH-A-NL Quick Change Stub Tapper Designed for use on KH-A spindle. Spindle Feed: All kinds of feed styles.for spindle feed other than pitch feed, use KH-A-NL in a condition where the tension feature always
Specification for Manual Pulse Generator, GFK-2262
 Specification change in Manual Pulse Generator () A) Abstract This document explains about the specification change in Manual Pulse Generator (). The production of the former specifications written in
OUTSIDE FRONT COVER Setup Guide セットアップ ガイド C M Y K PMS 3005
 OUTSIDE FRONT COVER Setup Guide セットアップ ガイド C M Y K PMS 3005 Microsoft Surface Hub with 55 display MS Surface Hub Setup Guide English This guide assumes youʼve already unpacked and mounted Microsoft Surface
 Title 社 会 化 教 育 における 公 民 的 資 質 : 法 教 育 における 憲 法 的 価 値 原 理 ( fulltext ) Author(s) 中 平, 一 義 Citation 学 校 教 育 学 研 究 論 集 (21): 113-126 Issue Date 2010-03 URL http://hdl.handle.net/2309/107543 Publisher 東 京
Microsoft Word - PCM TL-Ed.4.4(特定電気用品適合性検査申込のご案内)
") (2017.04 29 36 234 9 1 1. (1) 3 (2) 9 1 2 2. (1) 9 1 1 2 1 2 (2) 1 2 ( PSE-RE-101/205/306/405 2 PSE-RE-201 PSE-RE-301 PSE-RE-401 PSE-RE-302 PSE-RE-202 PSE-RE-303 PSE-RE-402 PSE-RE-203 PSE-RE-304 PSE-RE-403
(2017.04 29 36 234 9 1 1. (1) 3 (2) 9 1 2 2. (1) 9 1 1 2 1 2 (2) 1 2 ( PSE-RE-101/205/306/405 2 PSE-RE-201 PSE-RE-301 PSE-RE-401 PSE-RE-302 PSE-RE-202 PSE-RE-303 PSE-RE-402 PSE-RE-203 PSE-RE-304 PSE-RE-403
LC304_manual.ai
 Stick Type Electronic Calculator English INDEX Stick Type Electronic Calculator Instruction manual INDEX Disposal of Old Electrical & Electronic Equipment (Applicable in the European Union
L3 Japanese (90570) 2008
 2008") 90570-CDT-08-L3Japanese page 1 of 15 NCEA LEVEL 3: Japanese CD TRANSCRIPT 2008 90570: Listen to and understand complex spoken Japanese in less familiar contexts New Zealand Qualifications Authority: NCEA
90570-CDT-08-L3Japanese page 1 of 15 NCEA LEVEL 3: Japanese CD TRANSCRIPT 2008 90570: Listen to and understand complex spoken Japanese in less familiar contexts New Zealand Qualifications Authority: NCEA
32C2100操作編ブック.indb
 02 08 32C2100 18 24 31 37 2 3 12 13 6 7 68 67 41 42 33 34 3 4 11 8 18 4 11 4 22 13 23 11 23 12 13 14 15 10 18 19 20 20 10 9 20 18 23 22 8 8 22 9 9 4 30 10 10 11 5 13 13 16 15 26 24 37 40 39 6 7 8 1 2 29
 10 2000 11 11 48 ( ) ( ) ( ) ( ) ( ) ( ) ( ) ( ) ( ) CU-SeeMe NetMeeting Phoenix mini SeeMe Integrated Services Digital Network 64kbps 16kbps 128kbps 384kbps
 MFS 8A3 9.8A3 #026832XE OB NO.002-21051-4 0910 NB 3,400 HOW TO USE THIS PARTS LIST 1. This Parts List contains the component parts of the Tohatsu outboard motors. 2. Please keep the Parts List updated
Huawei G6-L22 QSG-V100R001_02
 G6 1 2 3 4 5 6 7 8 9 10 11 12 13 14 15 16 1 2 3 17 4 5 18 UI 100% 8:08 19 100% 8:08 20 100% 8:08 21 100% 8:08 22 100% 8:08 ********** 23 100% 8:08 Happy birthday! 24 S S 25 100% 8:08 26 http://consumer.huawei.com/jp/
Microsoft Word - Win-Outlook.docx
 Microsoft Office Outlook での設定方法 (IMAP および POP 編 ) How to set up with Microsoft Office Outlook (IMAP and POP) 0. 事前に https://office365.iii.kyushu-u.ac.jp/login からサインインし 以下の手順で自分の基本アドレスをメモしておいてください Sign
警告および注意 警告! 装置の表面または領域にこの記号が貼付されている場合は 高温の表面または高温の部品が存在することを示しています この表面に触れると 火傷をするおそれがあります 高温の部品による火傷の危険を防ぐため 必ず 表面の温度が十分に下がってから手を触れてください 警告! 装置の表面または
 PCI Express グラフィックスカードの取り付け HP xw シリーズワークステーション このマニュアルでは ワークステーションで使用する PCI Express グラフィックスカードの取り付け方法を説明します このグラフィックスカードでは PCI Express ハードウェア相互接続規格が採用されています PCI Express は PCI PCI-X および AGP I/O 規格に準拠しています
LC-24_22_19K30.indb
 L C -24K 30 L C -22K 30 L C -19K 30 http://www.sharp.co.jp/support/aquos/ 2 3 4 5 6 7 8 LC-24K30 9 10 11 12 LC-24K30 8 10 PM 11 12 9 PM 13 10 PM 14 11 15 PM 16 0 17 AM 1 3 101 103 00 00 30 50 00 00 00
ユーザーズガイド
 T2 iddr Rack Mount Kit ユーザーズガイド www.grassvalley.jp F3951410062 October 2014 ご注意 (1) 本製品の一部または全部を無断で複製することを禁止します (2) 本製品の内容や仕様は将来予告無しに変更することがあります (3) 本製品は内容について万全を期して作成いたしましたが 万一ご不審な点や誤り 記載漏れなどお気付きの点がございましたら
MIDI_IO.book
 MIDI I/O t Copyright This guide is copyrighted 2002 by Digidesign, a division of Avid Technology, Inc. (hereafter Digidesign ), with all rights reserved. Under copyright laws, this guide may not be duplicated