Standard-L/M/S Assembly Guide
|
|
|
- とらふみ あきくぼ
- 6 years ago
- Views:
Transcription
1
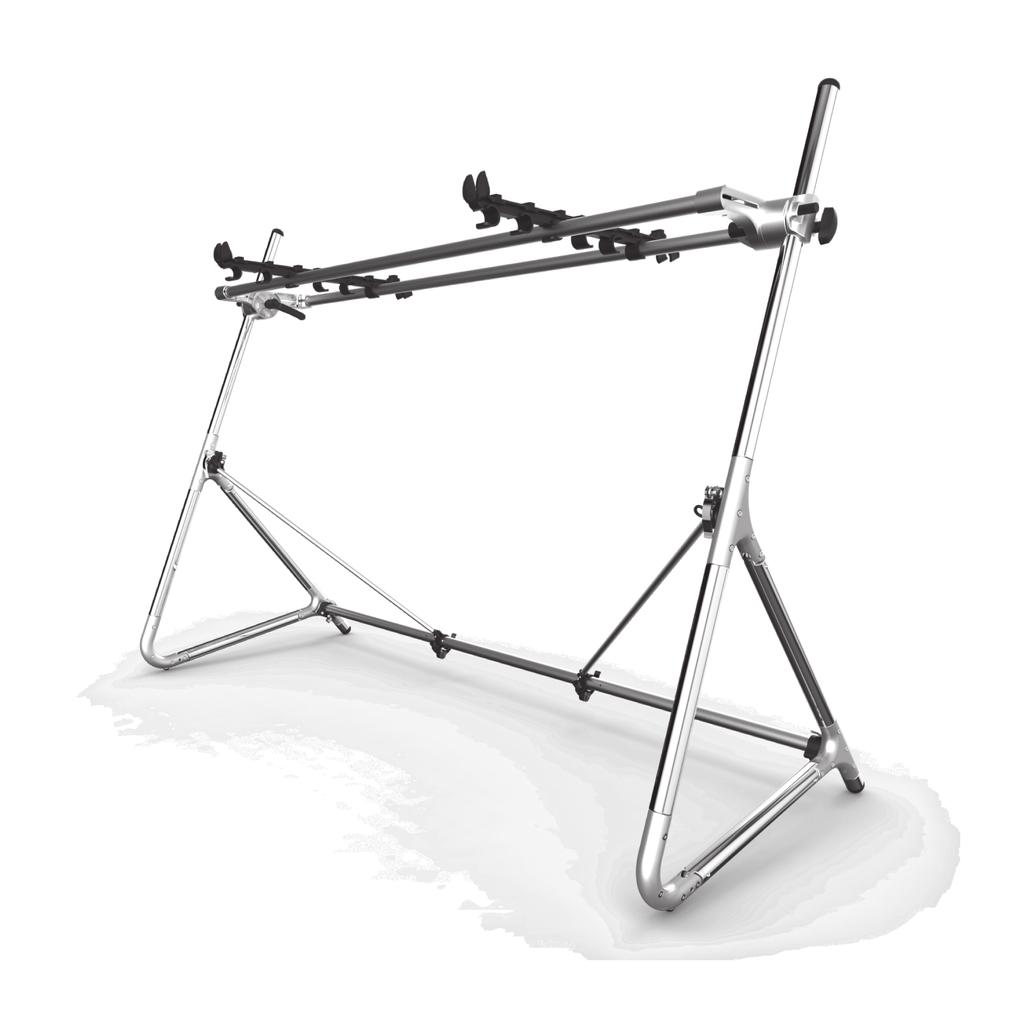
2 Precautions Location Using the unit in the following locations can result in a malfunction. In direct sunlight Locations of extreme temperature or humidity xcessively dusty or dirty locations Locations of excessive vibration Handling To avoid breakage, do not apply excessive force to the switches or controls. are If the exterior becomes dirty, wipe it with a clean, dry cloth. o not use liquid cleaners such as benzene or thinner, or cleaning compounds or flammable polishes. Keep this manual fter reading this manual, please keep it for later reference. Keeping foreign matter out of your equipment Never set any container with liquid in it near this equipment. If liquid gets into the equipment, it could cause a breakdown, fire, or electrical shock. e careful not to let metal objects get into the equipment. IMPORTNT NOTI TO ONSUMRS This product has been manufactured according to strict specifications and voltage requirements that are applicable in the country in which it is intended that this product should be used. If you have purchased this product via the internet, through mail order, and/or via a telephone sale, you must verify that this product is intended to be used in the country in which you reside. WRNING: Use of this product in any country other than that for which it is intended could be dangerous and could invalidate the manufacturer s or distributor s warranty. Please also retain your receipt as proof of purchase otherwise your product may be disqualified from the manufacturer s or distributor s warranty. * ll product names and company names are the trademarks or registered trademarks of their respective owners. aution uring ssembly In order to safely assemble the stand, please observe the following points: ssembly must be carried out by at least two people. e careful not to pinch your fingers during assembly. List of Parts Please check the illustration below carefully, and make sure you have all the parts before assembly. ssemble the parts in a flat, stable location. Using the Quick Release In order to lock the quick release with enough strength, you should feel a certain amount of resistance when locking the lever. See the illustration when adjusting the lever. 1 Unlock the lever. 2 Turn the adjusting nut in the direction of the arrow, and tighten it until you feel a small amount of resistance. 3 Fold the lever down 180 to lock it. If the clamping force does not seem tight enough, open the lever again, and tighten the adjusting nut. Using the Height djustment Knob Follow the steps in the illustration to tighten the height adjustment knob. Knurled nut Height adjustment knob 1 Turn the knurled nut in the direction of the arrow to tighten, while the height adjustment knob is loose. 2 Turn the height adjustment knob in the direction of the arrow to secure it to the pipe. Firmly tighten the knob until it is entirely snug so that it is secure. Steps for ssembly [1] Lay out parts and as shown in the diagram, and hold the bottom side pipe in place. orrect Incorrect Push the bottom side arm firmly into the locking mechanism. [2] Insert both ends of into parts and. : Right leg : Left leg : Side pipes : Tier (keyboard rack) : Keyboard holders Lever (c) Keyboard Holders To take off the keyboard holders, turn the keyboard holders while pulling them off the pipes on the tier. To make the stand more compact when carrying it around, attach the keyboard holders to the tier by following the steps in reverse order. 1 Position part so that the quick release lever (c) faces the rear side. 2 Open the quick release levers for and. 3 Insert the ends of part as far as they will go. 4 Lock the quick release levers for and to stabilize part. 2
3 [3] Fold out the rods (narrow pole) on part. [6] Place the parts (keyboard holders) onto part, and rotate them accordingly so that they snap onto part. Stopper Rod Quick release 1 Release the quick release levers at each base of the rod. 2 Slide the quick release to the stopper position. 3 Move the rods outwards horizontally. [4] Lock the rod ends of onto and. 1 Place the parts at an angle opposed to the pipes of part. 2 Rotate the parts in the direction of the arrow, and snap them onto the pipes. Place the parts towards the outside as much as possible, in order to distribute the weight of the instrument, and to reduce the amount of vibration and swaying when playing. Using the Keyboard Holders Front Keyboard stopper ack The attachment position of the keyboard holders can be moved forward or backward, to match the size of the instrument that you are using. Position the keyboard stoppers in front of you, in a configuration which makes the instrument easy to play. You re now finished assembling the stand. Place the instrument on the stand, aligned with the keyboard stoppers. 1 Open the quick release levers for and. 2 Insert the ends of the rods as far as they will go. 3 Lock the quick release levers for and to stabilize the rod ends. 4 Lock the quick release for part to stabilize the bases of the rods. efore doing step 4, make sure that the bases of the rods are not misaligned away from the stopper positions. [5] ttach part (the tier) as shown in the illustration, and turn the handles to lock. Handle If you fail to tighten the handles, your instrument may fall off the tier and become damaged, or you may become injured. For this reason, be sure to stabilize the tier by firmly tightening the handles until they cannot move any more. When the handle interferes with the instrument: Grab the handle as shown in the illustration, and pull out the handle while pressing in the center part to rotate the handle part only. djust the handle angle so that it does not interfere with the instrument. Precautions fter ssembly - djusting the height and angle Take your instrument off of the stand before adjusting the stand s height and angle. Failure to do so may result in your hand getting pinched, or the stand may fall over and injure you. djusting the height: 1 Loosen the height adjustment knob. 2 Slide the tier up and down, and turn the height adjustment knob to lock the tier in place. djusting the angle: 1 Loosen the handles on the inside of the tier to adjust the angle. 2 Once you have decided on the tier angle, firmly close the handles to lock the tier in place. - What to do when the quick release levers or height adjustment knobs are loose fter you assemble the stand, the quick release levers and height adjustment knobs may gradually become loose over time. Periodically check these parts to make sure that they are not loose. If the stand seems to vibrate a lot when you are playing, retighten the quick release adjusting nuts and the height adjustment knobs. When carrying the stand This stand can easily be disassembled without changing the height adjustments. isassemble the stand using the steps you use to assemble the stand in reverse order. You do not need to remove the holders in order to remove the tier. With the holders still attached to the pipes, loosen the handles and disassemble as shown in the illustration. You will be able to quickly reassemble the stand as it was before. Handle Holder 3
4 Précautions mplacement L utilisation de cet instrument dans les endroits suivants peut en entraîner le mauvais fonctionnement. n plein soleil ndroits très chauds ou très humides ndroits sales ou fort poussiéreux ndroits soumis à de fortes vibrations Maniement Pour éviter de les endommager, manipulez les commandes et les boutons de cet instrument avec soin. ntretien Lorsque l instrument se salit, nettoyez-le avec un chiffon propre et sec. Ne vous servez pas d agents de nettoyage liquides tels que du benzène ou du diluant, voire des produits inflammables. onservez ce manuel près avoir lu ce manuel, veuillez le conserver soigneusement pour toute référence ultérieure. vitez toute intrusion d objets ou de liquide Ne placez jamais de récipient contenant du liquide près de l instrument. Si le liquide se renverse ou coule, il risque de provoquer des dommages, un court-circuit ou une électrocution. Veillez à ne pas laisser tomber des objets métalliques dans le boîtier (trombones, par ex.). RMRQU IMPORTNT POUR LS LINTS e produit a été fabriqué suivant des spécifications sévères et des besoins en tension applicables dans le pays où ce produit doit être utilisé. Si vous avez acheté ce produit via l internet, par vente par correspondance ou/et vente par téléphone, vous devez vérifier que ce produit est bien utilisable dans le pays où vous résidez. TTNTION: L utilisation de ce produit dans un pays autre que celui pour lequel il a été conçu peut être dangereuse et annulera la garantie du fabricant ou du distributeur. onservez bien votre récépissé qui est la preuve de votre achat, faute de quoi votre produit ne risque de ne plus être couvert par la garantie du fabricant ou du distributeur. * Tous les noms de produits et de sociétés sont des marques commerciales ou déposées de leur détenteur respectif. Prudence durant le montage Observez les points suivants pour veiller à la sécurité durant le montage. Le montage doit être effectué par deux personnes au moins. Veillez à ne pas vous pincer les doigts durant le montage du pied. Liste des pièces Observez soigneusement l'illustration ci-dessous et assurez-vous d'avoir toutes les pièces avant de commencer l'assemblage. ssemblez les pièces sur un espace plat et stable. Utiliser le mécanisme de libération rapide Pour verrouiller le mécanisme de libération rapide avec une force suffisante, vous devriez sentir un certain degré de résistance lors du verrouillage du levier. Référez-vous à l'illustration pour ajuster le levier. 1 éverrouillez le levier. 2 Tournez l'écrou d'ajustement dans le sens indiqué par la flèche, et serrez-le jusqu'à sentir un certain degré de résistance. 3 Repliez le levier de 180 pour le verrouiller. Si la force de serrage ne semble pas suffisante, ouvrez de nouveau le levier et serrez l'écrou d'ajustement. Utiliser la manette d ajustement de hauteur Suivez les procédures illustrées pour serrer la manette d'ajustement de hauteur. Écrou moleté Manette 1 Tournez l'écrou moleté dans le d ajustement de hauteur sens indiqué par la flèche pour le serrage, tant que la manette d'ajustement de hauteur sont desserrée. 2 Tourner la manette d'ajustement de hauteur dans le sens indiqué par la flèche pour la serrer sur le tube. Serrer fermement la manette jusqu'à ce qu'elle soit bien serrée contre le tube afin de la fixer. Procédures d'assemblage [1] Placez les éléments et comme indiqué sur le schéma et maintenez le tube du côté inférieur en place. orrect Incorrect Poussez fermement le bras du côté inférieur dans le mécanisme de verrouillage. [2] Insérez les deux extrémités de dans les éléments et. : Pied droit : Pied gauche : Tubes latéraux : Plateau (étagère pour clavier) : Supports pour clavier Supports pour clavier Pour retirer les supports pour clavier, les faire tourner tout en les tirant pour les dégager des tubes sur le plateau. Pour rendre le stand plus compact durant le déplacement, fixer les supports pour clavier sur le plateau en suivant les procédures en ordre inverse. Levier (c) 4 1 Positionnez l'élément afin que le levier de libération rapide (c) soit orienté vers la face arrière. 2 Ouvrez les leviers de libération rapide des éléments et. 3 Insérez les extrémités de l'élément aussi profondément que possible. 4 Verrouillez les leviers de libération rapide des éléments et pour fixer l'élément.
5 [3] épliez les tiges (mâts étroits) de l'élément. [6] Placez les éléments (supports pour clavier) sur l'élément, et faites-les tourner afin qu'ils s'enclenchent sur l'élément. rrêt Tige ispositif de libération rapide 1 Ouvrez les leviers de libération rapide à la base de chaque tige. 2 Faites glisser les dispositifs de libération rapide jusqu'aux positions d'arrêt. 3 éplacez les tiges horizontalement vers l'extérieur. [4] Fixez les extrémités des tiges de l'élément sur et. 1 Placez les éléments avec un angle opposé par rapport aux tubes de l'élément. 2 Faites tourner les éléments dans le sens indiqué par la flèche, et enclenchez-les sur les tubes. Placez les éléments autant vers l'extérieur que possible, pour répartir le poids de l'instrument et réduire la quantité de vibrations et de balancement durant l'utilisation. Utiliser les supports pour clavier vant rrêt de clavier rrière L'assemblage du stand est terminé. Placez l'instrument sur son stand, aligné sur les arrêts de clavier. La position de fixation des supports pour clavier peut être décalée vers l'avant ou vers l'arrière, pour s'adapter à la taille de l'instrument que vous utilisez. Placez les arrêts de clavier devant vous, dans une configuration qui facilite l'utilisation de l'instrument. 1 Ouvrez les leviers de libération rapide des éléments et. 2 Insérez les extrémités des tiges aussi profondément que possible. 3 Verrouillez les leviers de libération rapide des éléments et pour fixer les extrémités des tiges. 4 Verrouillez les dispositifs de libération rapide sur l'élément pour stabiliser les bases des tiges. vant d'effectuer la procédure 4, assurez-vous que les bases des tiges sont bien alignées avec les positions d'arrêt. [5] Fixez l'élément (le plateau) comme illustré, et tournez les poignées pour le verrouiller en place. Poignée Si vous ne serrez pas les poignées, votre instrument peut tomber du plateau et subir des dégâts, ou vous pourriez être blessé(e). Pour cette raison, assurez-vous de bien stabiliser le plateau en serrant fermement les poignées jusqu'à ce qu'elles ne puissent plus bouger. Si la poignée interfère avec l'instrument : Tenez la poignée comme illustré et tirez-la tout en pressant la section centrale pour ne faire tourner que la partie poignée. justez l'angle de la poignée afin qu'elle ne gêne pas l'instrument. Précautions à prendre après l'assemblage - justement de hauteur et d'angle Retirez votre instrument du stand avant d'ajuster la hauteur et l'angle du stand. Si vous ne le faites pas, vous risquez de vous faire pincer la main, ou le stand pourrait basculer et vous blesser. Pour ajuster la hauteur : 1 esserrez la manette d'ajustement de hauteur. 2 Faites coulisser le plateau vers le haut ou le bas, puis tourner la manette d'ajustement de hauteur pour verrouiller le plateau en place. Pour ajuster l'angle d'inclinaison : 1 esserrez les poignées à l'intérieur du plateau pour ajuster l'angle. 2 Une fois l'angle du plateau décidé, serrez fermement les poignées pour verrouiller le plateau en place. - Que faire si les leviers de libération rapide ou les manettes d'ajustement de hauteur se desserrent? près l assemblage du stand, les leviers de libération rapide et les manettes d'ajustement de hauteur peuvent progressivement se desserrer au fil du temps. Vérifiez régulièrement ces éléments pour vous assurer qu'ils ne sont pas desserrés. Si le stand semble beaucoup vibrer pendant que vous jouez, resserrez les écrous d'ajustement des mécanismes de libération rapide et les manettes d'ajustement de hauteur. Transporter le stand Il est facile de démonter ce stand sans modifier les ajustements de hauteur. émontez le stand en suivant les procédures utilisées pour assembler le stand dans l'ordre inverse. Il n'est pas nécessaire de retirer les supports de clavier pour retirer le plateau. vec les supports fixés sur les tubes, desserrez les poignées et démontez l'ensemble comme illustré. Vous pourrez ré-assembler rapidement le stand tel qu'il était avant le démontage. Poignée Support 5
6 Vorsichtsmaßnahmen ufstellungsort Vermeiden Sie das ufstellen des Geräts an Orten, an denen es direkter Sonneneinstrahlung ausgesetzt ist; hohe Feuchtigkeit oder xtremtemperaturen auftreten können; Staub oder Schmutz in großen Mengen vorhanden sind; das Gerät rschütterungen ausgesetzt sein kann. edienung Vermeiden Sie bei der edienung von Schaltern und Reglern unangemessenen Kraftaufwand. Reinigung ei auftretender Verschmutzung können Sie das Gehäuse mit einem trockenen, sauberen Tuch abwischen. Verwenden Sie keinerlei Flüssigreiniger wie beispielsweise Reinigungsbenzin, Verdünnungsoder Spülmittel. Verwenden Sie niemals brennbare Reiniger. edienungsanleitung ewahren Sie diese edienungsanleitung gut auf, falls Sie sie später noch einmal benötigen. Flüssigkeiten und Fremdkörper Stellen Sie niemals ehältnisse mit Flüssigkeiten in der Nähe des Geräts auf. Wenn Flüssigkeit in das Gerät gelangt, können eschädigung des Geräts, Feuer oder ein elek-trischer Schlag die Folge sein. eachten Sie, daß keinerlei Fremdkörper in das Gerät gelangen. WIHTIGR HINWIS FÜR KUNN ieses Produkt wurde unter strenger eachtung von Spezifikationen und Spannungsanforderungen hergestellt, die im estimmungsland gelten. Wenn Sie dieses Produkt über das Internet, per Postversand und/oder mit telefonischer estellung gekauft haben, müssen Sie bestätigen, dass dieses Produkt für Ihr Wohngebiet ausgelegt ist. WRNUNG: Verwendung dieses Produkts in einem anderen Land als dem, für das es bestimmt ist, verwendet wird, kann gefährlich sein und die Garantie des Herstellers oder Importeurs hinfällig lassen werden. itte bewahren Sie diese Quittung als Kaufbeleg auf, da andernfalls das Produkt von der Garantie des Herstellers oder Importeurs ausgeschlossen werden kann. * lle Produkt- und Firmennamen sind Warenzeichen oder eingetragene Warenzeichen der betreffenden igentümer. Vorsicht beim Zusammenbau Im Sinne eines ordnungsgemäßen und sicheren Zusammenbaus müssen Sie folgende Punkte beachten. Zum ufbau sind mindestens zwei Personen nötig. chten Sie darauf, sich die Finger beim Zusammenbau nicht zu quetschen. Schnellspanner-edienung Um sicherzustellen, dass der Schnellspanner ausreichend fest verriegelt ist, sollte beim Sichern des Hebels ein gewisser Widerstand spürbar sein. eim instellen des Hebels die bbildung berücksichtigen. 1 en Hebel lösen. 2 ie instellmutter in Pfeilrichtung anziehen, bis ein geringer Widerstand spürbar ist. 3 en Hebel um 180 nach unten klappen, um ihn zu sichern. Ist die Klemmkraft unzureichend, den Hebel erneut lösen und die instellmutter nachziehen. Höhenverstellknopf-edienung eim Festziehen des Höhenverstellknopfs die bbildung berücksichtigen. Rändelmutter Höhenverstellknopf 1 ie Rändelmutter bei gelöstem Höhenverstellknopf in Pfeilrichtung anziehen. 2 en Höhenverstellknopf in Pfeilrichtung drehen, um ihn am Rohr zu sichern. en Knopf ausreichend anziehen, um eine solide Verbindung zu erzielen. Zusammenbau [1] ie Teile und wie in der bbildung gezeigt anordnen und das Querrohr in Stellung halten. Richtig Falsch as untere Seitenrohr fest in die Verriegelung drücken. [2] eide nden des Teils in die Teile und stecken. Lieferumfang Vor dem Zusammenbau anhand folgender bbildung überprüfen, dass alle notwendigen Teile vorhanden sind. en Zusammenbau auf einer ebenen und festen Unterlage vornehmen. : Rechtes ein : Linkes ein : Querrohr : Rahmen (Keyboard-uflage) : Keyboard-Halter Keyboard-Halter Zum bnehmen der Keyboard-Halter diese drehen und dabei von den Rahmenrohren abziehen. Um den Ständer für Transportzwecke kompakter zu machen, die Keyboard-Halter in umgekehrter Schrittfolge am Rahmen anbringen. Hebel (c) 1 Teil so anordnen, dass der Schnellspanner-Hebel (c) nach hinten gerichtet ist. 2 ie Schnellspanner-Hebel für und lösen. 3 ie nden des Teils so weit wie möglich einschieben. 4 ie Schnellspanner-Hebel für und sichern, um Teil zu stabilisieren. 6
7 [3] ie Streben (schmale Stangen) am Teil aufklappen. [6] ie Teile (Keyboard-Halter) auf Teil ablegen und dann so drehen, dass sie an Teil einschnappen. nschlag Strebe Schnellspanner 1 ie Schnellspanner-Hebel an den Streben-nden lösen. 2 en Schnellspanner bis zum nschlag verschieben. 3 ie Streben nach außen klappen. [4] ie Streben-nden des Teils an den Teilen und befestigen. 1 ie Teile im rechten Winkel zu den Rohren von Teil anordnen. 2 ie Teile in Pfeilrichtung drehen, sodass sie an Teil einschnappen. ie Teile so weit wie möglich nach hinten anordnen, um das Gewicht des Instrumentes zu verteilen und um Schwingen und Schwanken beim Spielen zu verringern. insatz der Keyboard-Halter Vorn Keyboard-nschlag Hinten ie efestigungslage der Keyboard- Halter kann zur npassung an die usmaße des Instrumentes nach vorn oder hinten verschoben werden. ie Keyboard-nschläge auf den Musiker gerichtet so anordnen, dass das Instrument sich bequem spielen lässt. er Zusammenbau des Ständers ist hiermit abgeschlossen. as Instrument so auf dem Ständer anordnen, dass es an den Keyboard-nschlägen anliegt. 1 ie Schnellspanner-Hebel für und lösen. 2 ie Streben-nden so weit wie möglich einschieben. 3 ie Schnellspanner-Hebel für und sichern, um die Streben-nden zu fixieren. 4 en Schnellspanner für Teil sichern, um die Streben-nden zu fixieren. Vor dem usführen von Schritt 4 sicherstellen, dass die Streben-nden an deren nschlägen anliegen. [5] as Teil (Rahmen) wie in der bbildung gezeigt anbringen und durch Schwenken der Hebel sichern. Hebel Werden die Hebel nicht gesichert, könnte das Instrument vom Ständer abstürzen und beschädigt werden oder der enutzer sich verletzen. eshalb die Hebel festziehen, bis sie sich nicht mehr bewegen lassen, sodass der Rahmen stabil ist. Wenn der Hebel das Instrument stört: en Hebel wie in der bbildung gezeigt greifen und bei eingedrückter Mitte nach außen ziehen, sodass lediglich der Hebel gedreht werden kann. en Hebel so ausrichten, dass er das Instrument nicht stört. Vorsichtsmaßnahmen nach dem Zusammenbau - Höhen- und Winkelverstellung as Instrument vor der Höhen- und Winkelverstellung des Ständers vom Ständer abnehmen. nderenfalls besteht Quetschgefahr der Hand oder Umstürzgefahr des Ständers und Verletzungsgefahr. Höhenverstellung 1 en Höhenverstellknopf lösen. 2 en Rahmen nach oben oder unten verschieben und dann durch rehen des Höhenverstellknopfes sichern. Winkelverstellung 1 ie Hebel an der Innenseite des Rahmens lösen, um den Winkel zu verstellen. 2 Nach der Winkelverstellung den Rahmen durch Schwenken der Hebel sichern. - Was tun, wenn die Schnellspanner-Hebel oder Höhenverstellknöpfe locker sind? Nach dem Zusammenbau des Ständers können die Schnellspanner- Hebel und Höhenverstellknöpfe allmählich locker werden. iese Teile regelmäßig überprüfen, um sicherzustellen, dass sie nicht locker sind. Wenn der Ständer beim Spielen stark zu schwingen scheint, die Schnellspanner-instellmuttern und Höhenverstellknöpfe nachziehen. Ständertransport er Ständer kann bequem ohne Änderung der Höhenverstellung zerlegt werden. Zum Zerlegen des Ständers die Schrittfolge für den Zusammenbau umkehren. er Rahmen kann abgenommen Hebel werden, ohne die Halterungen abzunehmen. Mit an den Rohren angebrachten Halterungen die Hebel lösen und den Rahmen wie in der bbildung gezeigt abnehmen. Halter er Ständer kann rasch wieder zusammengebaut werden. 7
8 Precauciones Ubicación l uso de la unidad en las siguientes ubicaciones puede dar como resultado un mal funcionamiento: xpuesto a la luz directa del sol Zonas de extremada temperatura o humedad Zonas con exceso de suciedad o polvo Zonas con excesiva vibración Manejo Para evitar una rotura, no aplique excesiva fuerza a los conmutadores o controles. Tenga cuidado para no pellizcarse sus dedos durante el montaje del soporte y colocación del instrumento ya montado. uidado Si exterior se ensucia, límpiese con un trapo seco. No use líquidos limpiadores como disolvente, ni compuestos inflamables. Guarde este manual espués de leer este manual, guárdelo para futuras consultas. Mantenga los elementos externos alejados del equipo Nunca coloque ningún recipiente con líquido cerca de este equipo, podría causar un cortocircuito, fuero o descarga eléctrica. uide de que no caiga ningún objeto metálico dentro del equipo. NOT IMPORTNT PR L ONSUMIOR ste producto ha sido fabricado de acuerdo a estrictas especificaciones y requerimientos de voltaje aplicables en el país para el cual está destinado. Si ha comprado este producto por internet, a través de correo, y/o venta telefónica, debe usted verificar que el uso de este producto está destinado al país en el cual reside. VISO: l uso de este producto en un país distinto al cual está destinado podría resultar peligroso y podría invalidar la garantía del fabricante o distribuidor. Por favor guarde su recibo como prueba de compra ya que de otro modo el producto puede verse privado de la garantía del fabricante o distribuidor. Uso de la liberación rápida Para bloquear la liberación rápida con suficiente fuerza, debería notar cierto grado de resistencia al bloquear la palanca. onsulte la ilustración cuando ajuste la palanca. 1 esbloquee la palanca. 2 Gire la tuerca de ajuste en la dirección de la flecha y apriétela hasta que sienta un pequeño grado de resistencia. 3 oble la palanca hacia abajo 180 para bloquearla. Si la fuerza de fijación no ofrece el ajuste suficiente, vuelva a abrir la palanca y apriete la tuerca de ajuste. Uso de la perilla de ajuste de altura Siga los pasos en la ilustración para apretar la perilla de ajuste de altura. Tuerca estriada Perilla de ajuste de altura Pasos de montaje 1 Gire la tuerca estriada en la dirección de la flecha para apretarla, con la perilla de ajuste de altura suelta. 2 Gire la perilla de ajuste de altura en la dirección de la flecha para fijarla al tubo. priete con firmeza la perilla hasta que esté completamente ajustada para asegurarla. [1] oloque las piezas y como se muestra en el diagrama y sostenga el tubo lateral inferior en su lugar. orrecto * Todos los nombres de productos y compañías son marcas comerciales o marcas registradas de sus respectivos propietarios. Precaución durante el ensamblaje Para ensamblar con seguridad el pedestal, tenga en cuenta los puntos siguientes. Incorrecto Otra persona por lo menos deberá ayudarle a ensamblar el pedestal. Tenga cuidado de no pillarse los dedos durante el montaje. Lista de piezas onsulte atentamente la ilustración siguiente y asegúrese de que dispone de todas las piezas antes del montaje. Monte las piezas en un lugar nivelado y estable. Presione el brazo lateral inferior con firmeza para introducirlo en el mecanismo de bloqueo. [2] Inserte ambos extremos de en las piezas y. : Pata derecha : Pata izquierda : Tubos laterales : Nivel (bastidor de teclado) : Soportes de teclado Soportes de teclado Para quitar los soportes de teclado, gírelos mientras tira de ellos para extraerlos de los tubos del nivel. Para que el pedestal sea más compacto durante el transporte, acople los soportes de teclado al nivel siguiendo los pasos en orden inverso. Palanca (c) 1 oloque la pieza de modo que la palanca de liberación rápida (c) quede orientada hacia la parte trasera. 2 bra las palancas de liberación rápida para y. 3 Inserte los extremos de la pieza hasta el tope. 4 loquee las palancas de liberación rápida para y para estabilizar la pieza. 8
9 [3] oble las varillas (poste estrecho) en la pieza. [6] oloque las piezas (soportes de teclado) sobre la pieza y gírelas según corresponda para que encajen sobre la pieza. Tope Varilla Liberación rápida 1 Libere las palancas de liberación rápida en cada base de la varilla. 2 eslice la liberación rápida hasta la posición de tope. 3 Mueva las varillas horizontalmente hacia fuera. [4] loquee los extremos de las varillas de en y. 1 oloque las piezas en un ángulo opuesto a los tubo de la pieza. 2 Gire las piezas en la dirección de la flecha y encájelas sobre los tubos. oloque las piezas hacia la parte exterior todo lo posible para distribuir el peso del instrumento y reducir la cantidad de vibración y balanceo al tocar. Uso de los soportes de teclado Parte frontal Tope de teclado Parte trasera on esto finaliza el montaje del pedestal. oloque el instrumento en el pedestal, alineado con los topes de teclado. La posición de acoplamiento de los soportes de teclado se puede desplazar hacia delante o hacia atrás para que coincida con el tamaño del instrumento que utilice. oloque los topes de teclado delante de usted, en una configuración que facilite poder tocar el instrumento. 1 bra las palancas de liberación rápida para y. 2 Inserte los extremos de las varillas hasta el tope. 3 loquee las palancas de liberación rápida para y para estabilizar los extremos de las varillas. 4 loquee la liberación rápida para la pieza para estabilizar las bases de las varillas. ntes de realizar el paso 4, asegúrese de que las bases de las varillas no están desalineadas con respecto a las posiciones de tope. [5] cople la pieza (el nivel) como se muestra en la ilustración y gire las asas para bloquearla. sa Si no consigue apretar las asas, el instrumento podría caerse del nivel y resultar dañado, o bien el usuario podría sufrir lesiones. Por este motivo, asegúrese de estabilizar el nivel apretando las asas con firmeza hasta que no se puedan mover. Si el asa interfiere con el instrumento: garre el asa como se muestra en la ilustración y extráigala mientras presiona en la parte central para girar solo la parte del asa. juste el ángulo del asa de modo que no interfiera con el instrumento. Precauciones tras el montaje - juste de la altura y el ángulo Retire el instrumento del pedestal antes de ajustar la altura y el ángulo del pedestal. n caso contrario podría pellizcarse la mano, o el pedestal podría caerse y provocarle lesiones. juste de la altura: 1 floje la perilla de ajuste de altura. 2 eslice el nivel hacia arriba y hacia abajo, y gire la perilla de ajuste de altura para bloquear el nivel en su lugar. juste del ángulo: 1 floje las asas en el interior del nivel para ajustar el ángulo. 2 Una vez que haya decidido el ángulo del nivel, cierre las asas con firmeza para bloquear el nivel en su lugar. - Qué hacer si las palancas de liberación rápida o las perillas de ajuste de altura están sueltas Una vez montado el pedestal, es posible que las palancas de liberación rápida y las perillas de ajuste de altura se vayan aflojando con el tiempo. ompruebe estas piezas periódicamente para asegurarse de que no están sueltas. Si le da la impresión de que el pedestal vibra mucho cuando toca el instrumento, vuelva a apretar las tuercas de ajuste de liberación rápida y las perillas de ajuste de altura. Transporte del pedestal ste pedestal se puede desmontar con facilidad sin cambiar los ajustes de altura. esmonte el pedestal siguiendo los pasos realizados para montarlo, en orden inverso. No es necesario que retire los soportes para extraer el nivel. on los soportes aún acoplados a los tubos, afloje las asas y desmonte como se muestra en la ilustración. Podrá volver a montar con rapidez el pedestal tal y como estaba anteriormente. sa Soporte 9
10 注意事项 使用场所在以下地方使用本乐器将导致乐器故障 : 阳光直接照射下 极端温度或湿度条件下 有过量灰尘 肮脏的地方 经常产生振动的地方操作为了避免损坏, 请不要过度用力操作开关或控制按钮 保养如果乐器表面有灰尘, 用清洁的干布擦拭 不要使用如苯或稀释剂等液体清洗剂或易燃的上光剂 保存本手册通读本手册后, 请保管好以便日后参考之用 将异物远离本乐器不要在本乐器附近放置盛放液体的容器 如果液体进入本乐器, 将导致乐器损坏 燃烧或触电 注意不要使金属物体进入本乐器 一旦有金属物体滑入本乐器, 从电源插座拔掉交流电源适配器, 然后联系您最近的 Korg 经销商或本乐器购买的商店 * 本手册内使用的所有产品名称和公司名称均为所属公司或所有者的注册商标 用户重要提示本产品严格按照产品使用国家的生产标准和电压要求制造 如果您通过网络 邮件或者电话销售购买本产品, 您必须核实本产品是否适合在您所在的国家使用 警告 : 在本产品适用国家之外的其他国家使用本产品极其危险, 同时制造商和经销商将不再履行质量担保 请妥善保存您的购买收据作为购买凭证, 否则您的产品将不能享有制造商或经销商的质量担保 部件名称 铅 (pb) 汞 (Hg) 有毒有害物质或元素 镉 (d) 六价铬 (r(vi)) 多溴联苯 (P) 多溴二苯醚 (P) 机体外壳 五金件 键盘托架若要取下键盘托架, 应从支架管上拉出并转动键盘托架 若要让支架更紧凑以便携带, 应按如下步骤反向顺序将键盘托架安装到支架上 使用快拆杆为了能够使用足够的力度锁定快拆杆, 锁定小拉杆时您应感觉到一些阻力 通过调节锁定小拉杆时的阻力, 使用适当的力度来锁定快拆杆 调节小拉杆时请参阅图示 1 解锁拉杆 2 按箭头所示方向拧动调节螺母, 拧紧直至感到有些阻力 折叠小拉杆进行锁定 如果锁定之后觉得不够紧, 则可以再次打开小拉杆, 拧紧调节螺母 使用高度调节旋钮按照图示步骤拧紧高度调节旋钮 凸边的螺母 高度调节旋钮 1 高度调节旋钮松动时, 按照箭头方向拧动带凸边的螺母 2 按照箭头方向拧动高度调节旋钮将其固定到支架管上 牢固拧紧旋钮, 直至其完全契合以确保其安全牢固 组装步骤 [1] 按图所示打开部件 和, 将底部侧管按压到位 正确 : 表示该有毒有害物质或元素在该部件所有均质材料中的含量均在 G /T 标准规定的限量要求以下 : 表示该有毒有害物质或元素至少在该部件的某一均质材料中的含量超出 G/T26572 标准规定的限量要求 不正确 此标记适用于中华人民共和国销售的电子信息产品, 标记中央的数字表示环境保护使用期限的年数 自制造日算起的此年月内, 产品中的指定 6 物质不会向外部泄漏或发生突变, 不会产生环境污染或者对人体或财产带来深刻的影响 此环境保护使用期限并不表示产品保证期限 组装注意事项为了安全组装支架, 请按以下几点操作 必须由至少两个人进行组装 请小心组装过程中不要夹到手指 将底部的管牢固地压到锁定位置 [2] 将 的两端插入部件 和 部件列表请仔细查看下图, 确保组装前拥有所有部件 请在平坦稳定的位置组装部件 小拉杆 (c) : 支架右腿 : 支架左腿 : 支架侧管 : 支架 ( 键盘架 ) 10 : 键盘托架 1 调整部件 的位置, 使快拆杆小拉杆 (c) 朝向背侧 2 打开 和 的快拆杆小拉杆 3 尽量深入地将 的两端插入 和 4 锁上 和 的快拆杆小拉杆固定部件
11 [3] 打开部件 上的拉杆 ( 细管 ) [6] 将部件 ( 键盘托架 ) 放置在部件 上, 进行适当转动使其安装在部件 上 止动销 拉杆 快拆杆 1 在每根拉杆的底部打开快拆杆小拉杆 2 将快拆杆滑动到止动销位置 3 水平向外移动拉杆 [4] 将 的拉杆两端锁定到 和 上 1 将部件 按照朝向部件 支架管的方向进行放置 2 按照箭头方向旋转部件, 将它们安装到支架管上 尽可能向外推动部件, 以便分散乐器的重量, 降低演奏时的震动和晃动 使用键盘托架 前 键盘止动销 后 现在您完成了组装支架 将乐器安装在支架上, 对齐键盘止动销 键盘托架的安装位置可以前后移动, 以便配合您所使用乐器的大小 在您前方设置键盘止动销的位置, 以方便演奏乐器为宜 1 打开 和 的快拆杆小拉杆 2 尽可能深入地插入拉杆两端 3 锁上 和 的快拆杆小拉杆固定拉杆的顶端 4 锁上部件 的快拆杆固定拉杆底端 操作第 4 步之前, 应确保正确对齐拉杆底端和止动销的位置 [5] 如图所示安装部件 ( 该支架 ), 转动把手进行锁定 把手 如果未能拧紧把手, 您的乐器可能会从支架上跌落继而受损, 您也可能会受伤 因此应确保固定支架, 牢固拧紧把手直至这些把手无法转动 把手妨碍使用乐器时 : 如图所示抓住把手, 按下中间部位拉出把手就可以只转动把手部件 调节把手角度以使它不会妨碍乐器的使用 安装后注意事项 - 调节高度和角度调节支架高度和角度之前应从支架上取下乐器 否则可能会夹到手, 支架可能会跌倒并伤到您 调节高度 : 1 松开高度调节旋钮 2 沿着支架上下滑动, 转动高度调节旋钮锁定支架 调节角度 : 1 松开支架内侧的把手调节角度 2 确定好支架角度之后, 牢固闭合把手以便锁定支架 - 快拆杆小拉杆或高度调节旋钮松动时怎么办组装支架后, 快拆杆小拉杆或高度调节旋钮可能会随着时间逐渐松动 应定期检查这些部件以确保它们不会松动 如果当您演奏时支架震动幅度有些过大, 应重新拧紧快拆杆调节螺母和高度调节旋钮 携带支架无需调节高度即可轻松拆卸支架 按照组装支架的反向步骤拆卸支架 无需卸下卡扣即可取下支架 保持把手卡扣安装在支架管上, 按图所示松开把手并进行拆卸 您可以像往常一样重新快速组装该支架 支架 11
12 安全上のご注意 ご使用になる前に必ずお読みください ここに記載した注意事項は 製品を安全に正しくご使用いただき あなたや他の方々への危害や損害を未然に防ぐためのものです 注意事項は誤った取り扱いで生じる危害や損害の大きさ または切迫の程度によって 内容を 警告 注意 の 2つに分けています これらは あなたや他の方々の安全や機器の保全に関わる重要な内容ですので よく理解した上で必ずお守りください 火災 感電 人身障害の危険を防止するには図記号の例 記号は 注意 ( 危険 警告を含む ) を示しています 記号の中には 具体的な注意内容が描かれています 左の図は 一般的な注意 警告 危険 を表しています 記号は 禁止 ( してはいけないこと ) を示しています 記号の中には 具体的な注意内容が描かれることがあります 左の図は 分解禁止 を表しています 記号は 強制 ( 必ず行うこと ) を示しています 記号の中には 具体的な注意内容が描かれることがあります 左の図は 守らなければならないこと を表しています 以下の指示を守ってください警告この注意事項を無視した取り扱いをすると 死亡や重傷を負う可能性が予想されます 本製品を分解したり改造したりしない 本紙に書かれているスタンドの組み立て手順に従って 確実に設置する 本製品が転倒または破損して お客様がけがをする恐れがあります 注意 この注意事項を無視した取り扱いをすると 傷害を負う可能性または物理的損害が発生する可能性があります ネジなどに必要以上の力を加えない 本製品が破損する恐れがあります 不安定な場所に置かない 本製品が転倒してお客様がけがをしたり 本製品が破損する恐れがあります 本製品の上に乗ったり 重いものをのせたりしない 本製品が転倒してお客様がけがをしたり 本製品が破損する恐れがあります 本製品の隙間に指などを入れない お客様がけがをしたり 本製品が破損する恐れがあります 本製品に前後方向から無理な力を加えない 本製品が転倒してお客様がけがをしたり 本製品が破損する恐れがあります 外装のお手入れに ベンジンやシンナー系の液体 コンパウンド質 強燃性のポリッシャーは使用しない 組み立て時の注意 正しく安全に組み立てるためには 次の項目に気をつけて作業してください 必ず2 人以上で組み立ててください 組立時に指を挟まないように注意してください 部品一覧 クイックリリースの使い方 クイックリリースは レバーをロックするときにある程度の抵抗がかかるように調整すると 適切な強度でロックできます 調整は図の手順で行ってください 高さ調整ノブの使い方 1 レバーを開放します 2 調整ナットを矢印の方向に回し 少し抵抗を感じる程度に締め付けます 3 レバーを180 度倒してロックします ロックしたときに固定が十分でないと感じる場合は もう一度レバーを開放し 調整ナットの締め付けを強くしてください 高さ調整ノブの固定は 図の手順で行ってください ローレットナット 高さ調整ノブ 1 高さ調整ノブは緩めたまま ローレットナットを矢印の方向に回して締め付けます 2 高さ調整ノブを矢印の方向に回してパイプに固定します ノブは動かなくなるまで回し 確実に固定してください 組み立て手順 [1] とを図のように広げ 下側のパイプを固定します 下側のパイプは 確実にロックされるまで押し込んでください [2] と に の両端を差し込みます 正 誤 下のイラストをよくご覧になって 部品がそろっていることを確認してから組み立ててください 各部品は平らで安定した場所へ置いてください レバー (c) : 右脚 : 左脚 : 横パイプキーボードホルダー : ティア ( キーボードラック ) : キーボードホルダー ティアのパイプから回転させるように引っ張ると取り外すことができます 運搬時は逆の手順でティアに取り付けることで コンパクトに収納できます 1 クイックリリースのレバー (c) が奥側になる向きで を配置する 2 と のクイックリリースを開放する 3 の両端を奥まで挿し込む 4 と のクイックリリースをロックして を固定する 12
13 [3] のロッド ( 細い棒 ) を展開します [6] ( キーボードホルダー ) を に載せ 回転させるように へはめ込みます ストッパー ロッド クイックリリース 1 ロッドの根元にあるクイックリリースを開放する 2 クイックリリースをストッパーの位置までスライドさせる 3 ロッドを左右に広げる [4] のロッドの先端を と に固定します 1 のパイプに対して を斜めに置きます 2 を矢印の方向に回転させ パイプにはめ込みます をできるだけ両端に設置すると 楽器の荷重が分散し 演奏時の揺れやふらつきを軽減できます キーボードホルダーの使い方 前 後 取り付ける場所は 設置する楽器にあわせて前後に変更できます キーボードストッパーを手前にして 演奏しやすい位置に取り付けてください キーボードストッパー これで組み立ては完了です キーボードストッパーに合わせて楽器を設置してください 1 と のクイックリリースを開放する 2 ロッドの先端を奥まで挿し込む 3 と のクイックリリースをロックして ロッドの先端を固定する 4 のクイックリリースをロックして ロッドの根元を固定する 4 を行う前に ロッドの根元がストッパーの位置からずれていないことを確認してください [5] ( ティア ) を図のように取り付け ハンドルを回して固定します ハンドル ハンドルが緩んだ状態で使用すると 楽器が落下して破損したり けがをしたりする恐れがあります ハンドルは 動かなくなるまで締め付けて 確実に固定させてください ハンドルが楽器に接触する場合 : 図のようにハンドルを握り 中央部を親指で押しながら引っ張ると ハンドル部分のみを回転できます 楽器が接触しないように ハンドルの角度を調節してください 組み立て後の注意 高さや角度の調整 本製品から楽器などを降ろした状態で行ってください 楽器をのせたまま高さを調整すると 手を挟んだり 本製品が転倒したりしてお客様がけがをする恐れがあります 高さの調節 : 1 高さ調整ノブを緩めます 2 ティアを上下にスライドさせ 高さ調整ノブを回して固定します 角度の調節 : 1 ティア内側のハンドルを緩めて角度を調節します 2 ティアの角度が決まったら ハンドルをしっかり締めて固定します クイックリリースや高さ調整ノブの緩みについて組み立て後 時間が経過すると クイックリリースや高さ調整ノブが緩むことがあります 緩んでいないかを定期的に確認することをおすすめします また スタンドの揺れが激しいと感じる場合は クイックリリースの調整ナットや高さ調整ノブを締め直してください スタンドを運搬するときは本製品は 高さの設定を固定したまま簡単に分解できます 組み立てと逆の手順で分解してください ティアを取り外すとき ホルダー部ハンドルを取り外す必要はありません ホルダー部はパイプに固定したままハンドルを緩めて 図のように分解してください 組み立てるとき素早く元ホルダー部の状態に戻すことができます 13
14 保証規定 ( 必ずお読みください ) 本保証書は 保証期間中に本製品を保証するもので 付属品類 ( ヘッドホンなど ) は保証の対象になりません 保証期間内に本製品が故障した場合は 保証規定によって無償修理いたします 1. 本保証書の有効期間はお買い上げ日より1 年間です 2. 次の修理等は保証期間内であっても有料修理となります 消耗部品 ( 電池 スピーカー 真空管 フェーダーなど ) の交換 お取扱い方法が不適当のために生じた故障 天災 ( 火災 浸水等 ) によって生じた故障 故障の原因が本製品以外の他の機器にある場合 不当な改造 調整 部品交換などにより生じた故障または損傷 保証書にお買い上げ日 販売店名が未記入の場合 または字句が書き替えられている場合 本保証書の提示がない場合 尚 当社が修理した部分が再度故障した場合は 保証期間外であっても 修理した日より3 ケ月以内に限り無償修理いたします 3. 本保証書は日本国内においてのみ有効です This warranty is valid only in Japan. 4. お客様が保証期間中に移転された場合でも 保証は引き続きお使いいただけます 詳しくは お客様相談窓口までお問い合わせください 5. 修理 運送費用が製品の価格より高くなることがありますので あらかじめお客様相談窓口へご相談ください 発送にかかる費用は お客様の負担とさせていただきます 6. 修理中の代替品 商品の貸し出し等は いかなる場合においても一切行っておりません 本製品の故障 または使用上生じたお客様の直接 間接の損害につきましては 弊社は一切の責任を負いかねますのでご了承ください 本保証書は 保証規定により無償修理をお約束するためのもので これよりお客様の法律上の権利を制限するものではありません お願い 1. 保証書に販売年月日等の記入がない場合は無効となります 記入できないときは お買い上げ年月日を証明できる領収書等と一緒に保管してください 2. 保証書は再発行致しませんので 紛失しないように大切に保管してください 保証書 STNR-L/M/S, ST-L/M/S 本保証書は 上記の保証規定により無償修理をお約束するものです お買い上げ日年月日 販売店名 アフターサービス 保証書本製品には 保証書が添付されています お買い求めの際に 販売店が所定事項を記入いたしますので お買い上げ日 販売店 等の記入をご確認ください 記入がないものは無効となります なお 保証書は再発行致しませんので 紛失しないように大切に保管してください 保証期間お買い上げいただいた日より一年間です 保証期間中の修理保証規定に基づいて修理いたします 詳しくは保証書をご覧ください 本製品と共に保証書を必ずご持参の上 修理を依頼してください 保証期間経過後の修理修理することによって性能が維持できる場合は お客様のご要望により 有料で修理させていただきます ただし 補修用性能部品 ( 電子回路などのように機能維持のために必要な部品 ) の入手が困難な場合は 修理をお受けすることができませんのでご了承ください また 外装部品 ( パネルなど ) の修理 交換は 類似の代替品を使用することもありますので あらかじめお客様相談窓口へお問い合わせください 修理を依頼される前に故障かな? とお思いになったら まず取扱説明書をよくお読みのうえ もう一度ご確認ください それでも異常があるときは お客様相談窓口へお問い合わせください 修理時のお願い修理に出す際は 輸送時の損傷等を防ぐため ご購入されたときの箱と梱包材をご使用ください ご質問 ご相談について修理や商品のお取り扱いについてのご質問 ご相談は お客様相談窓口へお問い合わせください WRNING! この英文は日本国内で購入された外国人のお客様のための注意事項です This Product is only suitable for sale in Japan. Properly qualified service is not available for this product if purchased elsewhere. ny unauthorised modification or removal of original serial number will disqualify this product from warranty protection. お客様相談窓口 PHS 等一部の電話ではご利用できません 固定電話または携帯電話からおかけください 受付時間月曜 ~ 金曜 10:00 ~ 17:00 ( 祝祭日 窓口休業日を除く ) コルグ サービス センター : 東京都杉並区下高井戸 F 販売元 :KORG Import ivision 東京都稲城市矢野口
15 SPIFITIONS Inner width Height (H) Outer width (W) epth () Inner width : 1,480 mm (58") Height adjustment : 650 mm - 1,100 mm (26"- 43") Weight capacity : 35 kg (77 lb) per tier or 70 kg total (154 lb) Size : 1,600 (W) x 600 () x 1,100 (H) mm (63"x 24"x 43.5") Weight : 9 kg (19.8 lb) Inner width : 1,320 mm (52") Height adjustment : 650 mm - 1,100 mm (26"- 43") Weight capacity : 35 kg (77 lb) per tier or 70 kg total (154 lb) Size : 1,440 (W) x 600 () x 1,100 (H) mm (56.7"x 24"x 43.5") Weight : 8.5 kg (18.7 lb) Inner width : 1,480 mm (58") Height adjustment : 650 mm mm (26"- 37") Weight capacity : 30 kg (66 lb) per tier or 60 kg total (132 lb) Size : 1,600 (W) x 600 () x 950 (H) mm (63"x 24"x 37") Weight : 6.6 kg (14.6 lb) Inner width : 1,130 mm (44.5") Height adjustment : 650 mm mm (26"- 37") Weight capacity : 30 kg (66 lb) per tier or 60 kg total (132 lb) Size : 1,250 (W) x 600 () x 950 (H) mm (49"x 24"x 37") Weight : 6.3 kg (13.9 lb) 15
16 KORG IN Yanokuchi, Inagi-ity, Tokyo JPN KORG IN
MA-L/MA-T Owner's manual
 KKS Mounting Adapters Owner s manual Thank you for purchasing the Korg MA-T rack tray (Mounting Adapter - Tray) and/or MA-L locking support (Mounting Adapter - Locking support). These product will allow
Taro11-OA0000_ jtd
 Application Form for Certificate of Criminal Record I apply for a certificate of criminal record for the reason stated below. I'll submit a digital record of my fingerprints or a sheet with my fingerprints
内蔵ハードディスクユニット-20GB (PG-HD2E4H) 内蔵ハードディスクユニット-40GB (PG-HD4E4H)取扱説明書 HARD DISK DRIVE 20GB(PG-HD2E4H) HARD DISK DRIVE 40GB(PG-HD4E4H) USER'S GUIDE
 内蔵ハードディスクユニット-40GB (PG-HD4E4H)取扱説明書 HARD DISK DRIVE 20GB(PG-HD2E4H) HARD DISK DRIVE 40GB(PG-HD4E4H) USER'S GUIDE") B7FY-0351-02 J E J 1 J 1 2 3 2 4 J 3 4 Preface Thank you very much for purchasing the hard disk drive. This hard disk drive provides a IDE interface and can be installed in the 3.5-inch storage bay of
B7FY-0351-02 J E J 1 J 1 2 3 2 4 J 3 4 Preface Thank you very much for purchasing the hard disk drive. This hard disk drive provides a IDE interface and can be installed in the 3.5-inch storage bay of
FSLC.indd
 FSLC/FSLD/FSLH/FSLJ FSCC/FSCD/FSCH Accessory Electric Blinds VAS 453786-2015-12 ENGLISH: Instructions for control keypad - Simple set-up ESPAÑOL: Instrucciones para el teclado de control - Simple set-up
I N S T R U M E N T A T I O N & E L E C T R I C A L E Q U I P M E N T Pressure-resistant gasket type retreat method effective bulk compressibility Fro
 Cable Gland This is the s to use for Cable Wiring in the hazardous location. It is much easier to install and maintenance and modification compared with Conduit Wiring with Sealing Fitting. The Standard
SV-SD750V700.book
 SV-SD750V SV-SD700 C 2005 Matsushita Electric Industrial Co., Ltd. All Rights Reserved. RQT8296-1S F0905Re1105 ( 10000B) R R C R R 08/937,950 5848391 5,291,557 5,451,954 5 400 433 5,222,189 5,357,594
SV-SD570V510.book
 SV-SD570V SV-SD510 C 2006 Matsushita Electric Industrial Co., Ltd. All Rights Reserved. RQT8645-1S F0306Re1046 ( 27000C) 2 1 R C R R 08/937,950 5848391 5,291,557 5,451,954 5 400 433 5,222,189 5,357,594
RR-US470 (RQCA1588).indd
.indd") RR-US470 Panasonic Corporation 2006 2 3 4 http://www.sense.panasonic.co.jp/ 1 2 3 ( ) ZOOM 5 6 7 8 9 10 4 2 1 3 4 2 3 1 3 11 12 1 4 2 5 3 1 2 13 14 q φ φ 1 2 3 4 3 1 2 3 4 2 3 15 16 1 2 3 [/]p/o 17 1 2
RR-US470 Panasonic Corporation 2006 2 3 4 http://www.sense.panasonic.co.jp/ 1 2 3 ( ) ZOOM 5 6 7 8 9 10 4 2 1 3 4 2 3 1 3 11 12 1 4 2 5 3 1 2 13 14 q φ φ 1 2 3 4 3 1 2 3 4 2 3 15 16 1 2 3 [/]p/o 17 1 2
SV-SD770V710.book
 SV-SD770V SV-SD710 C 2006 Matsushita Electric Industrial Co., Ltd. All Rights Reserved. RQT8625-1S F0306Re1046 ( 23000D) R C R R 08/937,950 5848391 5,291,557 5,451,954 5 400 433 5,222,189 5,357,594 5
BL57-NE
 (J) (1) 1 CLASS 1 LASER PRODUCT CLASS 1 LASER PRODUCT LASERSCHUTZKLASSE 1 PRODUKT TO EN 60825 (2) (J) (J) (3) C (4) (J) (J) (5) [For U.S.A. and Canada] THIS CLASS A DIGITAL DEVICE COMPLIES WITH PART15
115 B rev Draft-Layout
 1 1 1 1 1 1 1 1 1 2 2 2 2 2 2 2 17/8/15 ARCHITECTURE BETON ARMEE DATE 6 m² 1 NOTES 1 Première Emissions 1 1 1 1 1 1 1 SPECIFICATION GENERALES 1. Le mortier est dosé à kg de ciment / m3, sauf prescription
 Les journaux de deux bourgeois de Paris sous le règne de François rr (première partie) - nouvelles et bruits jusqu'à la défaite de Pavie - RIRA TE Tomohiko On dispose de journaux, de chroniques, de livres
注意 Caution 1) AMT-KS を溶接ロボット等に取り付ける際には 必ず溶接機の電源を OFF にし 電気が流れていないことを確認した後 作業を行ってください Keep off of the welding power source during AMT-KS installation w
 AMT-KS を溶接ロボット等に取り付ける際には 必ず溶接機の電源を OFF にし 電気が流れていないことを確認した後 作業を行ってください Keep off of the welding power source during AMT-KS installation w") 溶業資 No.012015-L001 溶接ワイヤ用矯正機 Welding wire straightener 取扱説明書 Instruction manual Ver.1.0-1- 注意 Caution 1) AMT-KS を溶接ロボット等に取り付ける際には 必ず溶接機の電源を OFF にし 電気が流れていないことを確認した後 作業を行ってください Keep off of the welding power
溶業資 No.012015-L001 溶接ワイヤ用矯正機 Welding wire straightener 取扱説明書 Instruction manual Ver.1.0-1- 注意 Caution 1) AMT-KS を溶接ロボット等に取り付ける際には 必ず溶接機の電源を OFF にし 電気が流れていないことを確認した後 作業を行ってください Keep off of the welding power
00_VC_C4Cover1
 INSTRUCTION MANUAL MODE D EMPLOI VC-C4 COMMUNICATION CAMERA f:4-64mm 1:1.4-2.8 ENGLISH a FRANÇAIS Please read this instruction manual carefully before operation. Be sure to read the asafe Use of Equipment
SV-SD850N.book
 SV-SD850N C 2007 Matsushita Electric Industrial Co., Ltd. C All Rights Reserved. RQT8981-S F0307Re0 A A A S M L 1 GB R R R C R 1 9 : rs RMTR 1/6 0:08 RMTR 3/6 0:12 III III k k 1 2 5 3 6 4 7 9 8
Rangänderung bei Teilhypotheken Wird die Forderung geteilt, so ist zur Änderung des Rangverhältnisses der Teilhypotheken untereinander die Zustimmung
 Rangänderung bei Teilhypotheken Wird die Forderung geteilt, so ist zur Änderung des Rangverhältnisses der Teilhypotheken untereinander die Zustimmung des Eigentümers nicht erforderlich. BGB BGB 175 BGB
untitled
 Neo-Flex Mobile Media Center, LD with 90 Portrait/Landscape rotation Holds displays with the following VESA mounting hole pattern: 100 x 100 mm 200 x 200 mm 200 x 300 mm 300 x 200 mm 300 x 300 mm 400 x
00_1512_SLIMLINE_BOOK.indb
 PIECE type SLIM type Imbalance value Less interference type, ideal for deep machining Ideal for drilling 2 PIECE REGULAR type Rigidity value Nozzle type When compared to the slim type, it has more rigidity
DZ-GX20/DZ-MV780取扱説明書(上巻)
") DZ-GX20 DZ-MV780(S) DZ-MV780(R) DZ-MV780(A) Important Information WARNING : To prevent fire or shock hazard, do not expose this unit to rain or moisture. WARNING : To prevent fire or shock hazard, use
DZ-GX20 DZ-MV780(S) DZ-MV780(R) DZ-MV780(A) Important Information WARNING : To prevent fire or shock hazard, do not expose this unit to rain or moisture. WARNING : To prevent fire or shock hazard, use
 L'amour suxuel dans la pensée russe ( I ) "La sonate à kreuzer" de L. Tolstoï AOUAMA Taro Dans "La sonate à Kreuzer" (1890) Tolstoï prêche l'abstinence complète de l'amour sexuel. L'acte sexuel est un
;y ;y ;; yy ;y;; yy y;y;y;y ;y; ;; yy ; y Portable CD player Operating Instructions RQT5364-S
 ;y ;y ;; yy ;y;; yy y;y;y;y ;y; ;; yy ; y Portable CD player Operating Instructions -S + - + - 1 3 K 2 - + H K Ni-Cd A.SHOCK S-XBS HOLD HOLD HOLD HOLD ( 1; 1; 6 VOLUME 5 4 1; A.SHOCK S-XBS RANDOM NOR
/ ? Nespresso Lattissima Touch
 19 30.... 3.... 8.... 10... 1.... 14... 16.... 17... 18 /... 0... 1...... 4?... 5... 8... 8... 9... 30 Nespresso Lattissima Touch Nespresso Lattissima Touch 3 9 1 4 Nespresso Lattissima Touch 15A 100V
DZ-HS503 取扱説明書
 DZ-HS503 Important Information WARNING : To prevent fire or shock hazard, do not expose this unit to rain or moisture. WARNING : To prevent fire or shock hazard, use the recommended accessories only. CAUTION
取扱説明書_KX-PW100CL
 See pages 236 238 for English Guide. KX-PW100CL Ni-MH KX-PW100CL-W KX-FKN100-W 1 2 NTT NTT 1 4 3 4 5 6
ERS-210
 4-652-093-01(1) Entertainment Robot AIBO ERS-210 2000 Sony Corporation 716 AIBO 2 b 1 2 3 AIBO66 VCCI B 3 ... 2 AIBO... 18 AIBO... 18... 19 ERS-210... 20... 21 AIBO... 22 AIBO... 24 AIBO... 26 AIBO...
MIDI_IO.book
 MIDI I/O t Copyright This guide is copyrighted 2002 by Digidesign, a division of Avid Technology, Inc. (hereafter Digidesign ), with all rights reserved. Under copyright laws, this guide may not be duplicated
SVSD870N-RQT9140.book
 SV-SD870N MODE MENU LIST RETURN C 2008 Matsushita Electric Industrial Co., Ltd. C All Rights Reserved. RQT9140-S F0208RE1038 MODE MENU LIST RETURN MODE MENU LIST RETURN LIST RETURN MODE MENU LIST RETURN
WARNING To reduce the risk of fire or electric shock,do not expose this apparatus to rain or moisture. To avoid electrical shock, do not open the cabi
 ES-600P Operating Instructions WARNING To reduce the risk of fire or electric shock,do not expose this apparatus to rain or moisture. To avoid electrical shock, do not open the cabinet. Refer servicing
DZ-GX3300/GX3100/GX3100取扱説明書
 DZ-GX3300(S)/(B) DZ-GX3200 DZ-GX3100 Important Information WARNING : To prevent fire or shock hazard, do not expose this unit to rain or moisture. WARNING : To prevent fire or shock hazard, use the recommended
DZ-HS303 取扱説明書
 DZ-HS303(S)/(A) Important Information WARNING : To prevent fire or shock hazard, do not expose this unit to rain or moisture. WARNING : To prevent fire or shock hazard, use the recommended accessories
% + RP-BC30 BATTERY CHARGER STAND K -! # % $ $ % % # $ $ $ %
 i C /RF-ND70R/RF-ND70R 3 4 3 4 5 6 7 % 8 5 6 7 8 9 : ;! # < = > #? @ 9 : ; < = >? @ % + RP-BC30 BATTERY CHARGER STAND K -! % @ # % $ $ % %! @ % # $ $ $ % % % % 3 %! @ % # $ % % % @ $ ! @ % # $ % ^ % ^
LC304_manual.ai
 Stick Type Electronic Calculator English INDEX Stick Type Electronic Calculator Instruction manual INDEX Disposal of Old Electrical & Electronic Equipment (Applicable in the European Union
2
 8 23 32A950S 30 38 43 52 2 3 23 40 10 33 33 11 52 4 52 7 28 26 7 8 8 18 5 6 7 9 8 17 7 7 7 38 10 12 9 23 22 22 8 53 8 8 8 8 1 2 3 17 11 52 52 19 23 29 71 29 41 55 22 22 22 22 22 55 8 18 31 9 9 54 71 44
elemmay09.pub
 Elementary Activity Bank Activity Bank Activity Bank Activity Bank Activity Bank Activity Bank Activity Bank Activity Bank Activity Bank Activity Bank Activity Bank Activity Bank Number Challenge Time:
Ensemble en français
 Voyage de 7 jours en France Cinquième jour 3 : Annuler / Changer sa réservation 1. Annuler sa réservation 予約をキャンセルする A (Réceptionniste) : Hôtel Concorde, bonjour! : Bonjour, je voudrais annuler ma réservation.
Microsoft Word - PCM TL-Ed.4.4(特定電気用品適合性検査申込のご案内)
") (2017.04 29 36 234 9 1 1. (1) 3 (2) 9 1 2 2. (1) 9 1 1 2 1 2 (2) 1 2 ( PSE-RE-101/205/306/405 2 PSE-RE-201 PSE-RE-301 PSE-RE-401 PSE-RE-302 PSE-RE-202 PSE-RE-303 PSE-RE-402 PSE-RE-203 PSE-RE-304 PSE-RE-403
(2017.04 29 36 234 9 1 1. (1) 3 (2) 9 1 2 2. (1) 9 1 1 2 1 2 (2) 1 2 ( PSE-RE-101/205/306/405 2 PSE-RE-201 PSE-RE-301 PSE-RE-401 PSE-RE-302 PSE-RE-202 PSE-RE-303 PSE-RE-402 PSE-RE-203 PSE-RE-304 PSE-RE-403
 5 7 3AS40AS 33 38 45 54 3 4 5 4 9 9 34 5 5 38 6 8 5 8 39 8 78 0 9 0 4 3 6 4 8 3 4 5 9 5 6 44 5 38 55 4 4 4 4 5 33 3 3 43 6 6 5 6 7 3 6 0 8 3 34 37 /78903 4 0 0 4 04 6 06 8 08 /7 AM 9:3 5 05 7 07 AM 9
Ensemble en français
 17. Ça te dit d aller au cinéma? - faire une proposition - 1. Avec «vous» A : Que faites-vous vendredi soir? B : Rien de spécial. Pourquoi? A : Ça vous dirait de dîner ensemble? B : Oui, volontiers. A
2
 8 24 32C800037C800042C8000 32 40 45 54 2 3 24 40 10 11 54 4 7 54 30 26 7 9 8 5 6 7 9 8 18 7 7 7 40 10 13 12 24 22 22 8 55 8 8 8 8 1 2 3 18 11 54 54 19 24 30 69 31 40 57 23 23 22 23 22 57 8 9 30 12 12 56
キヤノン POWER PROJECTOR 天吊金具 RS-CL11設置仕様書
 天吊り金具 Ceiling Attachment Fixation pour plafond Soporte de techo Deckenhalterung Dell'attacco per soffitto Plafondbevestiging RS-CL11 組立 設置説明書 Assembly/Installation Manual Manuel d assemblage/installation
 6 4 45 7ZS 5 59 7 8 94 05 4 5 6 4 5 5 6 8 8 40 45 48 56 60 64 66 66 68 7 78 80 8 7 8 0 0 0 90 0 57 64 69 66 66 69 0 4 4 4 4 4 0 7 48 5 4 4 5 4 4 4 7 46 46 6 46 8 46 48 46 46 4 46 46 4 4 5 4 6 4 9 9 0
2 3
 RR-XR330 C Matsushita Electric Industrial Co., Ltd.2001 2 3 4 + - 5 6 1 2 3 2 1-3 + + - 22 +- 7 22 8 9 1 2 1 2 1 2 3 12 4 1 2 5 12 1 1 2 3 1 2 1 2 10 11 1 2 $% 1 1 2 34 2 % 3 % 1 2 1 2 3 1 2 12 13 1 2
53 image Le Musée imaginaire La Tentation de l Occident La Voie royale, pp. -. Le Musée imaginaire «imaginaire», p.. Ibid., pp. -. André Malraux, Œuvr
 Title Author(s) アンドレ マルロー作品におけるモノクローム写真についての考察 井上, 俊博 Citation Gallia. 50 P.53-P.62 Issue Date 2011-03-03 Text Version publisher URL http://hdl.handle.net/11094/11819 DOI rights 53 image Le Musée imaginaire
Bead Instructions First, locate the acupressure point you wish to stimulate. Next, remove a plastic bead from the bag. Remove the backing from the adh
 icewave Instructions Bead Instructions First, locate the acupressure point you wish to stimulate. Next, remove a plastic bead from the bag. Remove the backing from the adhesive plastic patch included.
2
 8 23 26A800032A8000 31 37 42 51 2 3 23 37 10 11 51 4 26 7 28 7 8 7 9 8 5 6 7 9 8 17 7 7 7 37 10 13 12 23 21 21 8 53 8 8 8 8 1 2 3 17 11 51 51 18 23 29 69 30 39 22 22 22 22 21 56 8 9 12 53 12 56 43 35 27
2
 8 22 19A800022A8000 30 37 42 49 2 3 22 37 10 11 49 4 24 27 7 49 7 8 7 9 8 5 6 7 9 8 16 7 7 7 37 10 11 20 22 20 20 8 51 8 8 9 17 1 2 3 16 11 49 49 17 22 28 48 29 33 21 21 21 21 20 8 10 9 28 9 53 37 36 25
 6 4 45 ZS7ZS4ZS 5 59 7 8 94 05 4 5 6 4 5 5 6 8 8 40 45 48 56 60 64 66 66 68 7 78 80 8 7 8 0 0 0 90 0 0 4 4 4 4 6 57 64 69 66 66 66 69 4 0 7 48 5 4 4 5 4 4 4 7 46 46 6 46 8 46 48 46 46 4 46 46 4 4 5 4
PRODIGIO MY MACHINE
 PRODIGIO MY MACHINE 19 3 6 8 10 1 1 1 13 13 14 15 16? 18 0 0 1 Nespresso Prodigio 1 Nespresso Prodigio 3 13 15A 100V 1 1 4 Nespresso Prodigio 1 1 1 13 Nespresso Prodigio 5 9 110ml 40ml 5ml 6 Nespresso
H8000操作編
 8 26 35 32H800037H800042H8000 49 55 60 72 2 3 4 48 7 72 32 28 7 8 9 5 7 9 22 43 20 8 8 8 8 73 8 13 7 7 7 55 10 49 49 13 37 49 49 49 49 49 49 12 50 11 76 8 24 26 24 24 6 1 2 3 18 42 72 72 20 26 32 80 34
p034.pdf
 Exploded View / Explosionszeichnung / Vue clat e / Despiece / Differential(Front, Rear) / Gear Differential(Vorne, Hinten) / Diff rentiel(avant, Arri re) / Diferencial(Delantero, Trasero) 3 6 6 x 0 x Ball
Tab 5, 11 Tab 4, 10, Tab 3, 9, 15Tab 2, 8, 14 Tab 1, 7, 13 2
 COMPANION 20 MULTIMEDIA SPEAKER SYSTEM Owner s Guide Tab 5, 11 Tab 4, 10, Tab 3, 9, 15Tab 2, 8, 14 Tab 1, 7, 13 2 Tab1, 7, 13 Tab 2, 8, 14 Tab 3, 9, 15 Tab 4, 10, Tab 5, 11 This product conforms to all
untitled
 Model No. TY-WK70PV50 Fitting Instructions Wall-hanging bracket (Vertical mounting type) Montageanweisungen Wandhalterung (Typ für vertikale Anbringung) Istruzioni di montaggio Staffa per montaggio alla
Ensemble en français
 Voyage de 7 jours en France Troisième jour 2 : Acheter des chaussures 1. Acheter des chaussures 1 靴を買う A (Sato) : Bonjour, je peux essayer ces escarpins? B (Vendeuse) : Oui, bien sûr! Quelle est votre
 6 4 4 9RERE6RE 5 5 6 7 8 9 4 5 6 4 4 5 6 8 4 46 5 7 54 58 60 6 69 7 8 0 9 9 79 0 4 0 0 4 4 60 6 9 4 6 46 5 4 4 5 4 4 7 44 44 6 44 8 44 46 44 44 4 44 0 4 4 5 4 8 6 0 4 0 4 4 5 45 4 5 50 4 58 60 57 54
 5 11 3 1....1 2. 5...4 (1)...5...6...7...17...22 (2)...70...71...72...77...82 (3)...85...86...87...92...97 (4)...101...102...103...112...117 (5)...121...122...123...125...128 1. 10 Web Web WG 5 4 5 ²
GP05取説.indb
 E -G V P 05D L V E -G P 05D W Ni-MH + + + + + + + + + + + + + + + + + + + + + + + + + + + + + + + + + + 1 + 2 + 3 + 4 + 5 + 6 1 2 3 4 5 6 + + + 1 + + + + + + + + + + + + + + + + + + 1 A B C + D + E
19_22_26R9000操作編ブック.indb
 8 19R900022R900026R9000 25 34 44 57 67 2 3 4 10 37 45 45 18 11 67 25 34 39 26 32 43 7 67 7 8 7 9 8 5 7 9 21 18 19 8 8 70 8 19 7 7 7 45 10 47 47 12 47 11 47 36 47 47 36 47 47 24 35 8 8 23 12 25 23 OPEN
L1 What Can You Blood Type Tell Us? Part 1 Can you guess/ my blood type? Well,/ you re very serious person/ so/ I think/ your blood type is A. Wow!/ G
 L1 What Can You Blood Type Tell Us? Part 1 Can you guess/ my blood type? 当ててみて / 私の血液型を Well,/ you re very serious person/ so/ I think/ your blood type is A. えーと / あなたはとっても真面目な人 / だから / 私は ~ と思います / あなたの血液型は
 5 30 B36B3 4 5 56 6 7 3 4 39 4 69 5 56 56 60 5 8 3 33 38 45 45 7 8 4 33 5 6 8 8 8 57 60 8 3 3 45 45 8 9 4 4 43 43 43 43 4 3 43 8 3 3 7 6 8 33 43 7 8 43 40 3 4 5 9 6 4 5 56 34 6 6 6 6 7 3 3 3 55 40 55
fx-9860G Manager PLUS_J
 fx-9860g J fx-9860g Manager PLUS http://edu.casio.jp k 1 k III 2 3 1. 2. 4 3. 4. 5 1. 2. 3. 4. 5. 1. 6 7 k 8 k 9 k 10 k 11 k k k 12 k k k 1 2 3 4 5 6 1 2 3 4 5 6 13 k 1 2 3 1 2 3 1 2 3 1 2 3 14 k a j.+-(),m1
取説_KX-PW101CL_PW102CW
 See pages 270 and 271 for English Guide. KX-PW101CL KX-PW102CW Ni-Cd F1 F1 F2 F4 F1 F2 F4 F1 F2 F4 2 1 2 Ni-Cd Ni-Cd NTT NTT F1 F1 F1 F1 F1 F1 F1 F1 F4 F4 F4 F1 F4 F1
 Building a Culture of Self- Access Learning at a Japanese University An Action Research Project Clair Taylor Gerald Talandis Jr. Michael Stout Keiko Omura Problem Action Research English Central Spring,
 6 50G5S 3 34 47 56 63 http://toshibadirect.jp/room048/ 74 8 9 3 4 5 6 3446 4755 566 76373 7 37 3 8 8 3 3 74 74 79 8 30 75 0 0 4 4 0 7 63 50 50 3 3 6 3 5 4 4 47 7 48 48 48 48 7 36 48 48 3 36 37 6 3 3 37
Microsoft Word - ★(9215) 332_O.doc
 332_O.doc") No. : 205-03-332 取扱説明書 INSTRUCTION MANUAL 9215Series Sheltap BRANCH CONNECTOR FOR COPPER WIRE O EDN19163 2019/07/16 K. Nakagaki T. Hata T. Michihiro NO EDN/DCN DATE PREPARED by CHECKED by APPROVED by 106-03-003
No. : 205-03-332 取扱説明書 INSTRUCTION MANUAL 9215Series Sheltap BRANCH CONNECTOR FOR COPPER WIRE O EDN19163 2019/07/16 K. Nakagaki T. Hata T. Michihiro NO EDN/DCN DATE PREPARED by CHECKED by APPROVED by 106-03-003
 6 3 34 50G5 47 56 63 74 8 9 3 4 5 6 3446 4755 566 76373 7 37 3 8 8 3 3 74 74 79 8 30 75 0 0 4 4 0 7 63 50 50 3 3 6 3 5 4 4 47 7 48 48 48 48 7 36 48 48 3 36 37 6 3 3 37 9 00 5 45 3 4 5 5 80 8 8 74 60 39
PFQX2227_ZA
 V E -G P 05D B Ni-MH 1 2 3 4 5 6 1 2 3 4 5 6 A B C D E F 1 2 A B C 1 2 3 2 0 7 9 4 6 6 4 7 9 1 2 3 # 6 6 2 D11 D12 D21 D22 19 # # # # Ni-MH Ω Ω
ESSENZA MINI MY MACHINE
 ESSENZA MINI MY MACHINE 19 22 3 6 8 14 15 16? 18 10 12 20 12 20 13 21 22 2 Nespresso ESSENZA Mini Nespresso ESSENZA Mini 3 21 13 15A 100V 21 21 1 21 1 1 13 4 Nespresso ESSENZA Mini Nespresso ESSENZA Mini
VE-GP32DL_DW_ZA
 VE-GP32DL VE-GP32DW 1 2 3 4 5 6 1 2 3 4 1 1 2 3 2 3 1 1 2 2 2006 Copyrights VisionInc. @. _ & $ % + = ^ @. _ & $ % + = ^ D11 D12 D21
な時施工説明書兼取扱説明書 保証書付 この度は ハンスグローエ製品をお求めいただきまして 誠にありがとうございます この説明書は保証書付きですので お読みになりました後もすぐ取り出せる場所に大切に保管してください 安全上の注意...2 使用上の注意...4 製品別の特徴...5 施工方法...10
 な時施工説明書兼取扱説明書 保証書付 この度は ハンスグローエ製品をお求めいただきまして 誠にありがとうございます この説明書は保証書付きですので お読みになりました後もすぐ取り出せる場所に大切に保管してください 安全上の注意...2 使用上の注意...4 製品別の特徴...5 施工方法...10 アフターサービス...11 保証書... 裏表紙 お問合せ先... 裏表紙 はシャワーホース 初めに施工方法こん工事店様へのお願い
ÉXÅ[ÉpÅ[ÉRÉuÉâï\éÜ
 class SCLE HELICOPTER SUPERCOR W-1W ODY KIT INSTRUCTION MNUL SUPERCOR Please read this manual in its entirety before attempting to assemble the helicopter. This manual explains the parts exclusive to SUPERCOR.
The hand operated type HB unit is a worm gear drive which may be used for any valve or device requiring a 90 movement. The HB worm gear actuator is es
 The hand operated type HB unit is a worm gear drive which may be used for any valve or device requiring a 90 movement. The HB worm gear actuator is especially designed for operation of butterfly, plug
取説_VE-PV11L(応用編)
") * 0 # VE-PV11L VE-PVC11L VE-PS109N 1 2 3 4 5 6 7 8 9 C H H H C H H H C C CAUTION:These telephones are for use in Japan only. They cannot be used in other countries because of differences in voltages, telephone
* 0 # VE-PV11L VE-PVC11L VE-PS109N 1 2 3 4 5 6 7 8 9 C H H H C H H H C C CAUTION:These telephones are for use in Japan only. They cannot be used in other countries because of differences in voltages, telephone
1 2 3
 INFORMATION FOR THE USER DRILL SELECTION CHART CARBIDE DRILLS NEXUS DRILLS DIAMOND DRILLS VP-GOLD DRILLS TDXL DRILLS EX-GOLD DRILLS V-GOLD DRILLS STEEL FRAME DRILLS HARD DRILLS V-SELECT DRILLS SPECIAL
P3FY J E
 P3FY-1490-01 J E J 1 J 1 2 2 J 3 3 4 4 5 J 5 Preface Thank you very much for purchasing the hard disk drive. This hard disk drive provides a IDE interface and can be installed in the 3.5-inch storage
*Ł\”ƒ‚ä(CV03)
") VE-CV03 VE-CVW03 VE-CV03 VE-CVW03 Ni-Cd C C BC BC C C C C C C C C C C A C C C A A # $ % & ' # $ 64 A A A A ( A % & ' ( ) ) A * A + A * +, - /. 0/ 10 21 32 53, A - A A. A A / A 0 A 1 A 2 A A A A 3 4 #
VE-CV03 VE-CVW03 VE-CV03 VE-CVW03 Ni-Cd C C BC BC C C C C C C C C C C A C C C A A # $ % & ' # $ 64 A A A A ( A % & ' ( ) ) A * A + A * +, - /. 0/ 10 21 32 53, A - A A. A A / A 0 A 1 A 2 A A A A 3 4 #
2 3 12 13 6 7
 2 8 17 42ZH700046ZH700052ZH7000 28 43 54 63 74 89 2 3 12 13 6 7 3 4 11 21 34 63 65 8 17 4 11 4 55 12 12 10 77 56 12 43 43 13 30 43 43 43 43 10 45 14 25 9 23 74 23 19 24 43 8 26 8 9 9 4 8 30 42 82 18 43
ユーザーガイド
 SWR12 ...4...4...4...5...5... 5... 5... 5...6...7... 7 LED... 7... 7... 8... 8... 9... 9 SmartBand 2 Android...10... 10... 10... 11 LED... 12... 12... 13... 13... 13 Google Fit... 13 STAMINA... 14 STAMINA...
P
 03-3208-22482013 Vol.2 Summer & Autumn 2013 Vol.2 Summer & Autumn 90 527 P.156 611 91 C O N T E N T S 2013 03-3208-2248 2 3 4 6 Information 7 8 9 10 2 115 154 10 43 52 61 156 158 160 161 163 79 114 1 2
PCI Express Graphics Products
 PCI Express Graphics Products This graphics card uses the PCI Express hardware interconnect standard. It is designed to work using your PCI Express x16 I/O slot. PCI Express is the successor to the PCI,
literary play La Philosophie CRD p CRD p cf. Peter Caws, Sartre. The Arguments of the Philosophers, Routledge
 14 19 34 2017 6 19 Le problème de la raison dans la Critique de la raison dialectique de J.-P. Sartre Kazuhiro TANIGUCHI 1 Sartre, pour qui la raison n est pas seulement la faculté de raisonner au sens
ÉgÉEÉRÉuÉâï\éÜ
 60 class SCLE HELICOPTER TOWCOR H-1SIII ODY KIT INSTRUCTION MNUL TOWCOR 60 Please read this manual in its entirety before attempting to assemble the helicopter. This manual explains the parts exclusive
A N -37A G 3
 A N -37A G 3 お買いあげありがとうございましたご使用の前にこの取扱説明書をよくお読みください 特に 安全に正しくお使いいただくために は必ずお読みください お読みになったあとは いつでも取り出せる場所に必ず大切に保管してください 安全に正しくお使いいただくために この取扱説明書および商品には 安全にお使いいただくためにいろいろな表示をしています その表示を無視して誤った取り扱いをすることによって生じる内容を
C H H H C H H H C C CUTION:These telephones are for use in Japan only. They cannot be used in other countries because of differences in voltages, tele
 VE-PV01LVE-PVW01LVE-PVC01L 1 4 7 2 3 5 6 8 9 * 0 # C H H H C H H H C C CUTION:These telephones are for use in Japan only. They cannot be used in other countries because of differences in voltages, telephone
Anl_MonzaJAP.indd
 ENGLISH A car racing game which encourages tactical thinking for 2 to 6 clever players ages 5 to 99. Author: Jürgen P. K. Grunau Illustrations: Haralds Klavinius Length of the game: 10-15 minutes approx.
+ -
 i i C Matsushita Electric Industrial Co., Ltd.2001 -S F0901KK0 seconds ANTI-SKIP SYSTEM Portable CD player Operating Instructions -S + - + - 9 BATTERY CARRYING CASE K 3 - + 2 1 OP 2 + 3 - K K http://www.baj.or.jp
Microsoft Word - Couverture notice 1 page 2015
 MARQUE: SONY REFERENCE: SEL50F18F.SYX CODIC: 4237587 NOTICE 4-581-473-01(1) 交換レンズ Interchangeable Lens Objectif interchangeable 取扱説明書 Operating Instructions Mode d emploi Manual de instrucciones FE 50mm
VE-GD21DL_DW_ZB
 V E-G D21D L V E-G D21D W 1 2 3 4 1 2 1 2 1 2 2 1 2 3 1 2 3 1 2 3 1 4 4 2 3 5 5 1 2 3 4 1 2 3 1 2 3 4 1 2 3 2006 Copyrights VisionInc. @. _ & $ % + = ^ 2011
_05.indd
 : 82 1 2013 7 1 1 1 1 2 3 4 2 : 3 5 1 2 3 4 5 6 3 1 2 3 4 : 6 1 2 3 4 5 6 7 8 9 1 2 1998 The works, political, metaphysical, and chronological, of the late Sir James Steuart of Coltness, vol. I, London,
 Sommaire Etude Comparative sur les Deux Romans d' Adultère - Les Bourgeois de Molinchart de Champfleury, Madame Bovary de Flaubert- Hisashi TAKIZAWA Les Bourgeois de Molinchart et Madame Bovary, ces deux
2
 L C -24K 9 L C -22K 9 2 3 4 5 6 7 8 9 10 11 12 11 03 AM 04 05 0 PM 1 06 1 PM 07 00 00 08 2 PM 00 4 PM 011 011 021 041 061 081 051 071 1 2 4 6 8 5 7 00 00 00 00 00 00 00 00 30 00 09 00 15 10 3 PM 45 00
INSTRUCTION MANUAL WARNING Be sure to READ the Instruction Manual. Prior to using, be sure to check whether the machine functions properly. If not, NE
 INSTRUCTION MANUAL WARNING Be sure to READ the Instruction Manual. Prior to using, be sure to check whether the machine functions properly. If not, NEVER use it. NEVER apply your fingers to near the front
Z7000操作編_本文.indb
 2 8 17 37Z700042Z7000 46Z7000 28 42 52 61 72 87 2 3 12 13 6 7 3 4 11 21 34 61 8 17 4 11 4 53 12 12 10 75 18 12 42 42 13 30 42 42 42 42 10 62 66 44 55 14 25 9 62 65 23 72 23 19 24 42 8 26 8 9 9 4 11 18
 7 3 4 3 3 3 4 5 3 4 3 4 5 6 5 7 6 7 8 9 8 0 9 3 3 3 4 3 5 6 7! 3 3 8 3 7 9 7 0 3 3 3 3 3 4 4 4 5 3 4 6 5 3 4 7 6 6 3 5 4 4 3 4 7 3 4 6 4 7 4 3 8 4 3 4 5 9 4 6 7 30 3 F ENTER 33 34 ENTER F9 ENTER ENTER
137. Tenancy specific information (a) Amount of deposit paid. (insert amount of deposit paid; in the case of a joint tenancy it should be the total am
 Amount of deposit paid. (insert amount of deposit paid; in the case of a joint tenancy it should be the total am") 13Fast Fair Secure PRESCRIBED INFORMATION RELATING TO TENANCY DEPOSITS* The Letting Protection Service Northern Ireland NOTE: The landlord must supply the tenant with the Prescribed Information regarding
13Fast Fair Secure PRESCRIBED INFORMATION RELATING TO TENANCY DEPOSITS* The Letting Protection Service Northern Ireland NOTE: The landlord must supply the tenant with the Prescribed Information regarding
No_ST012.indd
 Pipe Threading Machine Supertronic INSTRUCTION MANUAL Double Insulation Important: For your safety and effective operation, read this Instruction Manual carefully and completely before use and thoroughly
Page 1 of 6 B (The World of Mathematics) November 20, 2006 Final Exam 2006 Division: ID#: Name: 1. p, q, r (Let p, q, r are propositions. ) (10pts) (a
 November 20, 2006 Final Exam 2006 Division: ID#: Name: 1. p, q, r (Let p, q, r are propositions. ) (10pts) (a") Page 1 of 6 B (The World of Mathematics) November 0, 006 Final Exam 006 Division: ID#: Name: 1. p, q, r (Let p, q, r are propositions. ) (a) (Decide whether the following holds by completing the truth
Page 1 of 6 B (The World of Mathematics) November 0, 006 Final Exam 006 Division: ID#: Name: 1. p, q, r (Let p, q, r are propositions. ) (a) (Decide whether the following holds by completing the truth
TH-42PAS10 TH-37PAS10 TQBA0286
 TH-42PAS10 TH-37PAS10 TQBA0286 2 4 8 10 11 17 18 20 21 22 23 24 25 26 27 28 29 30 31 32 33 38 42 44 46 50 51 52 53 54 3 4 5 6 7 8 3 4 1 2 9 5 6 1 4 2 3 5 6 10 11 1 2 3 4 12 13 14 TH-42PAS10 TH-42PAS10
_CS3.indd
 このたびは 株 松永製作所の車いすをお買い上げいただき ありがとうございます この取扱説明書には お客様が安全に正しくご使用していただくために必要な注意事項や正しい使い方が説明さ れています ご使用になる前には 必ずお読みください また 保証書 裏表紙 が付いておりますので紛失しないように大切に保管してください 安全にご使用していただ くために 点検 記録表が付いておりますので ご自身 お買い求めの販売店
On the Wireless Beam of Short Electric Waves. (VII) (A New Electric Wave Projector.) By S. UDA, Member (Tohoku Imperial University.) Abstract. A new e
 (A New Electric Wave Projector.) By S. UDA, Member (Tohoku Imperial University.) Abstract. A new e") On the Wireless Beam of Short Electric Waves. (VII) (A New Electric Wave Projector.) By S. UDA, Member (Tohoku Imperial University.) Abstract. A new electric wave projector is proposed in this paper. The
On the Wireless Beam of Short Electric Waves. (VII) (A New Electric Wave Projector.) By S. UDA, Member (Tohoku Imperial University.) Abstract. A new electric wave projector is proposed in this paper. The
Fukuda
 Repas français et repas japonais le boire et le manger comme mise en corrélation de l espace et du temps FUKUDA Ikuhiro Résumé Un repas est généralement constitué de plusieurs plats que l on consomme dans